Embedding the Webview
Creating Apps with PhoneGap and iOS Native Components
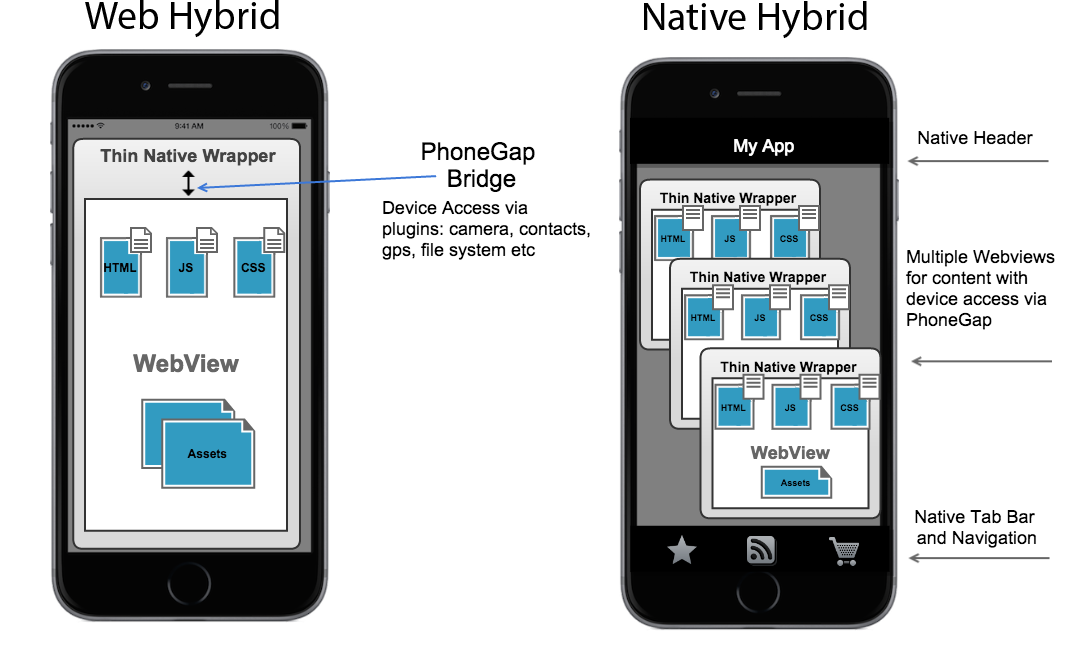
Before getting started you should read this blog post about choosing a mobile strategy. As a quick refresher, the type of app we're referring to here includes a blend of native controls and one or more webviews. One common use case implemented in many popular apps (Instagram, Basecamp) is to use native controls to provide the navigation and page transitions, with the main content wrapped in embedded Cordova webviews. However, you could combine the native and webview components in many different ways to achieve your needs. This guide is meant as a reference to help you start that journey.
The picture below helps denote the differences between a traditional PhoneGap hybrid app (left) and a native hybrid app approach (right):
Options
There are some different options available to achieve this mixed native iOS and WebView approach and this guide will cover two of them. The first is the recommended approach as it uses the popular iOS CocoaPods approach and is ultimately easier to set up and get started with, (even if you've never heard of or used CocoaPods). The 2nd manual approach is an option for those who do not want to use a CocoaPods approach and would like to use a more raw solution or have more control over the dependency setup. Choose from one of these options below to continue:
Option 1: Combining iOS Native and WebView Components with CocoaPods
CocoaPods is a dependency manager for building iOS projects, similar to how npm is used for node.js projects. To continue this analogy, a Podfile is used to specify those dependencies similar to how the package.json is used for npm. Since CocoaPods is built on Ruby, you install it using the Ruby gem command (you may or may not need sudo depending on your permissions) shown below:
$ sudo gem install cocoapodsOnce you have CocoaPods installed, you'll need a native iOS project to work with.
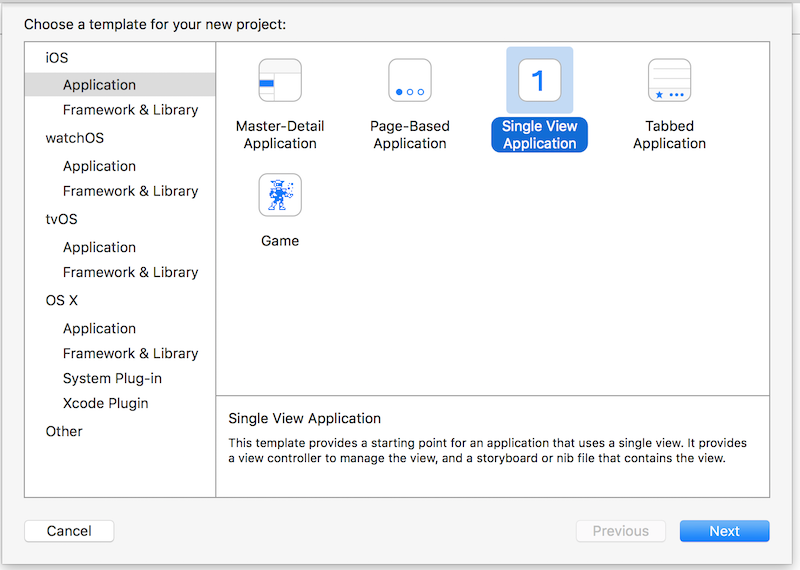
Open an existing native iOS project or create a new native iOS project. To create a new project in Xcode, go to File->New->Project and select an iOS project template. In this example we'll choose the Single View Controller project template for simplicity.
 **Note:** Your native project can be either *Objective-C* or *Swift* based and the instructions below are the same for both. Once you want to refer specifically to Cordova-based classes from your Swift classes however, you will need some further instructions which can be found in the Swift section.
Go back to the command line,
cdinto the root of the new iOS project from above and create aPodfileto manage your dependencies. The easiest way to create one is to use thepod initcommand, which creates a base one to start with.Type
pod initnow and make sure you see your newly createdPodfileafter you hit enter:$ pod initOpen it and copy the
podlines from the contents of thisPodfilesample into the firsttargetspecification for your project. The targets will already be set to the name of your project if you used thepod init. See this demo video for help if needed.# Uncomment this line to define a global platform for your project # platform :ios, '9.0' target 'CordovaProj' do # Uncomment this line if you're using Swift or would like to use dynamic frameworks # use_frameworks! # Pods for CordovaProj # CordovaLib Dependency Pod pod 'Cordova' # Cordova Core Plugin Dependency Pod References pod 'CordovaPlugin-console' pod 'cordova-plugin-camera' pod 'cordova-plugin-contacts' pod 'cordova-plugin-device' pod 'cordova-plugin-device-orientation' pod 'cordova-plugin-device-motion' pod 'cordova-plugin-globalization' pod 'cordova-plugin-geolocation' pod 'cordova-plugin-file' pod 'cordova-plugin-media-capture' pod 'cordova-plugin-network-information' pod 'cordova-plugin-splashscreen' pod 'cordova-plugin-inappbrowser' pod 'cordova-plugin-file-transfer' pod 'cordova-plugin-statusbar' pod 'cordova-plugin-vibration' pod 'cordova-plugin-wkwebview-engine' # The following includes the PhoneGap iOS Platform Project Template for a quick start pod 'phonegap-ios-template' target 'CordovaProjTests' do inherit! :search_paths # Pods for testing end target 'CordovaProjUITests' do inherit! :search_paths # Pods for testing end end**Note:** The `Cordova` CocoaPod is specified first and contains all of the `CordovaLib` core classes. The sample Podfile also specifies a number of plugin dependencies to make those available for use in your apps. Lastly, the `phonegap-ios-template` refers to a PhoneGap sample app `CocoaPod` that's included to help you get started quickly. The sample app uses the plugins listed in this `Podfile` sample so you can test them out easily as well.Next, run
pod installfrom the command line to install the Cordova dependencies defined above: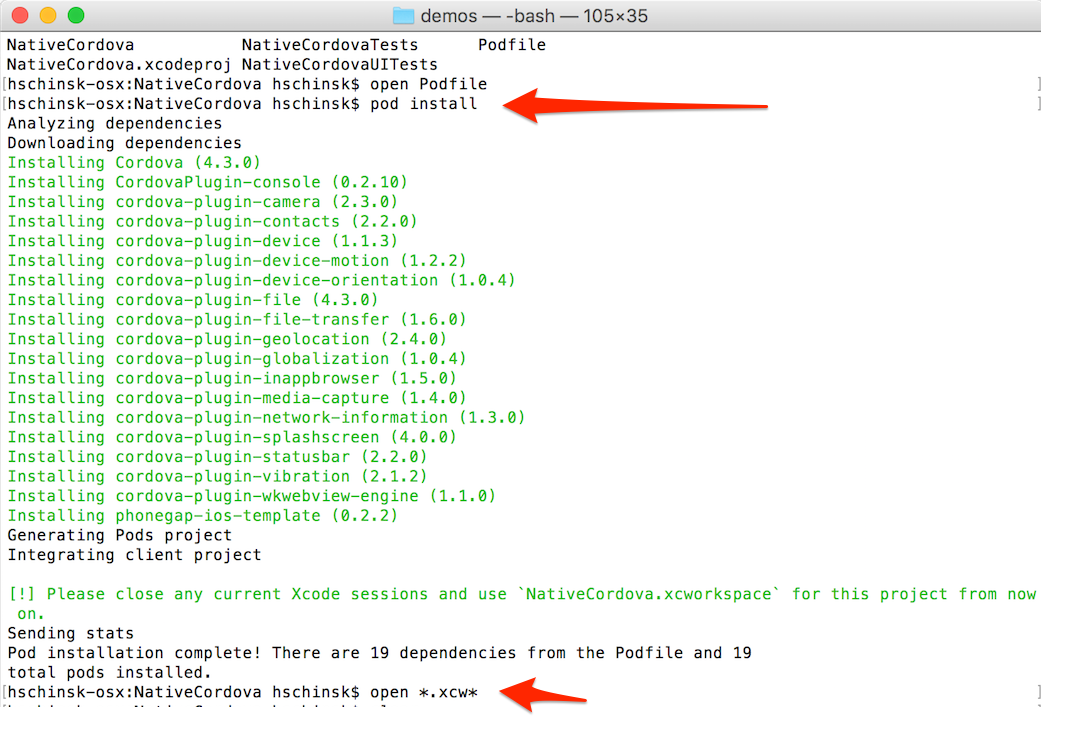
Close the Xcode project you created in step 1. From now on you'll need to use the Xcode workspace file that's been created for your project instead with all of the dependencies added.
Open the newly created
.xcworkspacefile created from thepod install. Ensure you see the newPodsfolder in the Xcode Workspace for your project and that it has all the Cordova dependencies as shown below: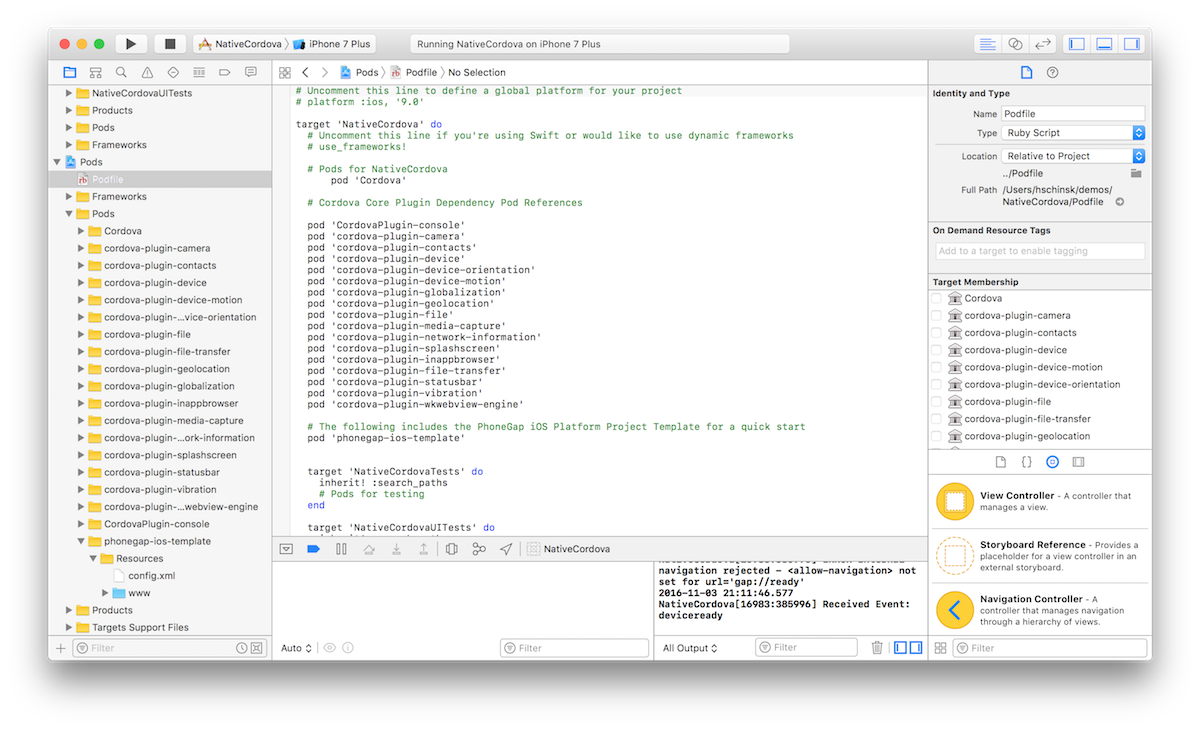
Now you can start using Cordova in your native project. To do so, open the
Main.storyboardfile and change the Custom Class value from the defaultViewControllertoCDVViewControllerin the Identity Inspector. TheCDVViewControlleris a Cordova-specific ViewController.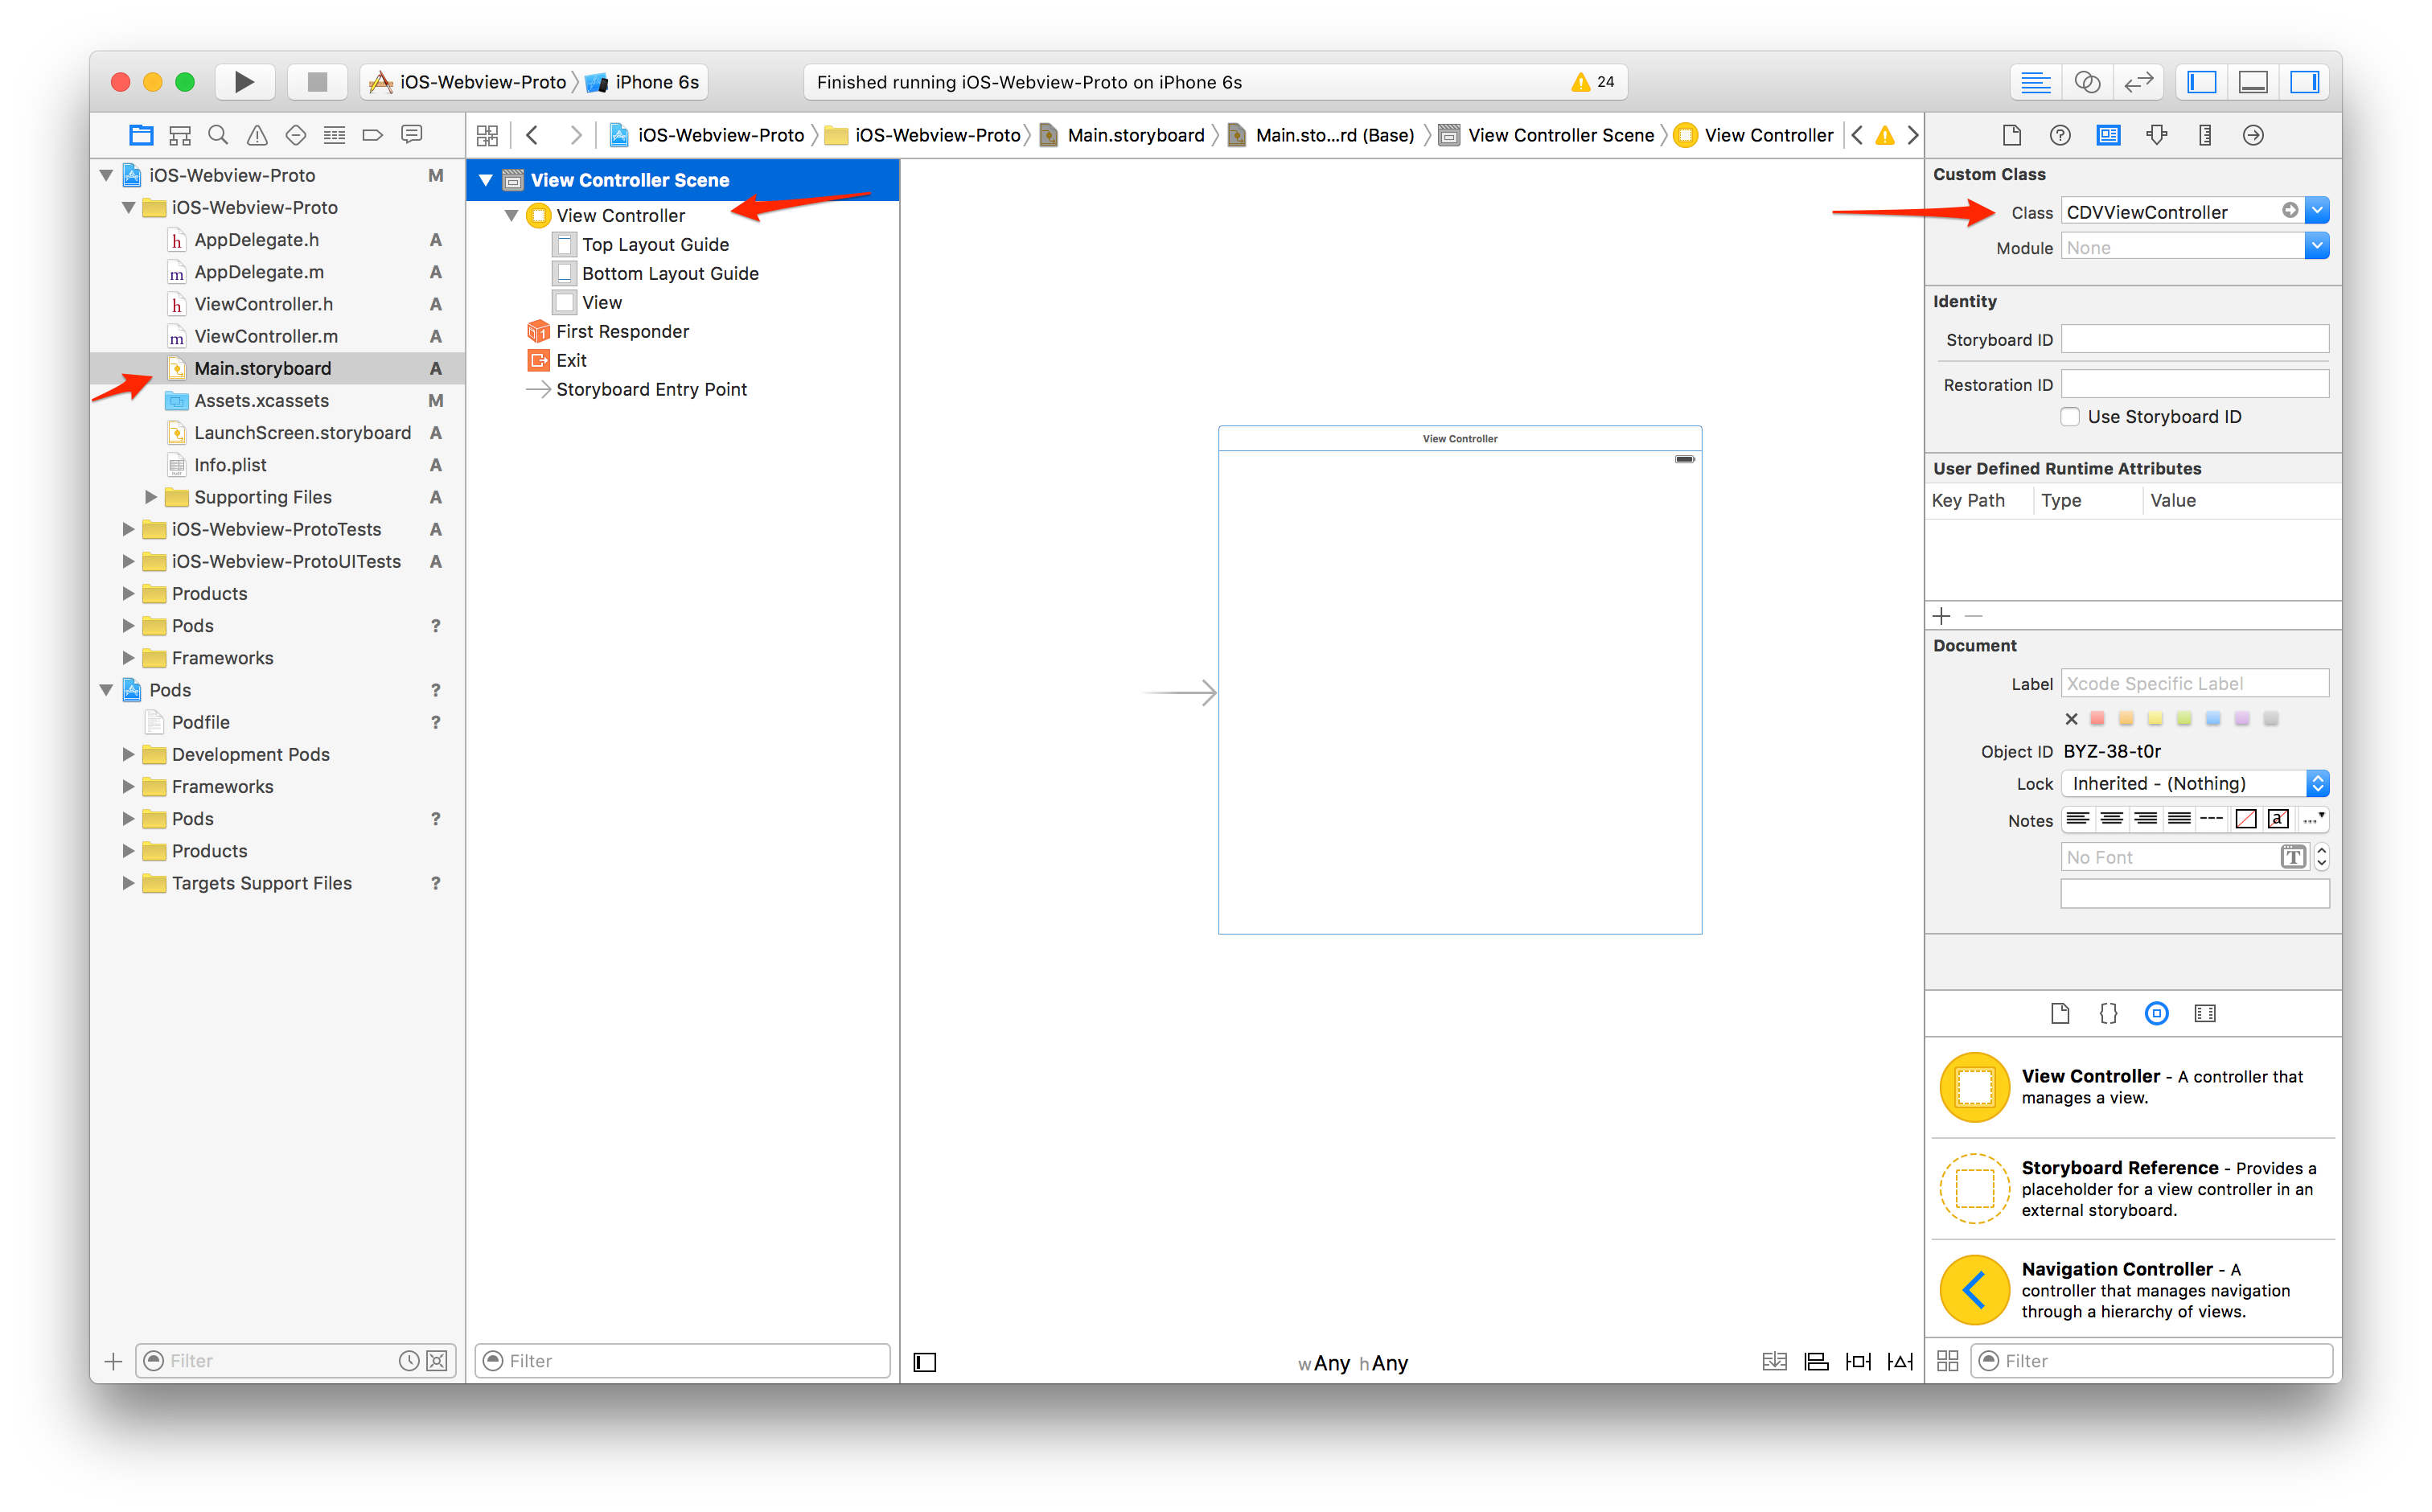
Run your app now from Xcode. The PhoneGap iOS sample app that was included in the CocoaPod dependencies will be run by default (see the explanation section for exactly how this works).

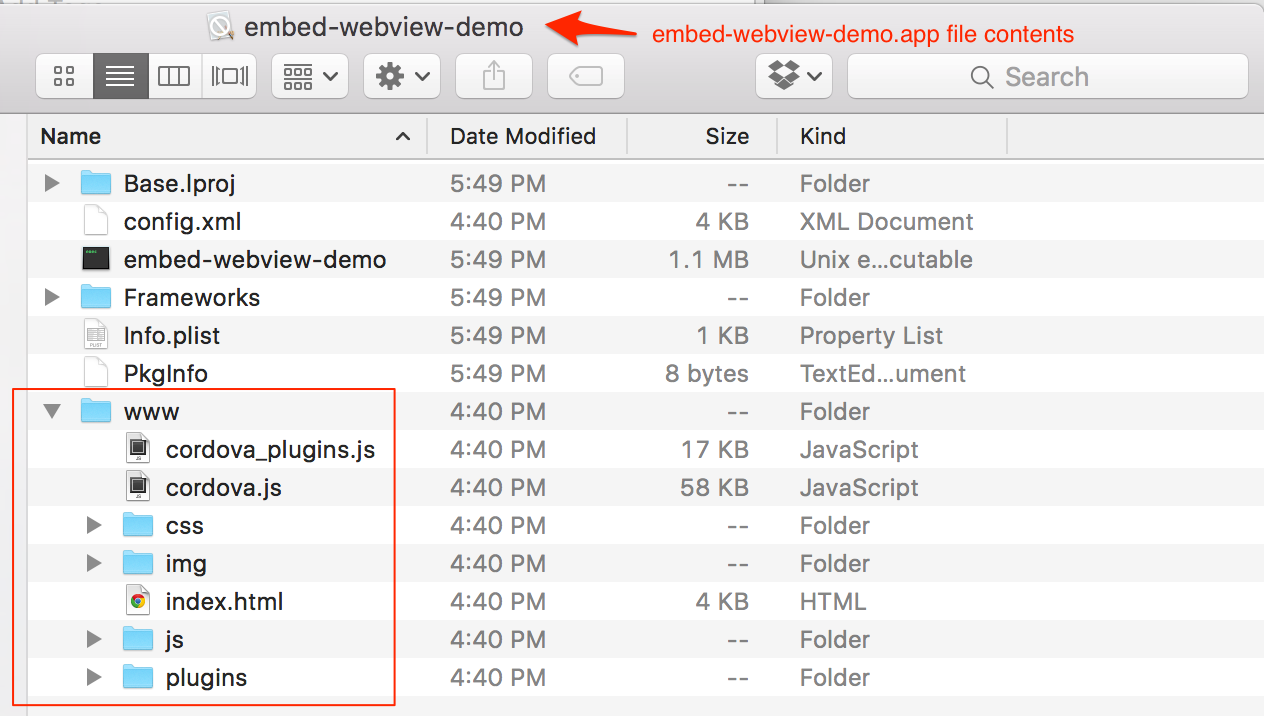
The sample app CocoaPod folder is outlined in the project below to point it out specifically. When you're ready to start using your own code for the webview, simply replace the contents in the
wwwfolder with your own app content and it will be linked up and ready to go.
How Does this Work?
If you're wondering how this all just automatically works and the sample app is loaded, it's due to the way the CocoaPod for the phonegap-webview-ios template was configured. The .podspec is a file that configures a CocoaPod, and in the definition for the phonegap-ios-template, a resources attribute is set that points to the files within the resources folder (which is the www and config.xml for the sample app). The podspec is shown below for reference:
Pod::Spec.new do |s|

  s.name               = "phonegap-ios-template"
  s.version            = "0.1.4"
  s.summary            = "PhoneGap sample template project for iOS."

  s.description        = <<-DESC "A PhoneGap sample project to get started quickly with an embedded webview in a native iOS project."
                         DESC
  s.license            = { :type => "Apache License, Version 2.0", :file => "LICENSE" }
  s.homepage           = "https://github.com/phonegap/phonegap-webview-ios"
  s.author             = { "The Adobe PhoneGap Team" => "" }
  s.social_media_url   = "http://twitter.com/phonegap"
  s.source             = { :git => "https://github.com/phonegap/phonegap-webview-ios.git", :tag => "0.1.4" }
  s.resources          = "resources/*"

end
Xcode will copy files and folders marked as resources into the target app bundle at runtime by producing special build instructions for it. For instance,
the build script generated by Xcode for a project including this CocoaPod generates these lines:
if [[ "$CONFIGURATION" == "Debug" ]]; then
  install_resource "phonegap-ios-template/resources/config.xml"
  install_resource "phonegap-ios-template/resources/www"
fi
if [[ "$CONFIGURATION" == "Release" ]]; then
  install_resource "phonegap-ios-template/resources/config.xml"
  install_resource "phonegap-ios-template/resources/www"
fi
The .app bundle file created after your app has been run shows the end result if you display the contents:
The CDVViewController class that was set in the Storyboard scans your project for the
existence of a www folder and index.html file by default as shown from the snippet here:
if (self.wwwFolderName == nil){
   self.wwwFolderName = @"www";
}
if (delegate.startPage && self.startPage == nil){
   self.startPage = delegate.startPage;
}
if (self.startPage == nil) {
   self.startPage = @"index.html";
}
Since the template app www etc was included in the app bundle, it's found and used it by default.
Check out this short Demo Video that shows the above process in entirety for further reference.
Custom ViewController
The CDVViewController was used directly in this example for simplicity. In your own apps you'll likely want to extend that class to customize your Cordova webview further by changing the size of the viewport for instance, if you're displaying it along with other native components in a view since it defaults to full screen by default. The PhoneGap iOS project template is a good example to look at for how to extend it since it does so in the MainViewController class and header file here. You can simply copy those into your project and reference MainViewController instead for the ViewController class name in your Storyboard and customize it accordingly. For example, to change the initial size of the viewport, you can change the bounds within your custom ViewController viewWillAppear method, such as (where the value 40 is an arbitrary offset for demonstration purposes):
- (void)viewWillAppear:(BOOL)animated
{
    CGRect viewBounds = self.view.bounds;
    CGRect webViewBound = CGRectMake(viewBounds.origin.x,
                                     viewBounds.origin.y + 40,
                                     viewBounds.size.width,
                                     viewBounds.size.height - 40);

    self.webView.frame = webViewBound;
    self.webView.backgroundColor = [UIColor clearColor];

    [super viewWillAppear:animated];
}
Swift-based Projects
As mentioned above, you can use Swift-based projects with Cordova using the same CocoaPods approach just described. You will need to add a bridging header file when you want to start extending or using the Cordova classes (written in Objective-C) to allow you to communicate with Objective-C classes from your Swift classes.
To set up a bridge header from Xcode:
- Go to File->New->File->Header File, choose a name, and save it to the root of your Xcode project.
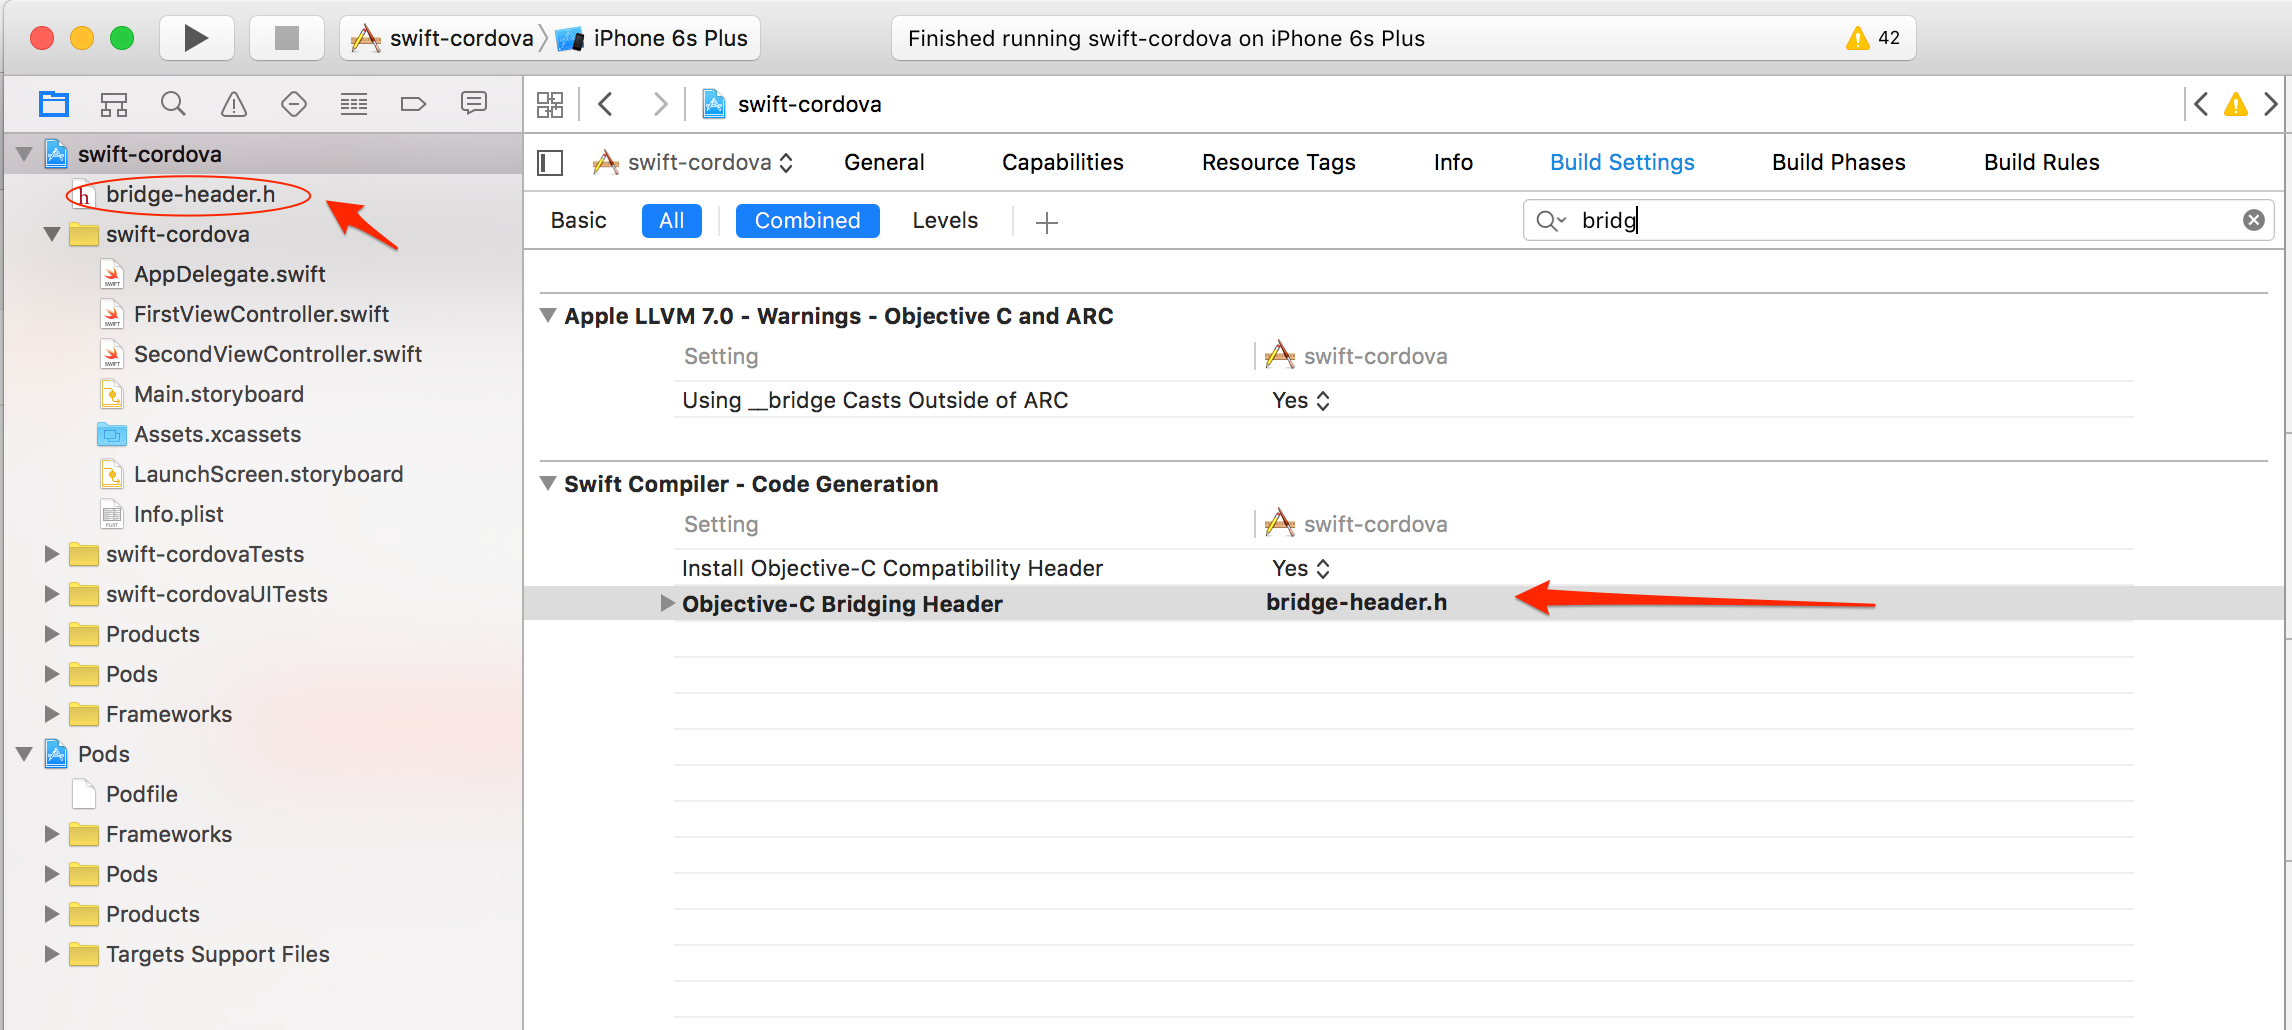
Next you need to ensure the bridge header file name is set in the build settings for the project. To do so, click on the root of the project in the navigator. Then in the Build Settings tab, look for the Swift Compiler - Code Generation section and enter your header file name for Objective-C bridging header. An example is shown below:
Now go back to your bridge header file and import the header files for the Cordova classes you wish to use in your project. For example:
#ifndef bridge_header_h
#define bridge_header_h

#import "CDVViewController.h"

#endif /* bridge_header_h */
Once the headers have been added to your bridging file, you can starting using them in your Swift code directly. For instance, in a
ViewController.swiftfile you might use something like the following to extend theCDVViewControllerclass and resize the webview frame:import UIKit class SecondViewController: CDVViewController { override func viewDidLoad() { super.viewDidLoad() // Do any additional setup after loading the view, typically from a nib. } override func didReceiveMemoryWarning() { super.didReceiveMemoryWarning() // Dispose of any resources that can be recreated. } override func viewWillAppear(animated: Bool) { super.viewWillAppear(true); self.webView.frame = CGRectMake( self.view.bounds.origin.x, self.view.bounds.origin.y+40, self.view.bounds.width, self.view.bounds.height-40) } }See this video to understand how to use Cordova in a Swift-based project with a live demonstration.
More Resources
- InstaSnap Sample Hybrid App - another sample hybrid iOS app with step by step instructions used for a PhoneGap Day 2016 workshop.
Option 2: Combining iOS Native and WebView Components from Scratch
In this section we'll cover the manual approach to combining iOS native components with Cordova webview components.
Reference App
We'll use this sample application for reference throughout the tutorial. It contains two views; a Cordova view and a native view. The final sample app will have a button on the Cordova webview that will add an item to a table control in the native view to represent a bookmark to show how to communicate between the web and native views.
Lesson 1: Create a Default Cordova iOS Project
Most developers use the PhoneGap or Cordova CLI to create their projects, and while it is possible to use it for this approach, it's not recommended since we are only working with the iOS platform project itself. Instead, we'll use the cordova-ios project. This is the same project used from the CLI when you add the iOS platform.
Begin by cloning or downloading the zip file for the base cordova-ios project.
Open a terminal window and
cdinto the directory containing the cordova-ios base project from above. So for instance if it was downloaded touserxyz/cordova-iosthen you'll want to run thecreatecommand fromuserxyz. Create a new Cordova iOS project by running the following command:$ cordova-ios/bin/create HybridIOSApp org.sample.hybridiosapp HybridIOSAppcdinto the newly created project:$ cd HybridIOSAppUse plugman to add any desired plugins to your project. If you don't have plugman, you can install it via npm. (You should add the Cordova console plugin at minimum on iOS so you can receive log messages):
$ plugman install --platform ios --project . --plugin cordova-plugin-consoleLesson 2: Set up the Storyboard
Open the
HybridIOSApp.xcodeprojfile in Xcode (requires Mac OS). This is the base native project we're extending.Create an iOS storyboard to lay out each screen as a 'scene'. Ensure you have the
Classesfolder of yourHybridIOSAppproject selected and use the Xcode File -> New menu to create a storyboard file and name itMain.storyboard.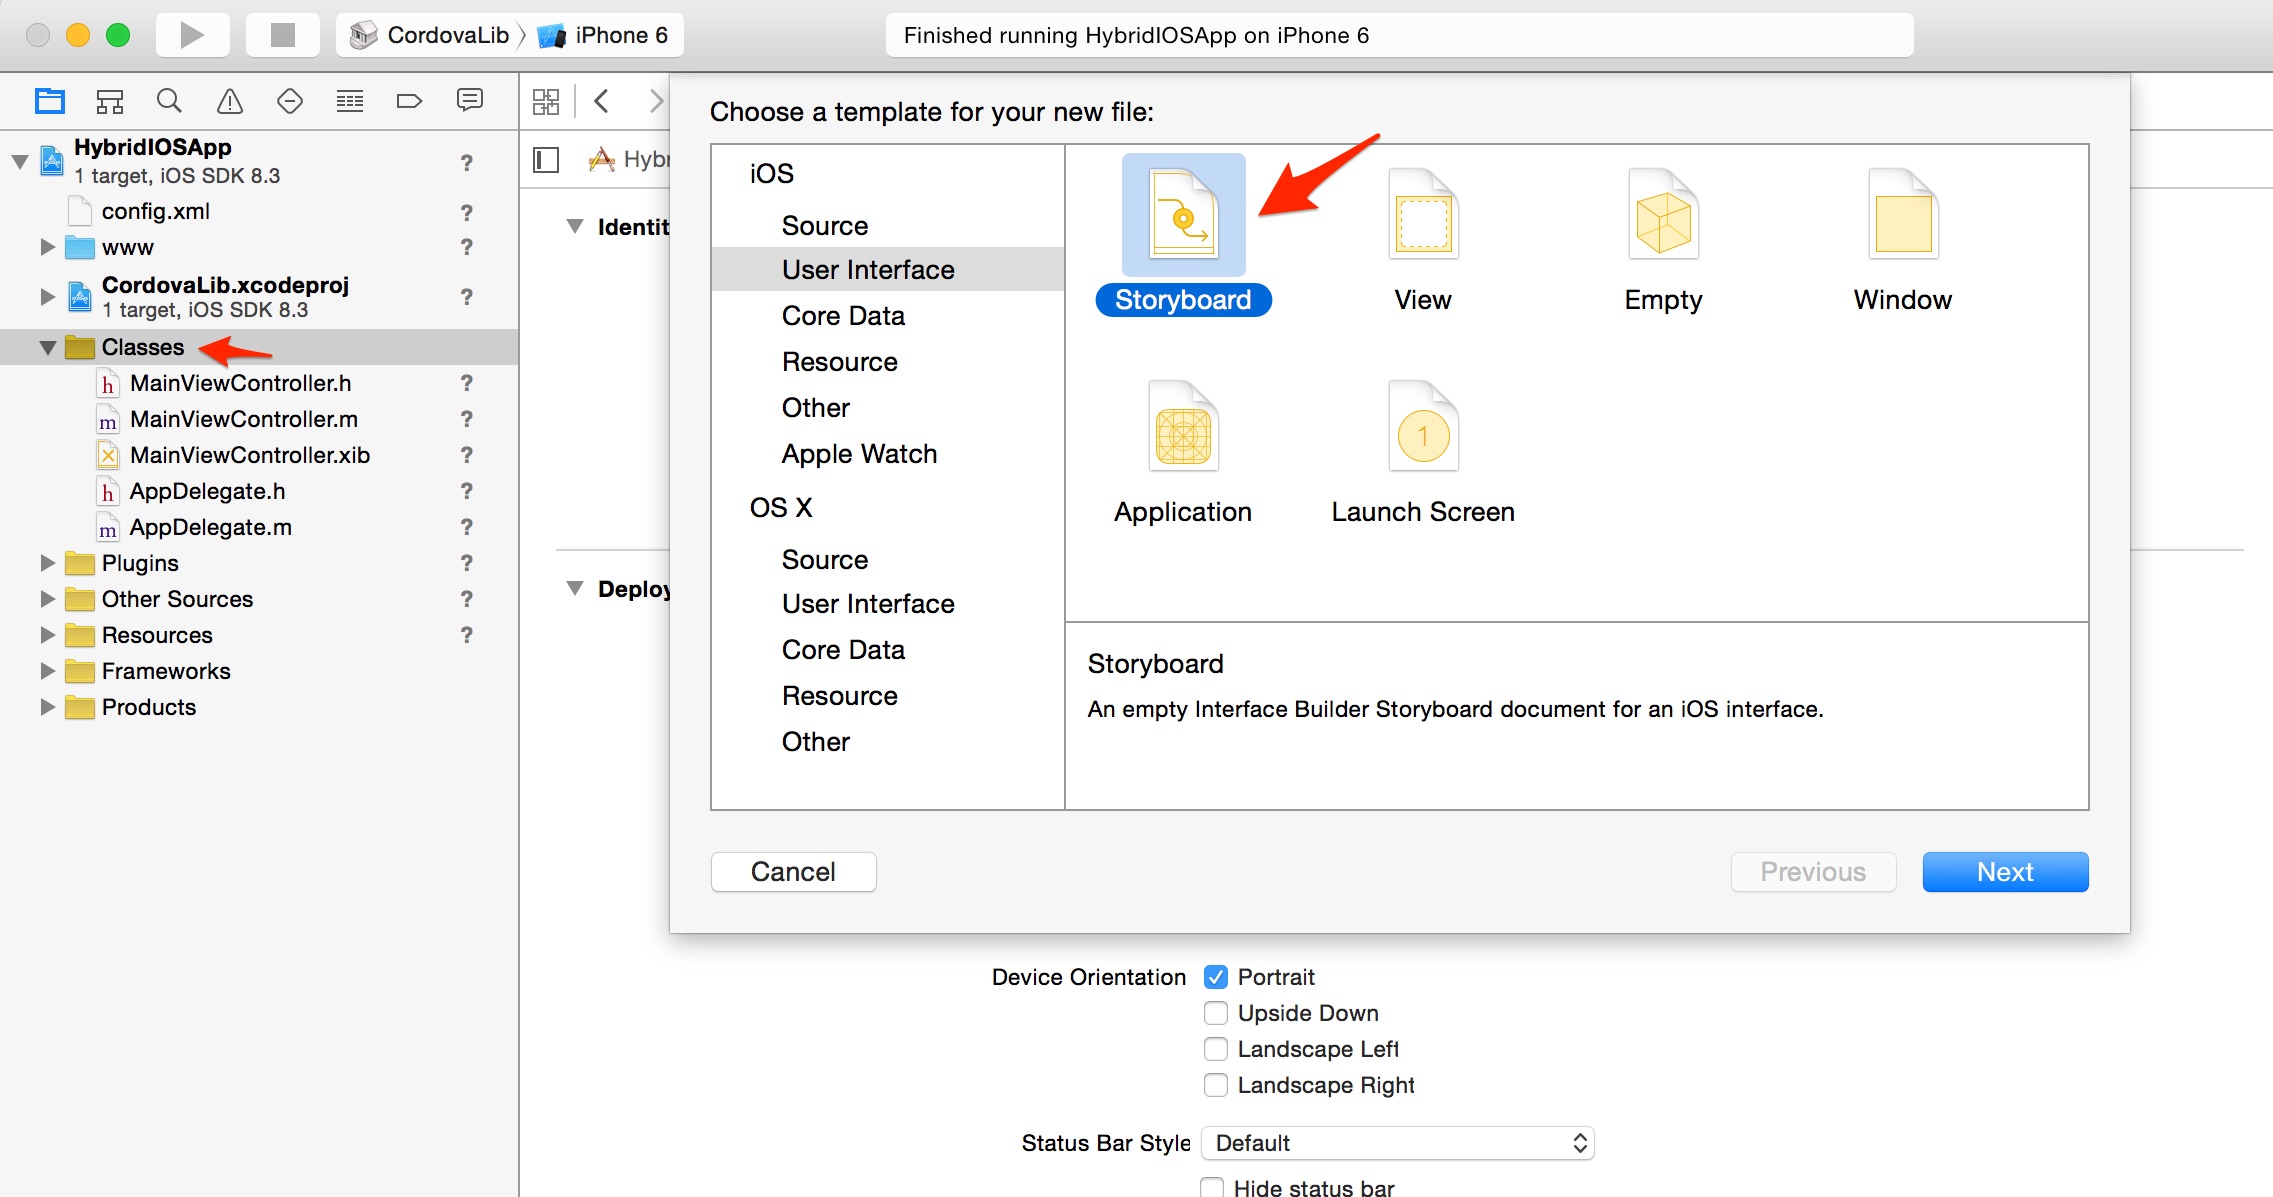
Set the main interface for the project to the Storyboard just created. This new storyboard file created in the previous step will serve as the main interface for your application, so before going further you need to update the project properties to point to it. Select the project root in the Project Navigator on the left and the first tab General, should be selected. Set Devices to iPhone if not already set, then set the Main Interface drop down to the
Main.storyboardfile you created. The screenshot below outlines all of this in red.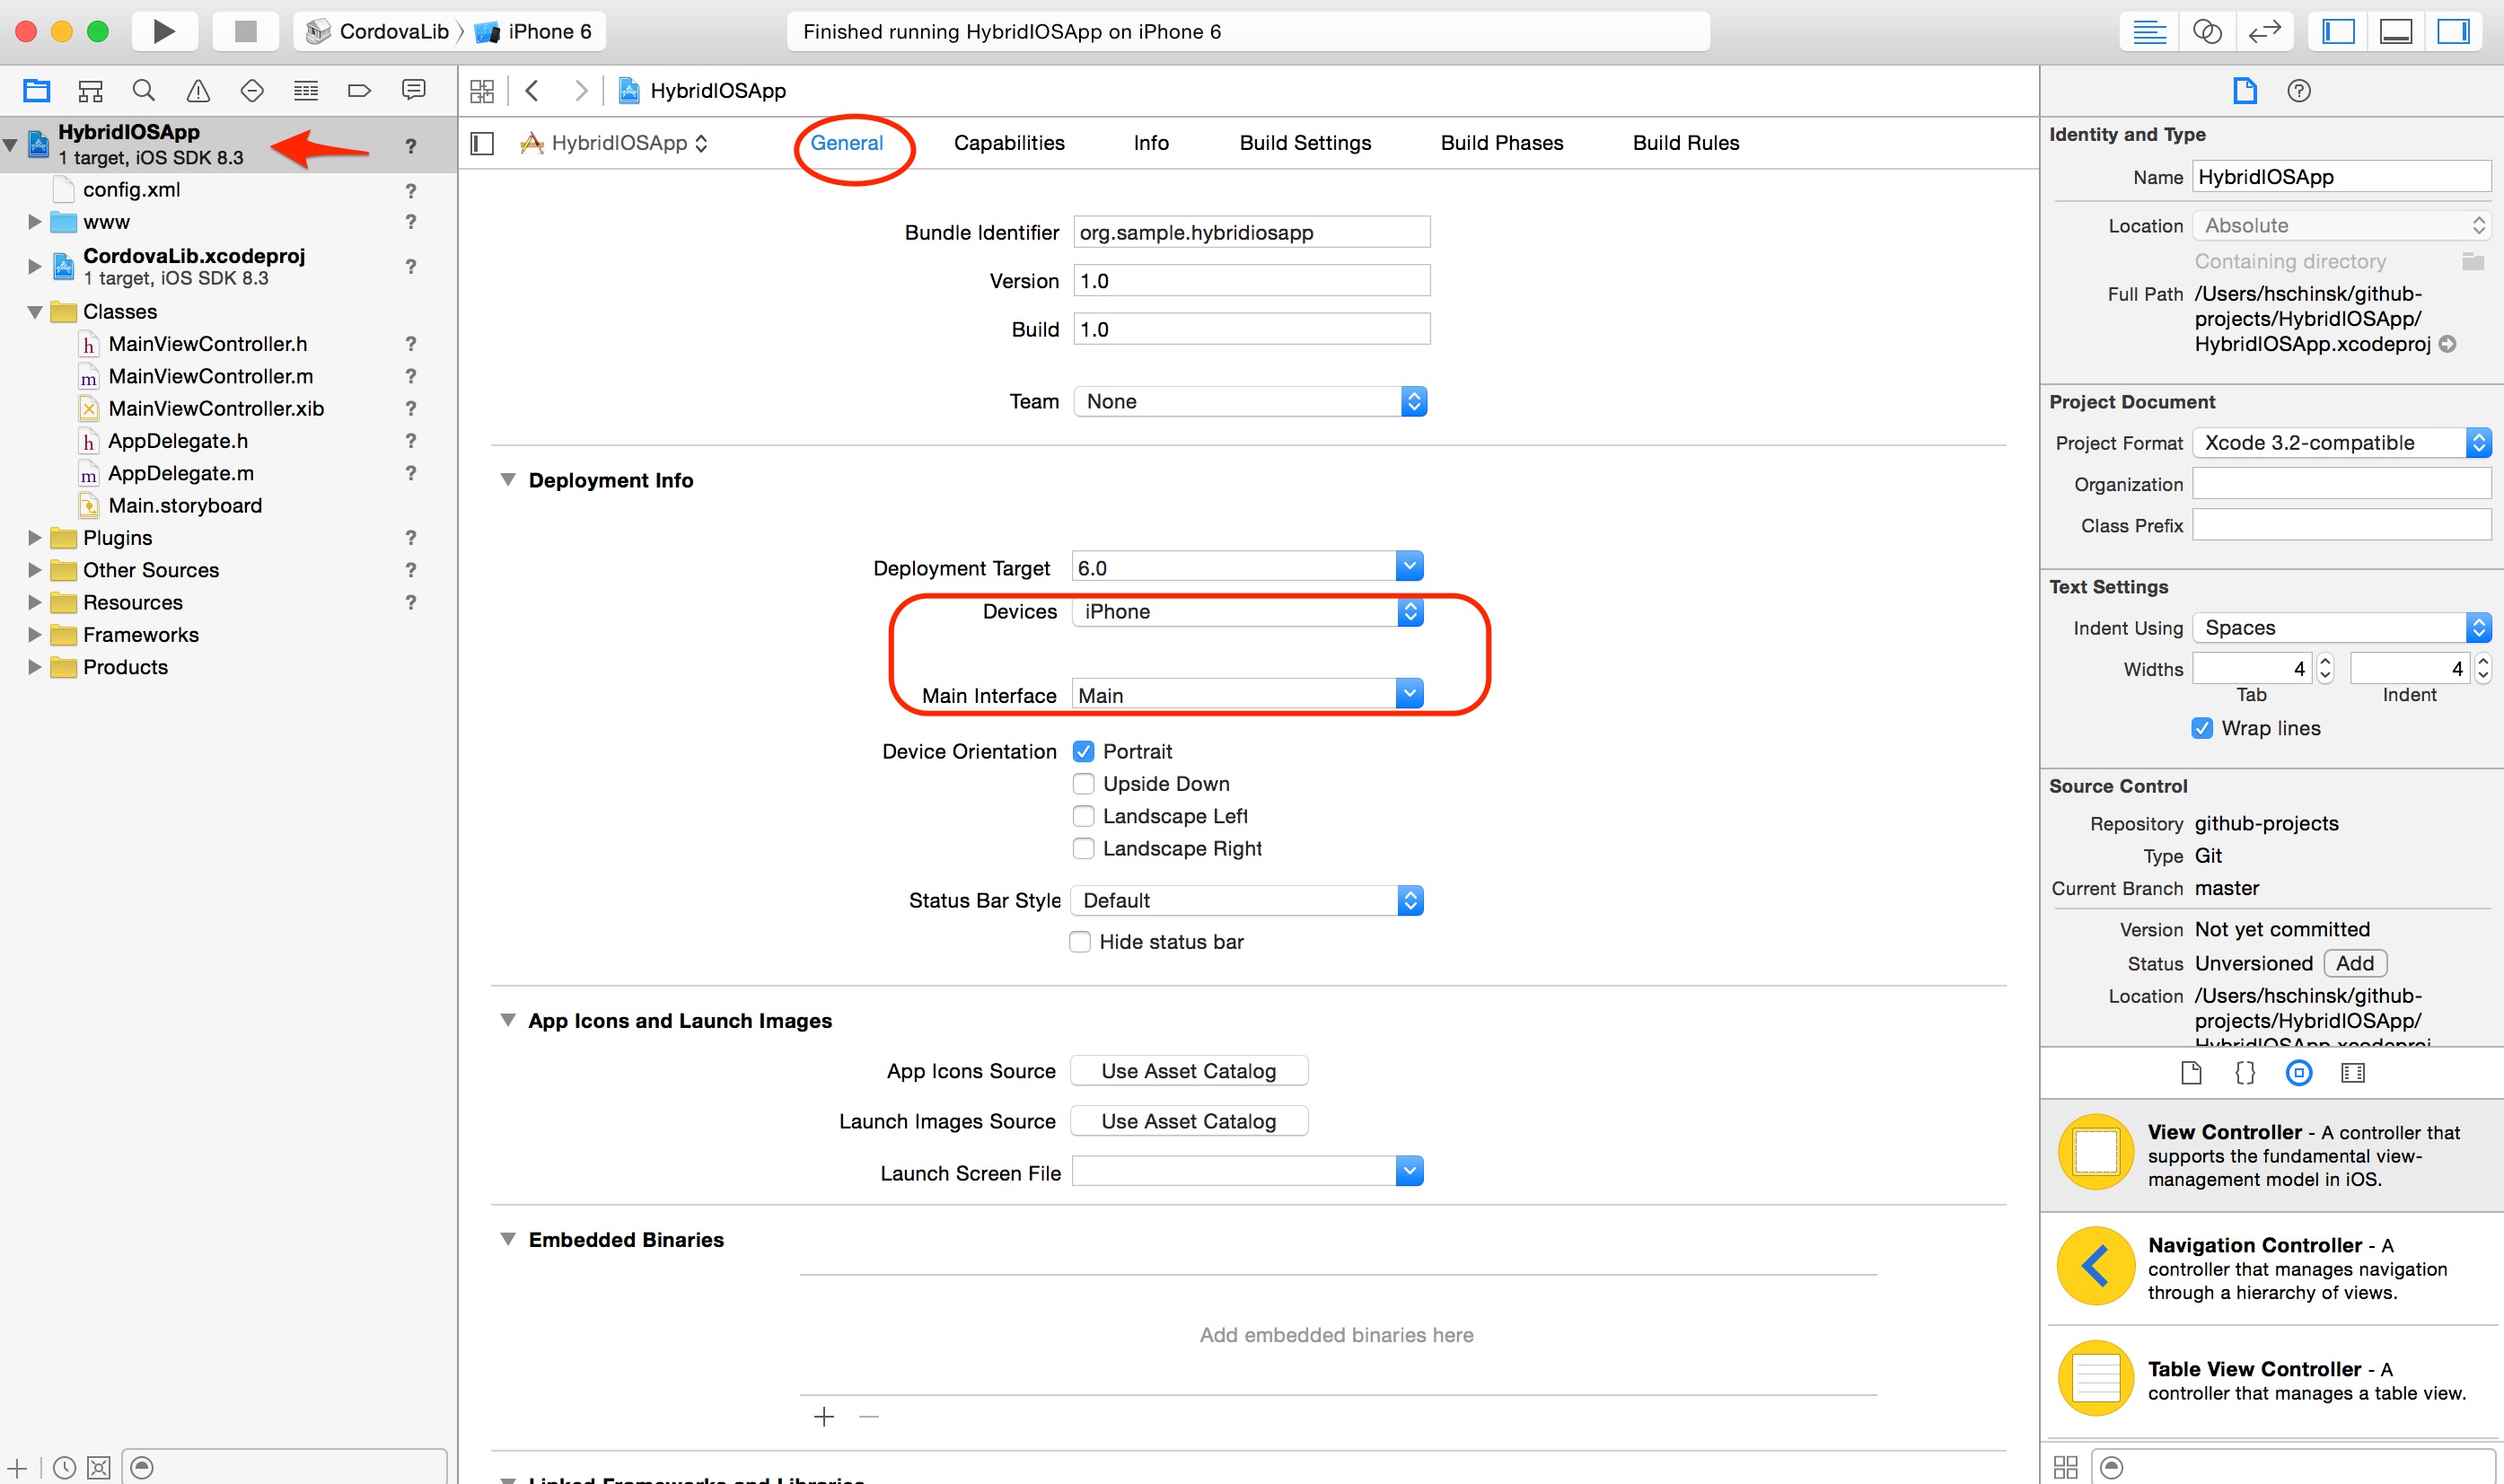
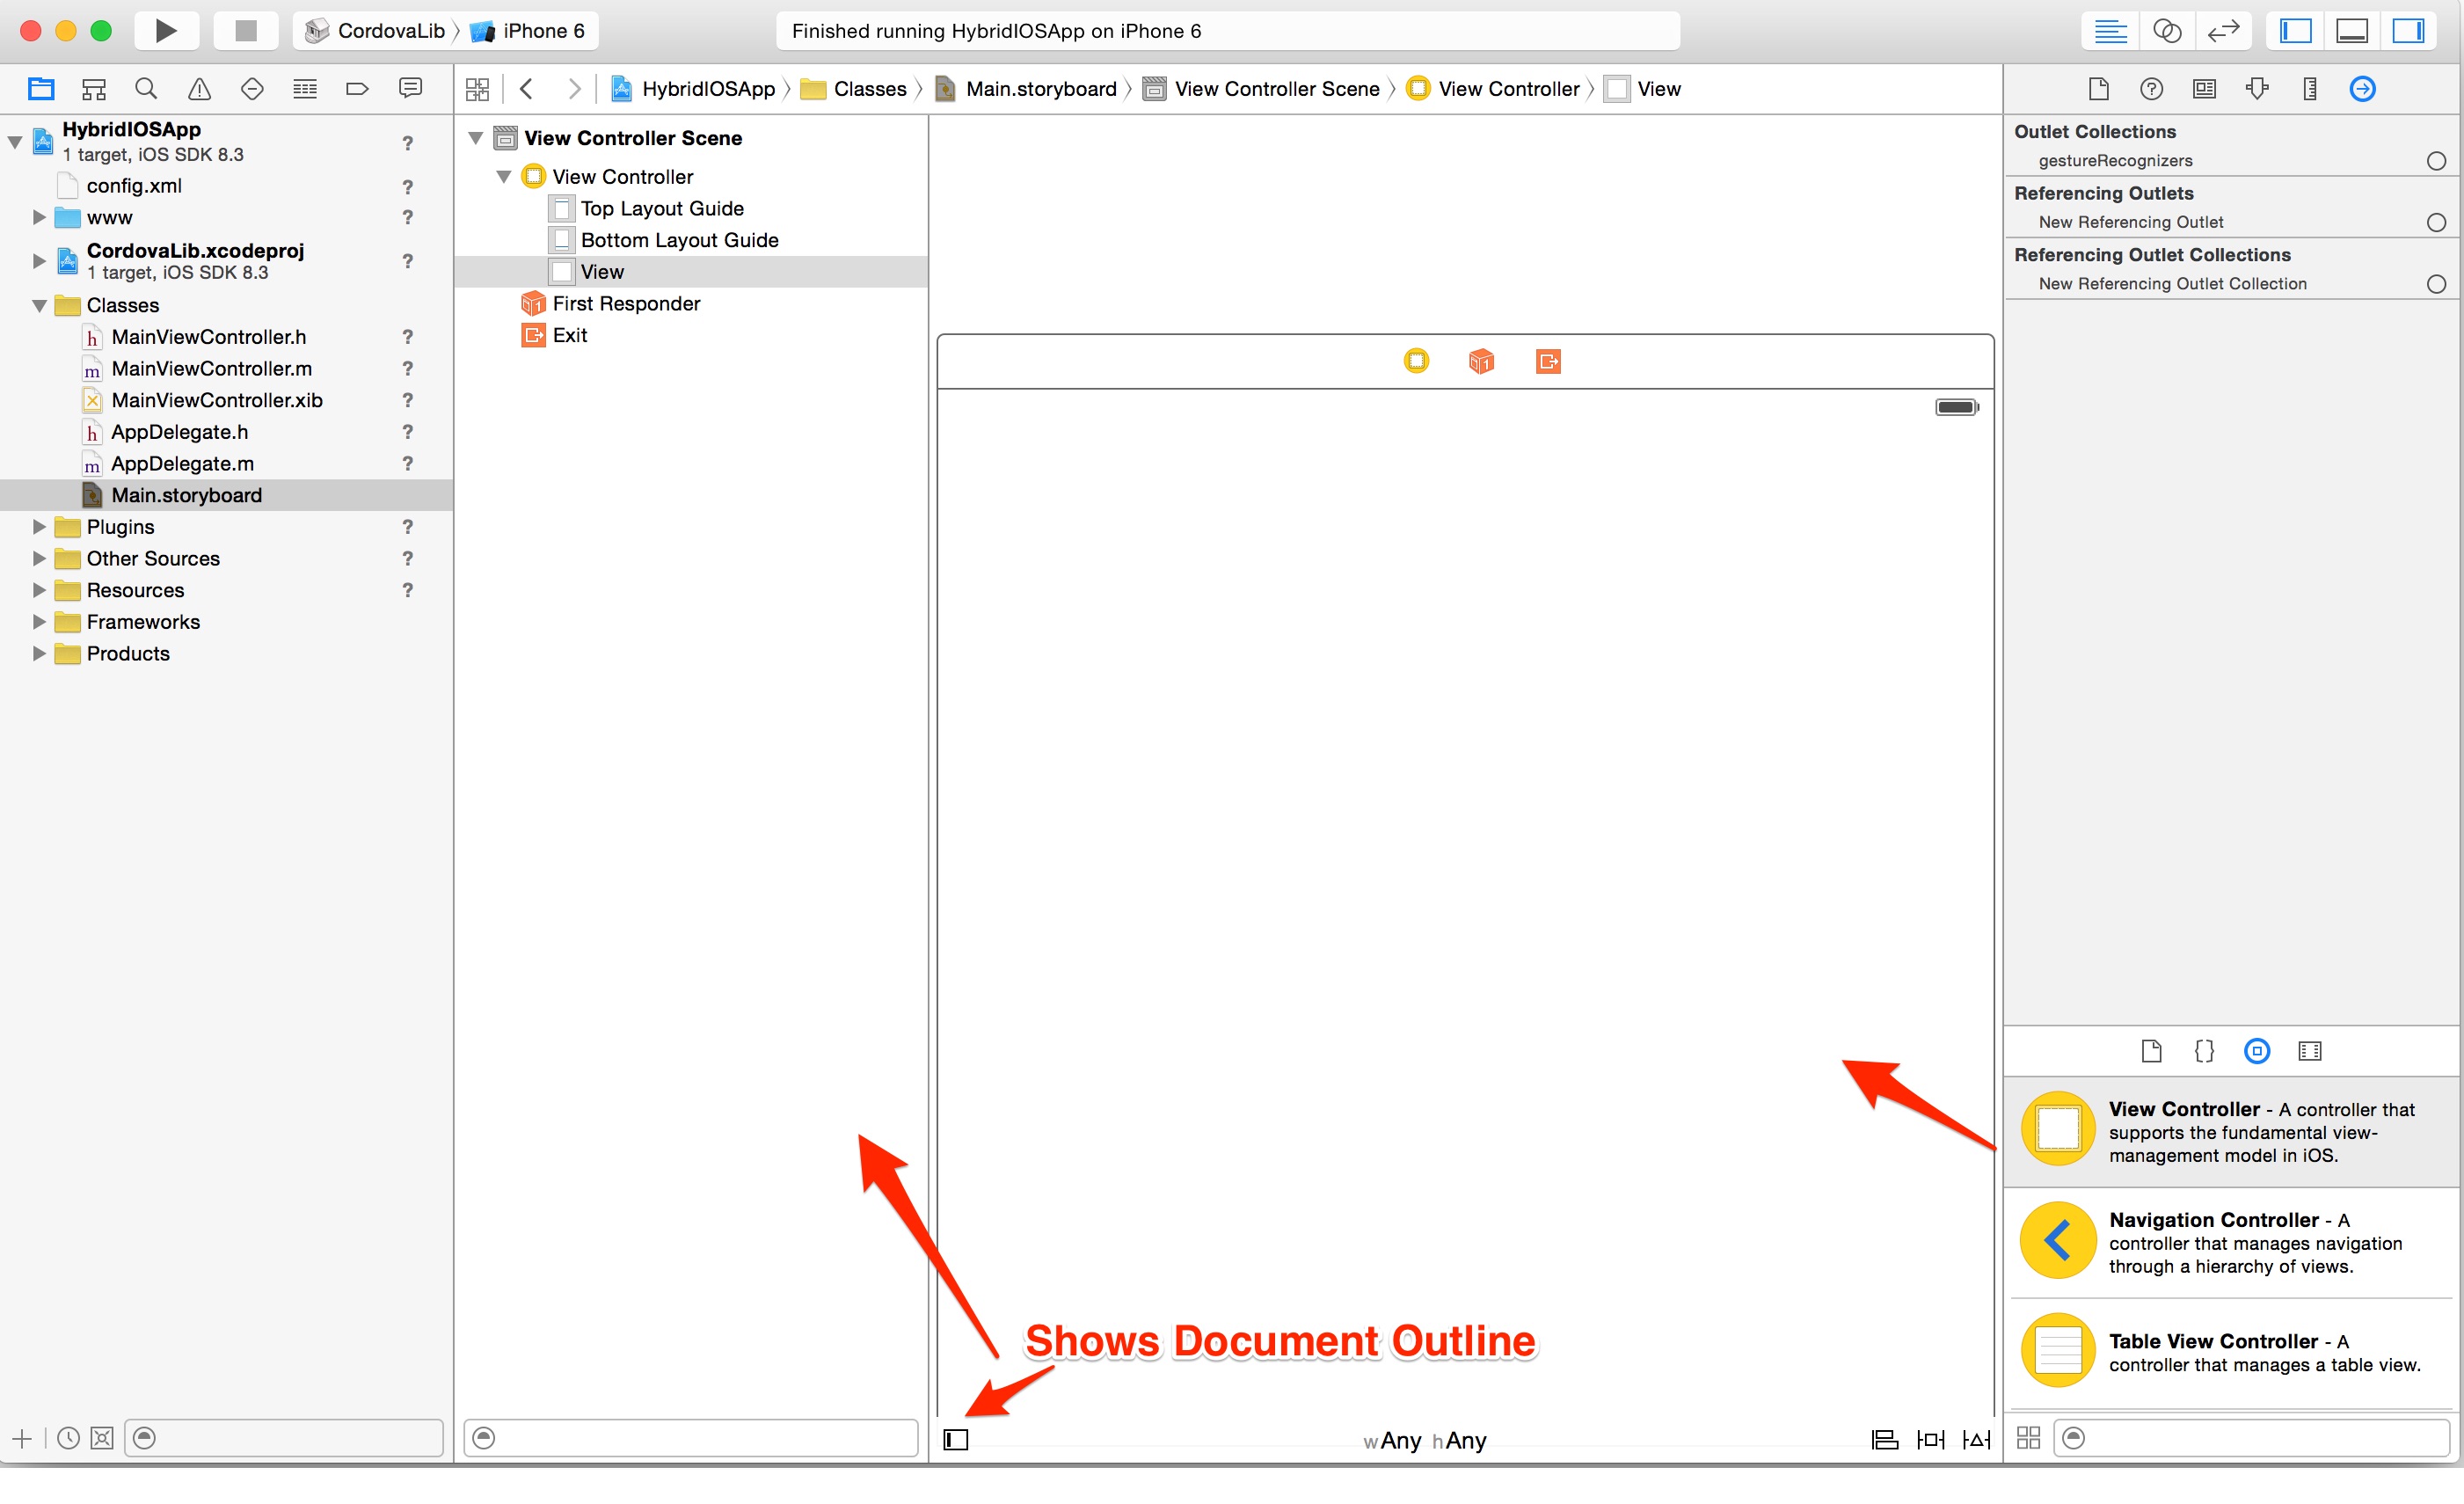
Now go back to the storyboard and create a scene by dragging a View Controller in from the Object Library panel on the right. (If it's not already opened, toggle it from the Xcode main menu bar under View -> Utilities). The right arrow below shows where to drag it from. Once it's dragged in, you should see it in the Document Outline view as shown below. If that outline is not showing, toggle it using the button pointed to with the red arrows below. You will need to use it throughout this guide.
Next we'll need to set the View Controller class to
MainViewController, which is the Cordova-enabled View Controller class created in your base project and provides the access to the PhoneGap APIs. To do this, ensure the new View Controller is selected and then open the Identity Inspector panel (circled below) and change the class name toMainViewController.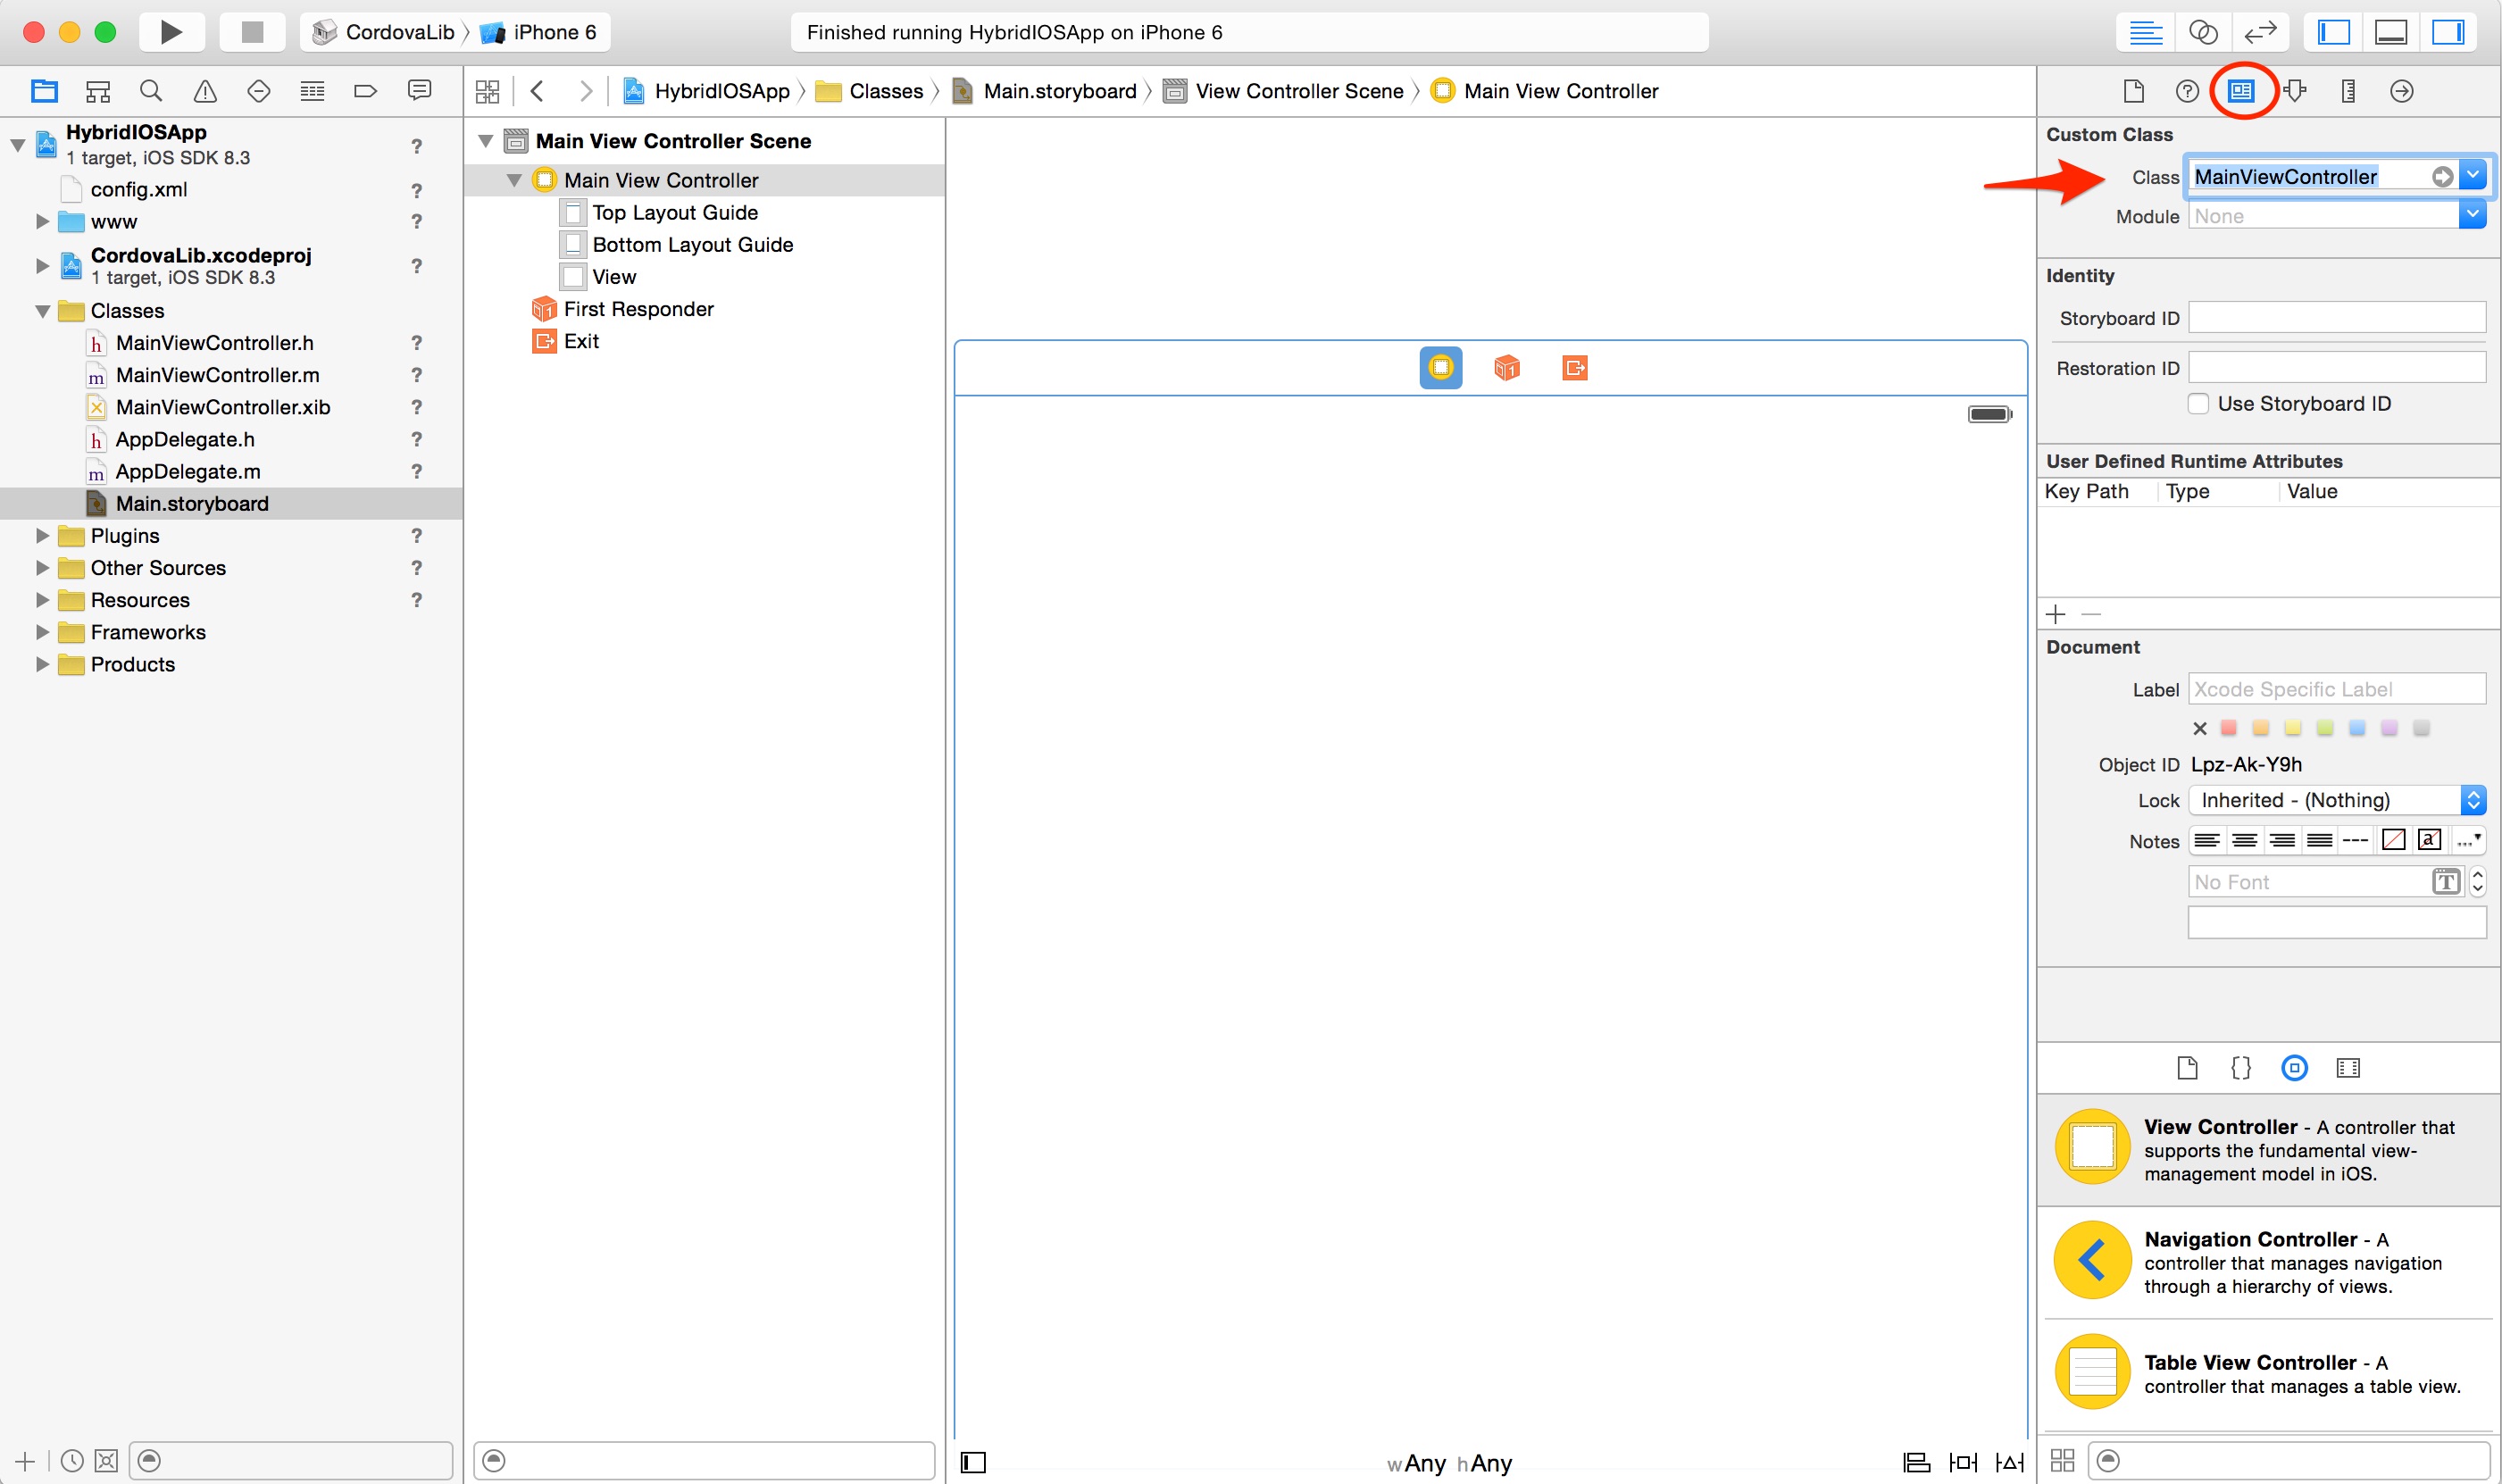
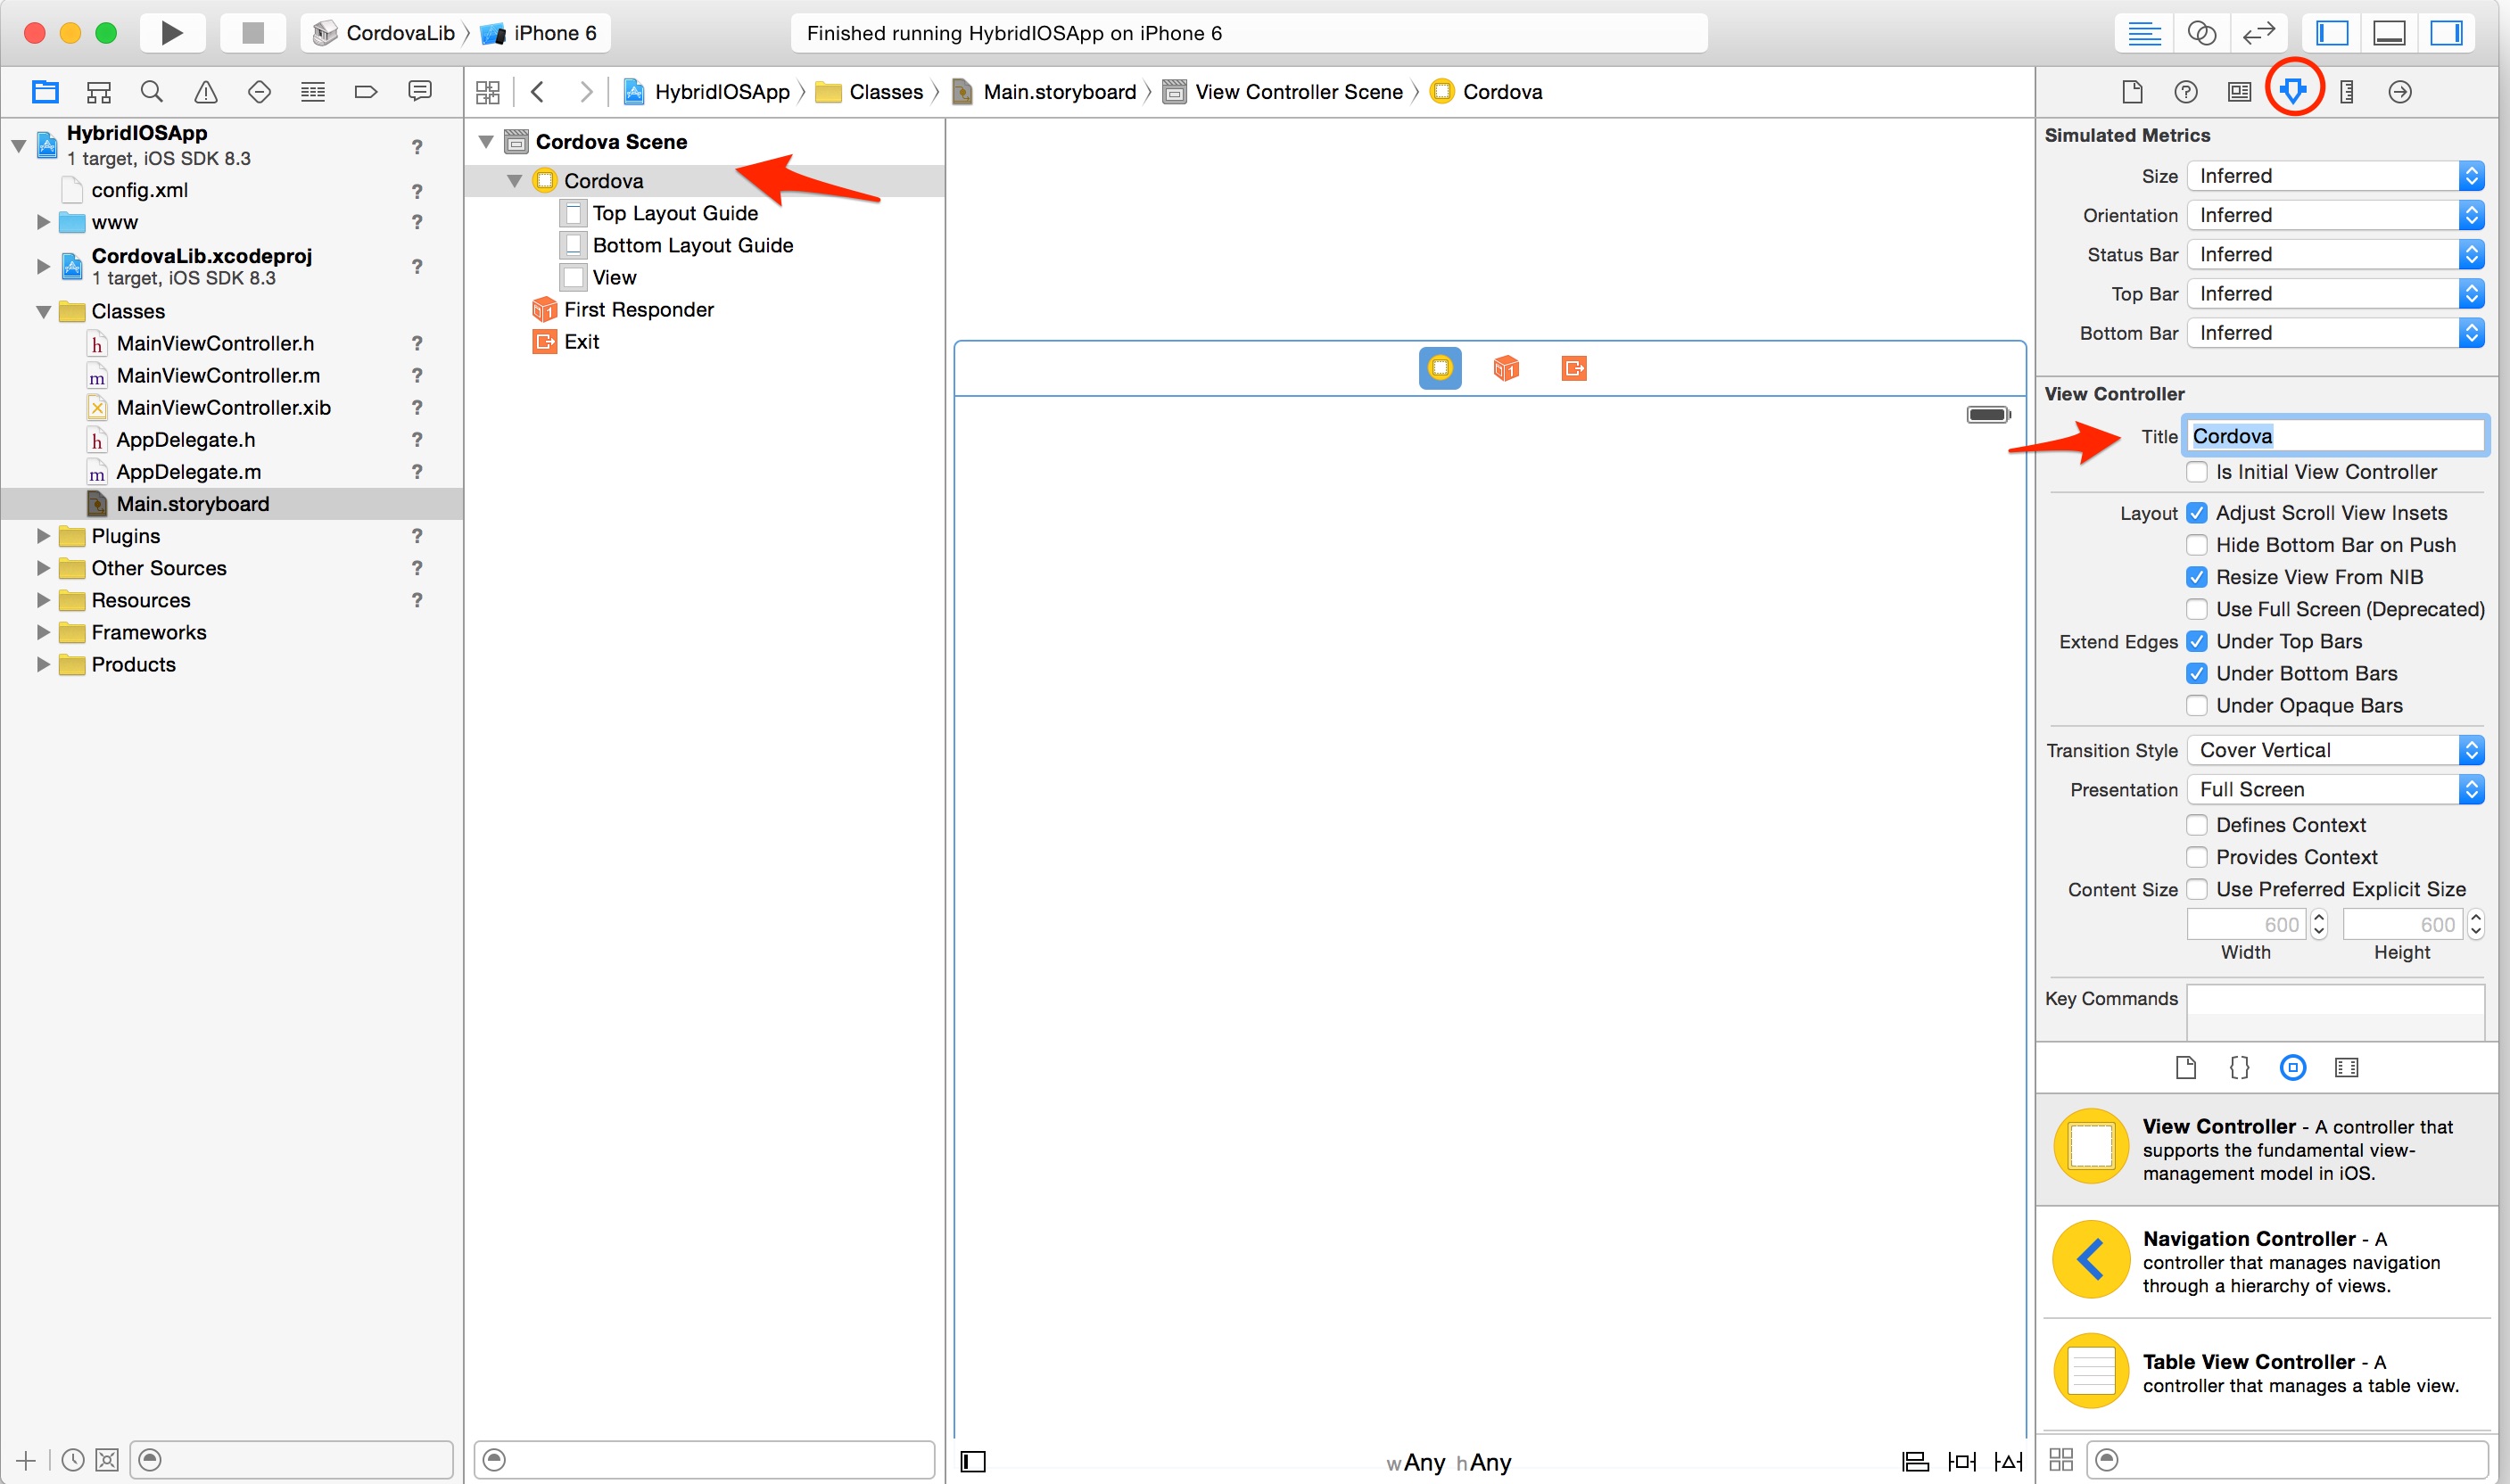
In the Attributes Inspector tab (circled in red), set the View Controller title to Cordova. This will display in the Document Outline for the view and helps better keep track of which view we're working on.
Next let's add one more View Controller to our storyboard to represent a Native View scene. Leave the default class set to
UIViewControllersince it's representing a native view scene. Set the title in the Attributes Inspector tab to Native.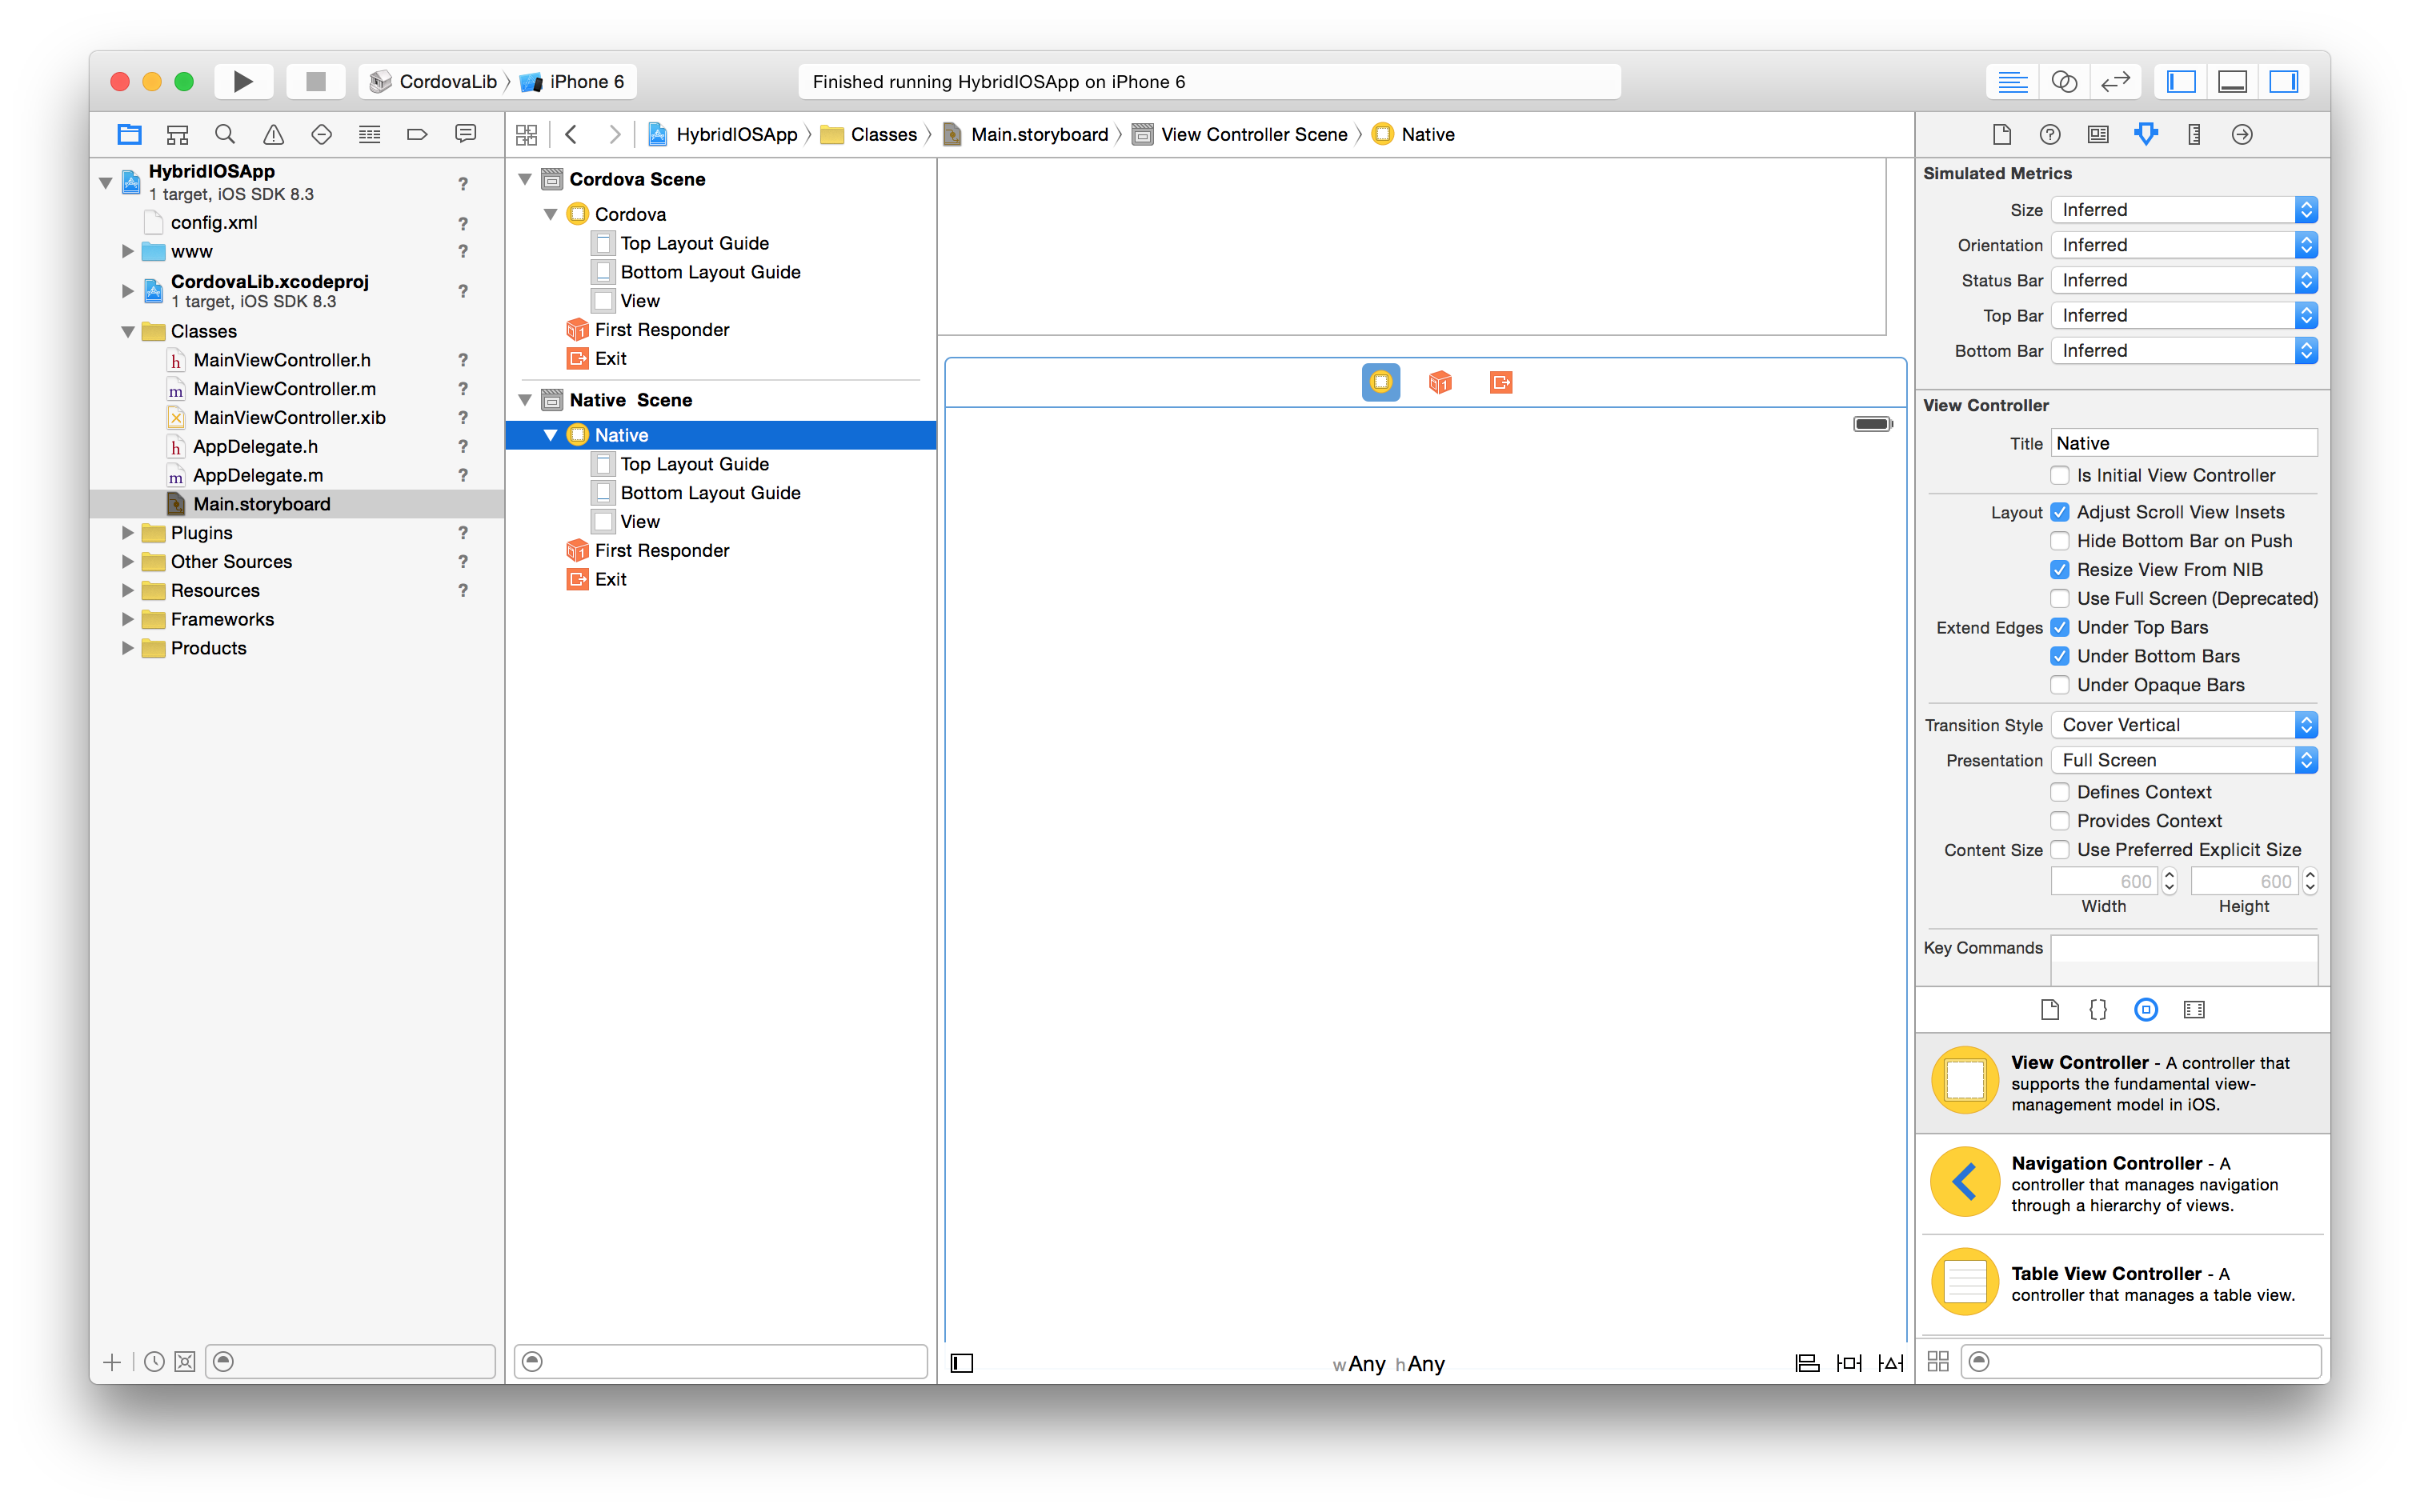
Now let's put some navigation into our app by adding a
TabBarControllerto allow users to switch between the cordova and native views from tabs at the bottom of the application. Our two View Controllers for Native and Cordova views can be embedded into thisTabBarControllervia the Xcode Editor menu. Ensure you have both View Controllers selected then go to Editor-> Embed In-> Tab Bar Controller.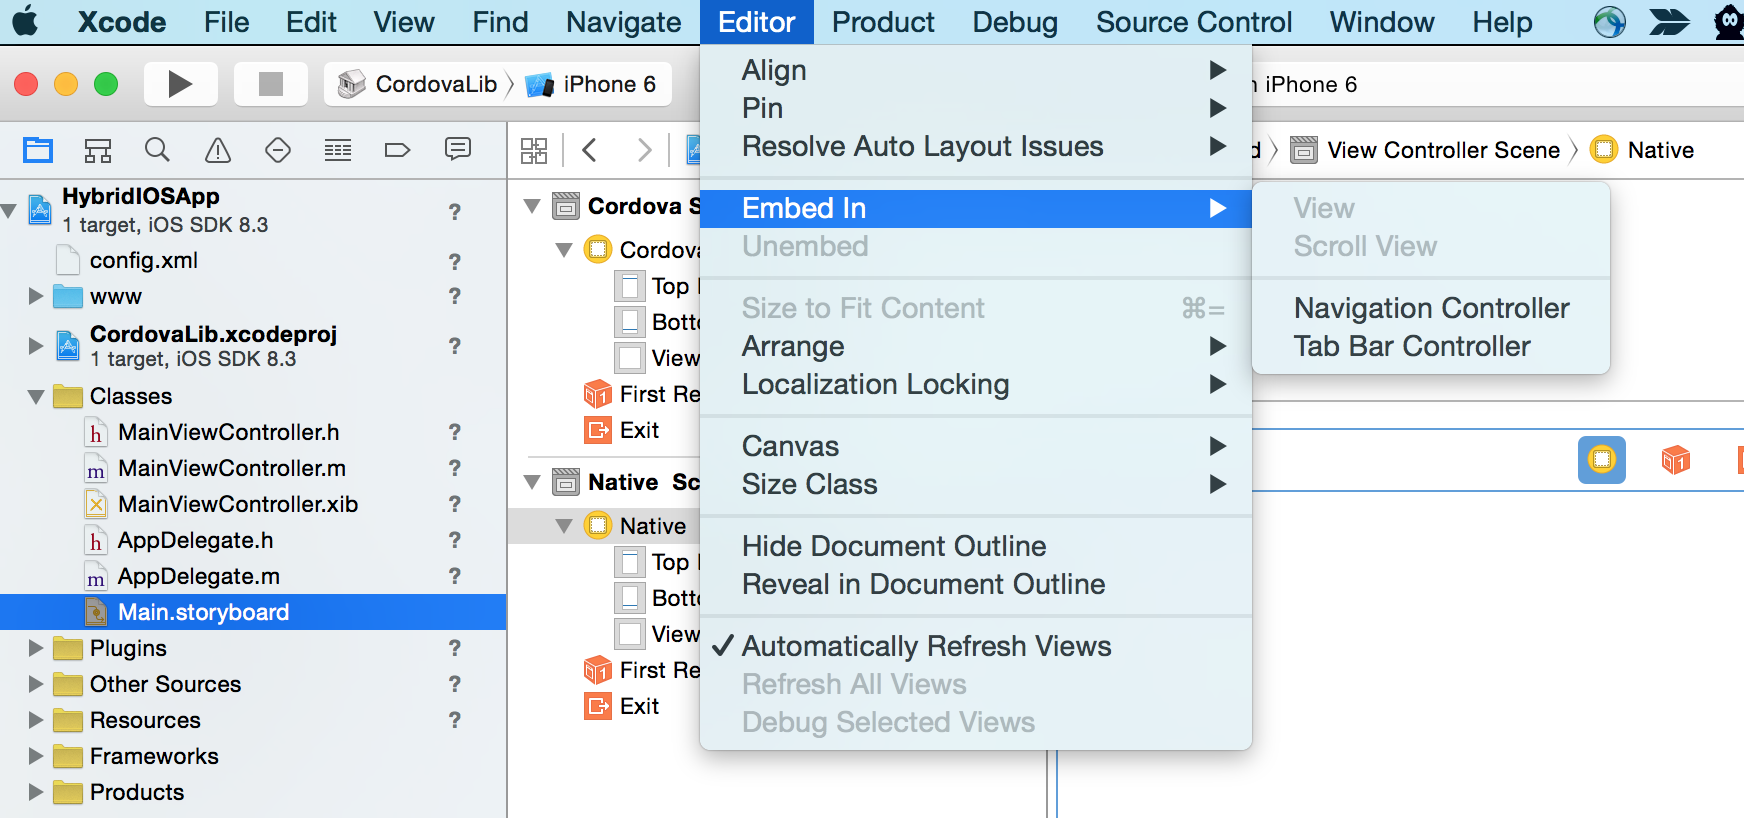
You will see that a new
TabBarControlleris now placed on the screen and connected to your View Controllers automatically.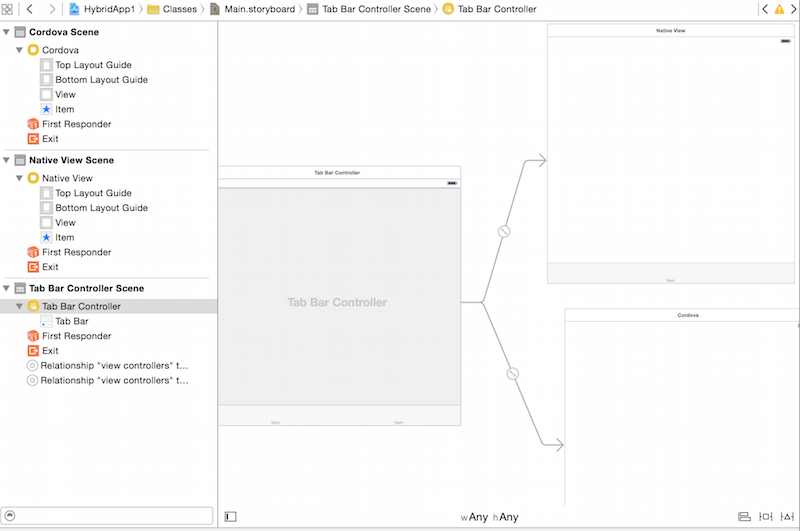
Now we'll need to set an entry point for our app to know what to display first. We'll set the
TabBarControllerto be the entry point by clicking on the Attribute Inspector tab and checking the box next to Is Initial View Controller like below. When the box is checked you'll see an arrow added to the screen into theTabBarController.
The storyboard entry point set in the previous step will not take effect quite yet as we still have code that exists to programmatically set the entry point as well that needs to be removed. Open AppDelegate.m and search for
didFinishLaunchingWithOptions. This method is the point where any final customization or final tweaks can be done before displaying the app. Since we're using a storyboard and have already set an entry point into theTabBarControllerthere, we don't need to use the current code in this method to set therootViewControllerso go ahead and completely remove it.In each of the scenes in the Document Outline view you will notice an Item object which represents the tab displayed for each view.
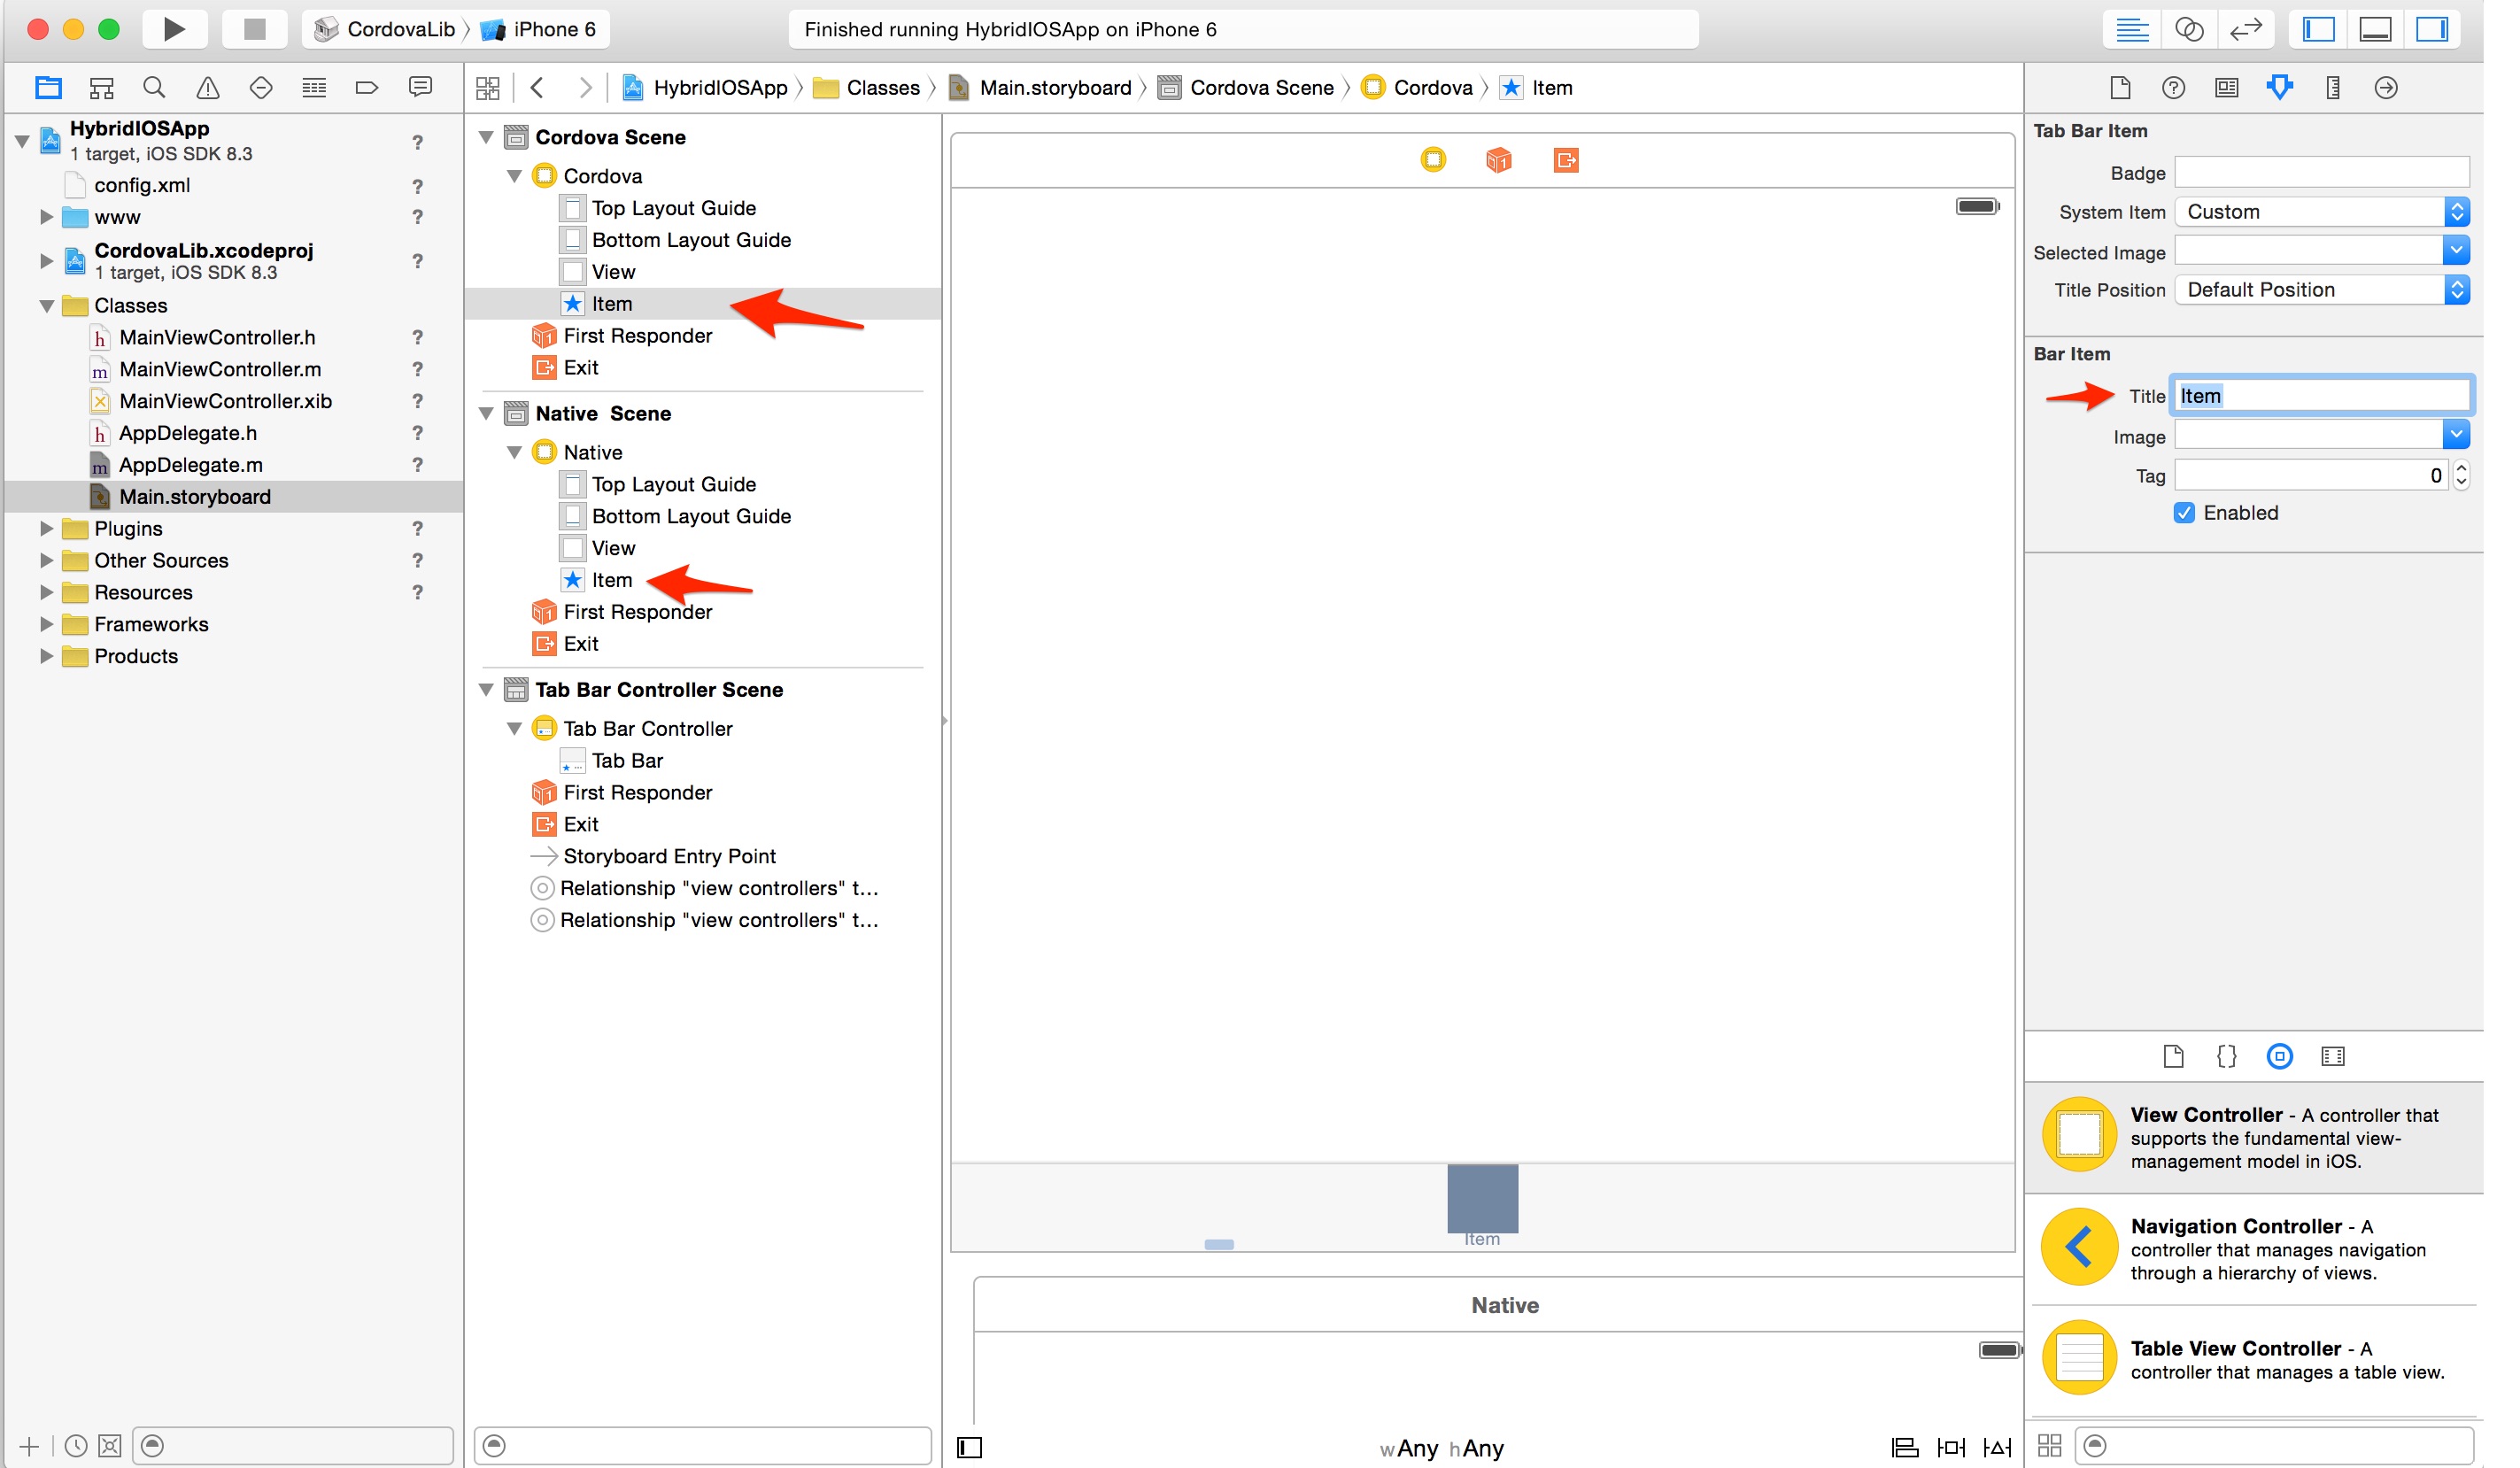
Change the name and icon to represent something more meaningful for each of them in the Attribute Inspector. For the Cordova view, set the name to Cordova and then choose a cordova logo for the Cordova view tab in the drop-down. Since the default logos are already included in the Resources folder from the cordova-ios project, you can easily select one from the drop-down. Choose the icon-40.png size.
For the native view we'll simply set the System Item to a built-in value of History since this view will represent a history of bookmarked items of sorts. Setting this value will automatically set the icon and title for us in the tab so we only need to fill in that value. See the screenshot in the next step for the result:
Now run the app and you will see the two buttons at the bottom and can toggle between views with them. The Cordova view shows the default Hello Cordova app and the native view is currently blank. We will change that in the next lesson.
Lesson 3: Adding to the Native View
In this lesson we'll set up a table in our native view to allow for items to be added to it and displayed when a button is clicked from the Cordova WebView. To set up our native view to display a table, we'll also need to define a custom UITableViewController class for our logic.
Go to File -> New -> File -> Cocoa Touch Class
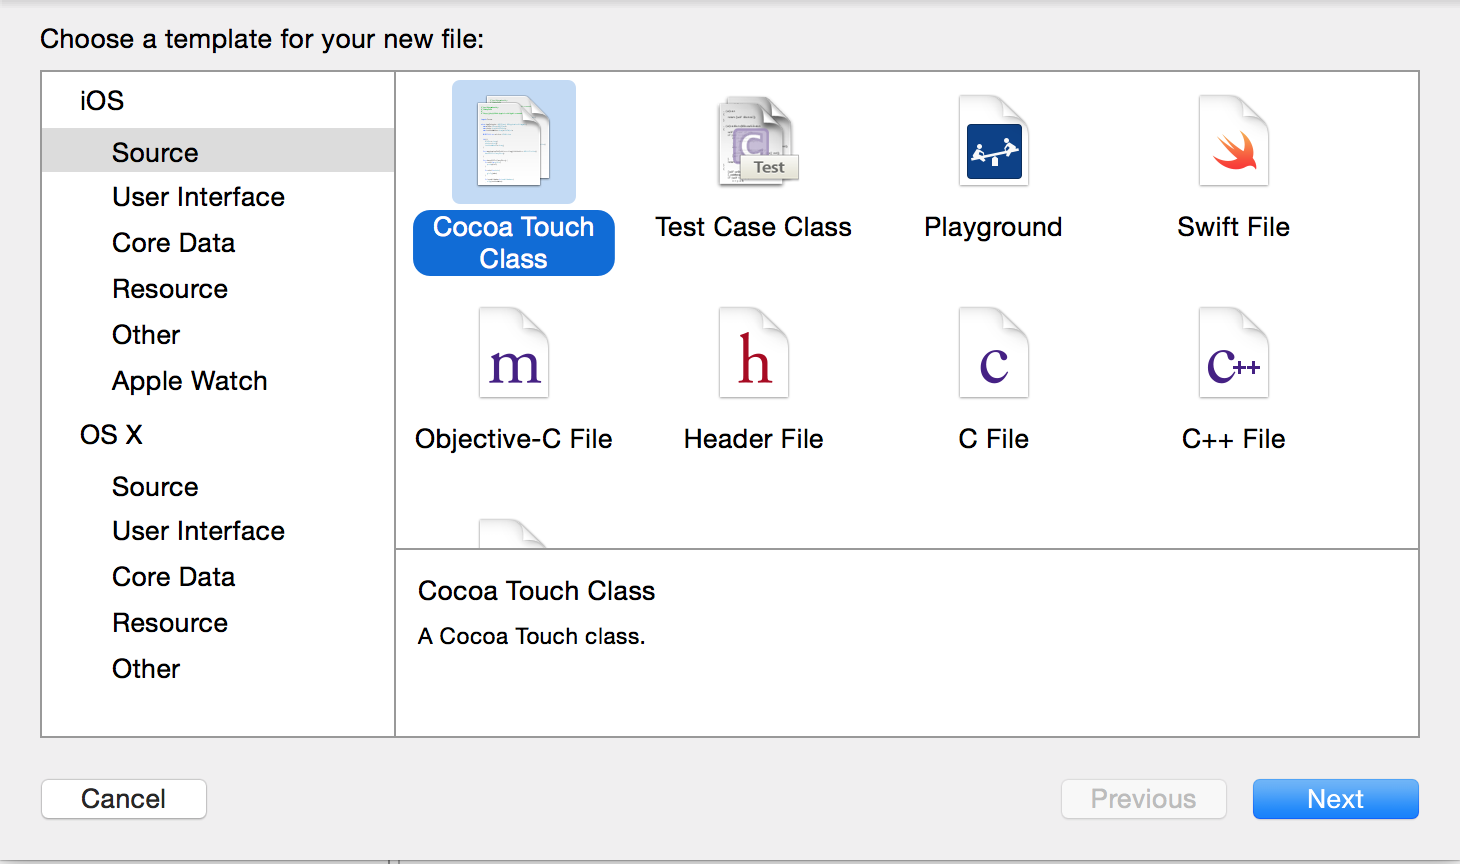
Name it to
MyTableViewControllerand ensure theUITableViewControllersubclass is selected and save into Classes folder.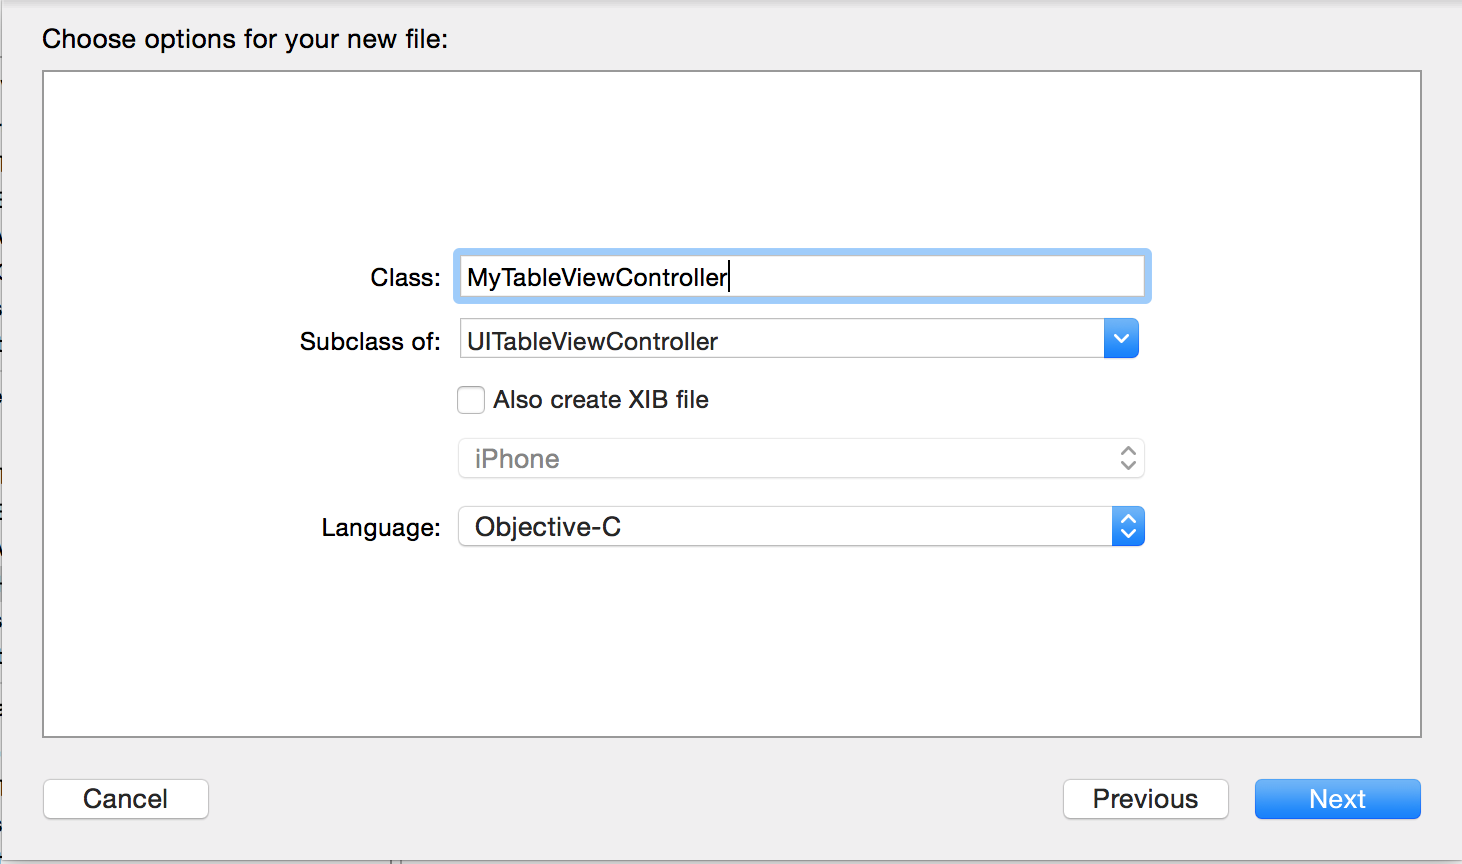
Next we'll need to use the new
TableViewControllerclass we created by setting it as our native View Controller from within the Storyboard of our native view. Ensure the native scene is selected and change the View Controller class toMyTableViewController(or to the value you named it in the above) in the Identity Inspector.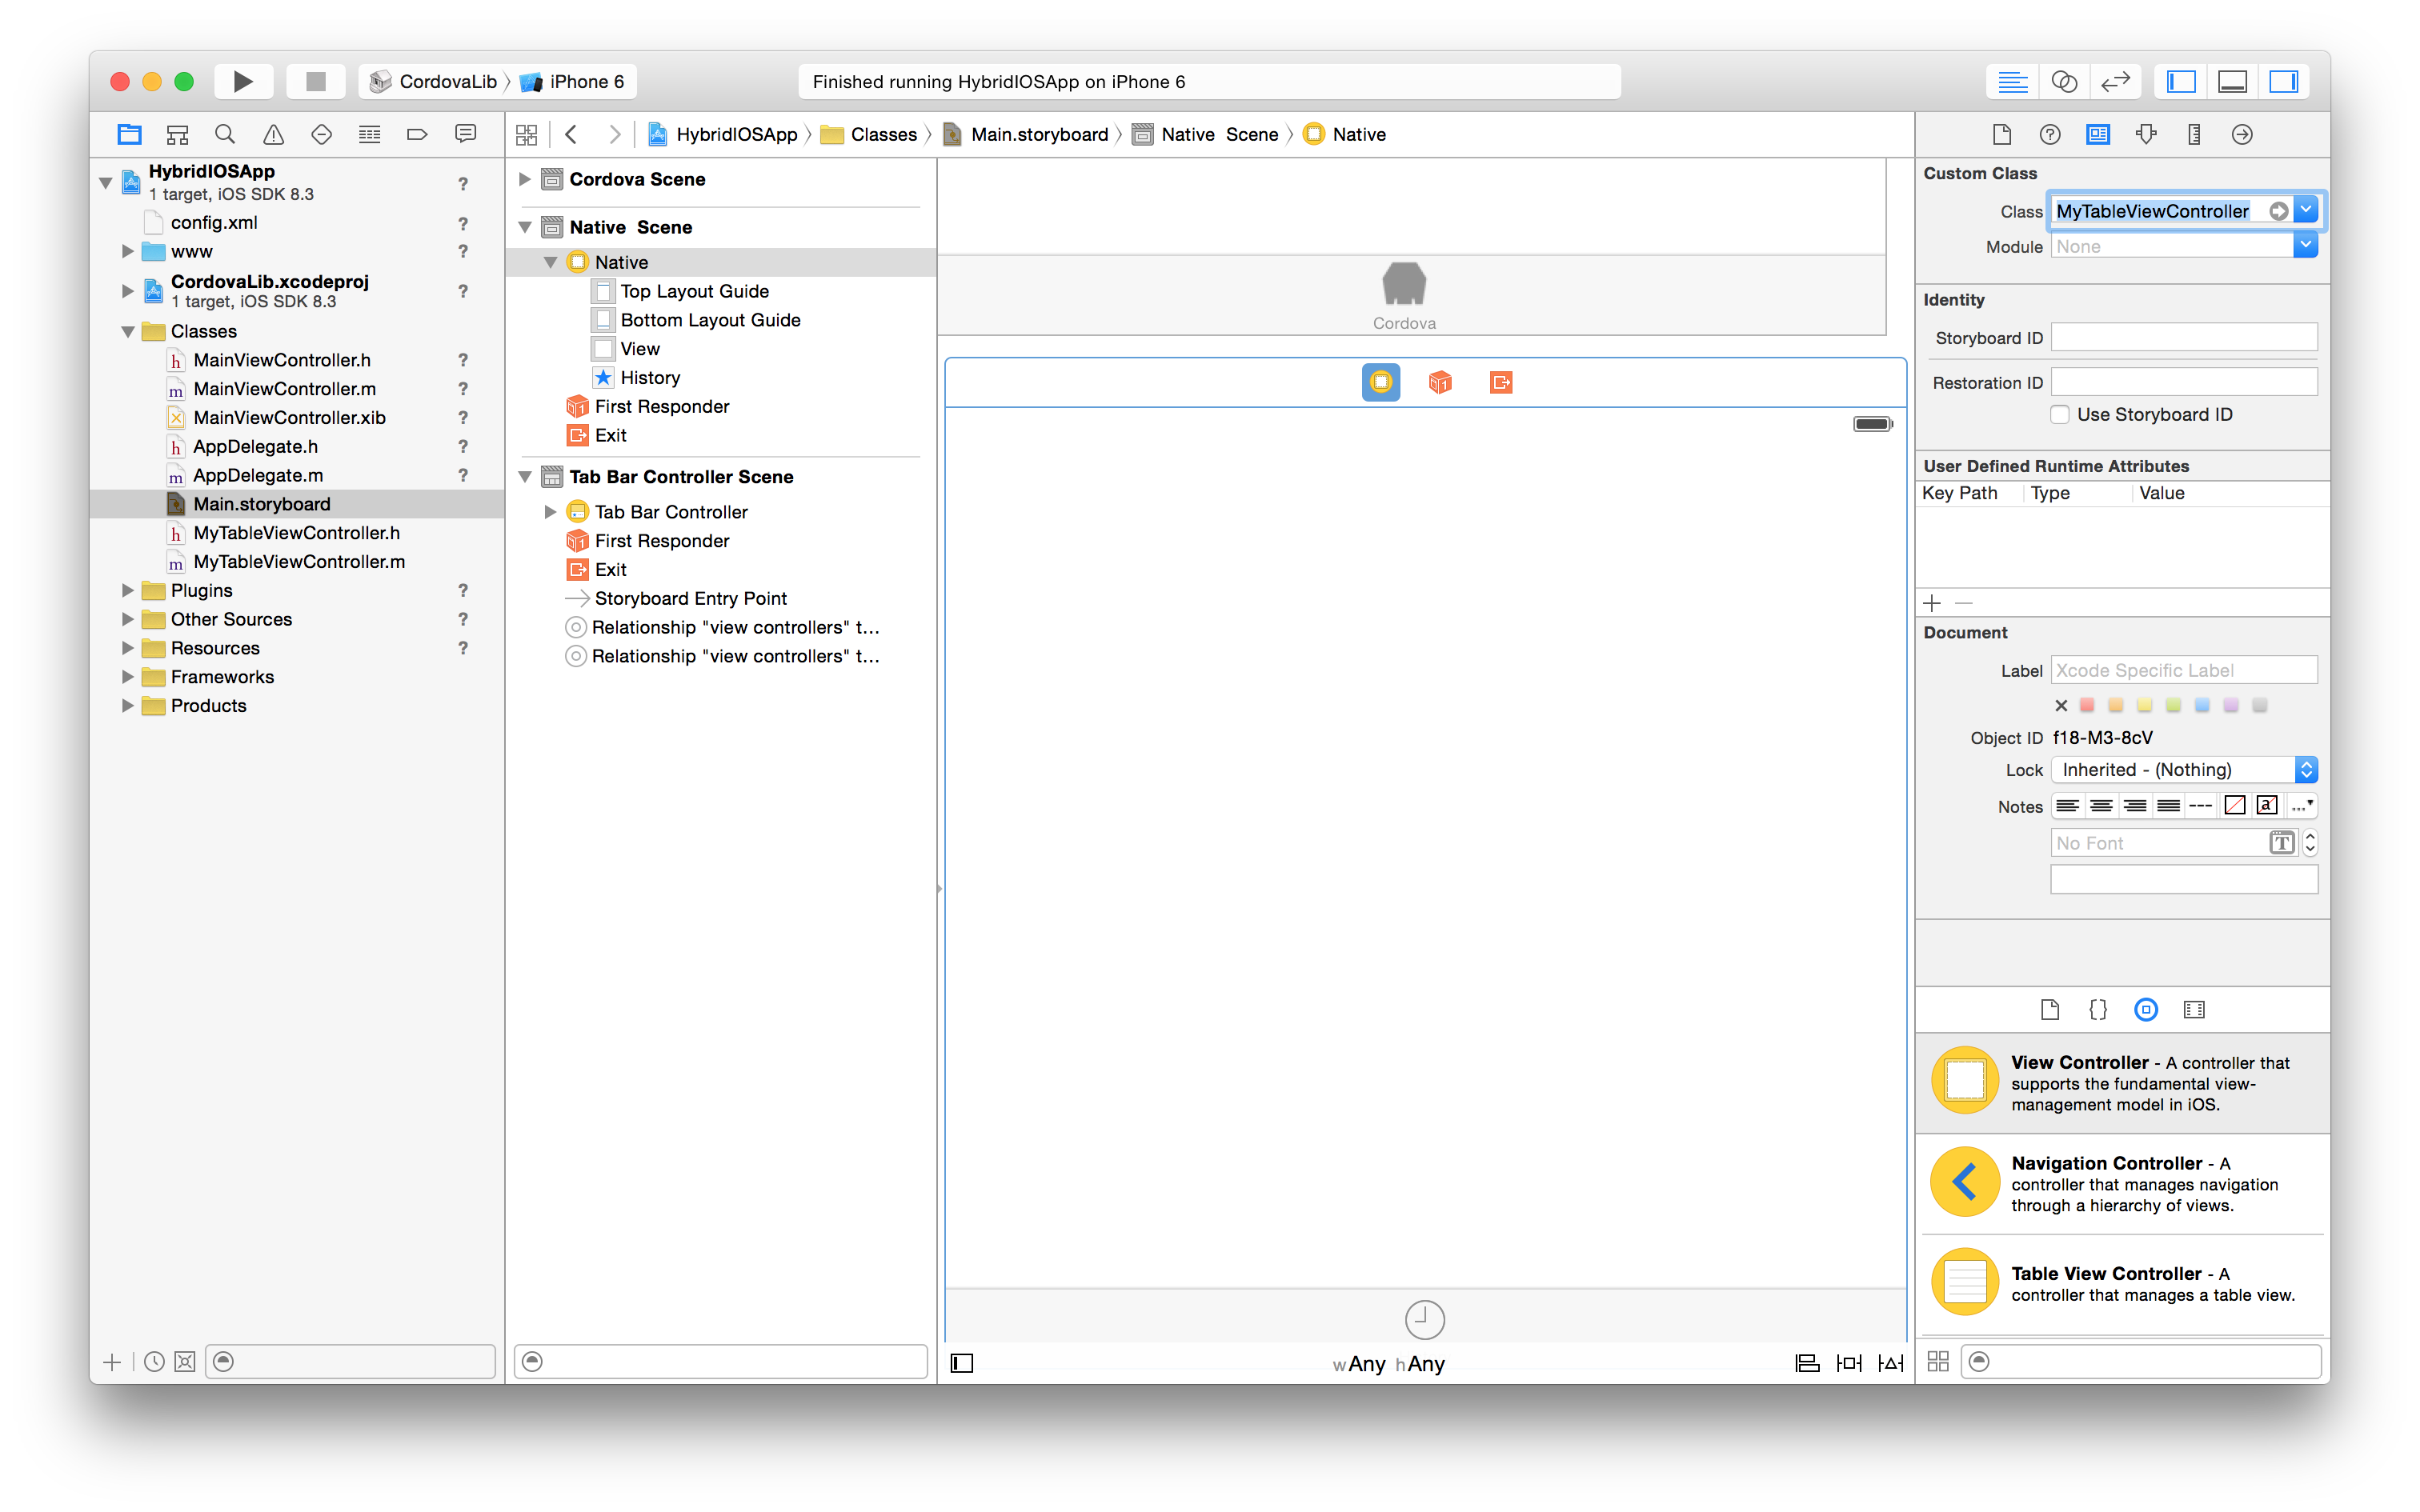
Since there's still nothing visible from a UI perspective in the native view, we'll need to add the actual Table control itself that the
MyTableViewControllerclass will manage. This control is represented by aUITableViewclass and will replace the current defaultUIViewthere (denoted by the View object in the Document Outline). Delete the current View In the Document Outline located under Native View by selecting it and pressing delete. Now drag a Table View component from the Object Library into the Native View. The result should look like the following: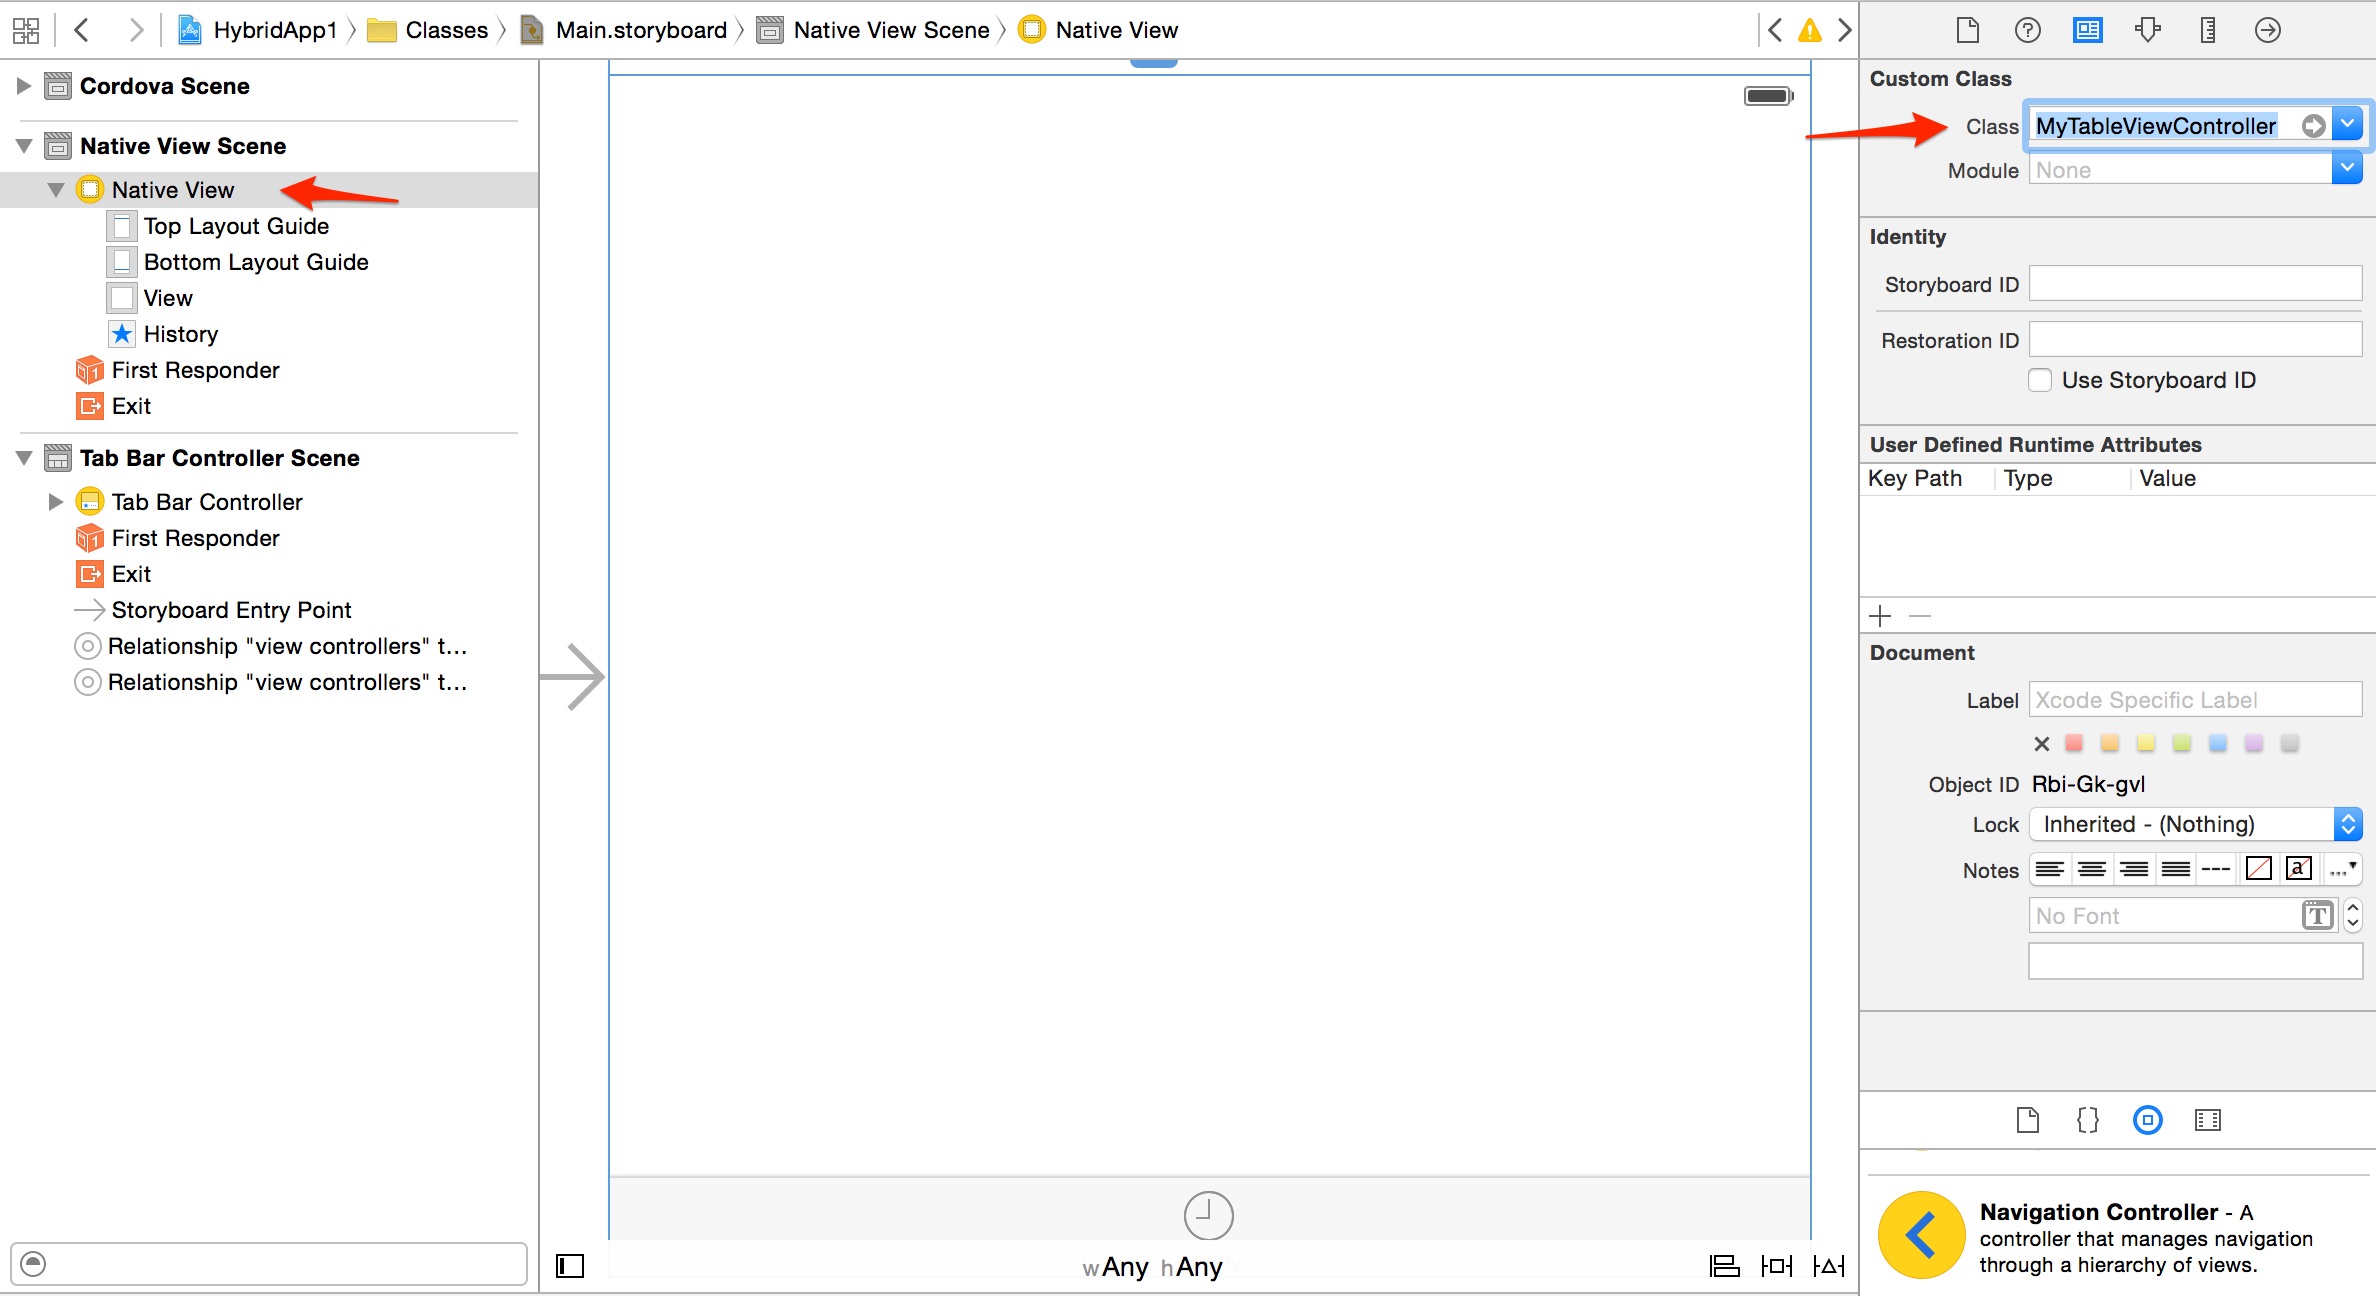
While we have our
TableViewselected, let's also change the row height to pad it a bit and make it easier to read. Change the Row Height to 70 as shown here: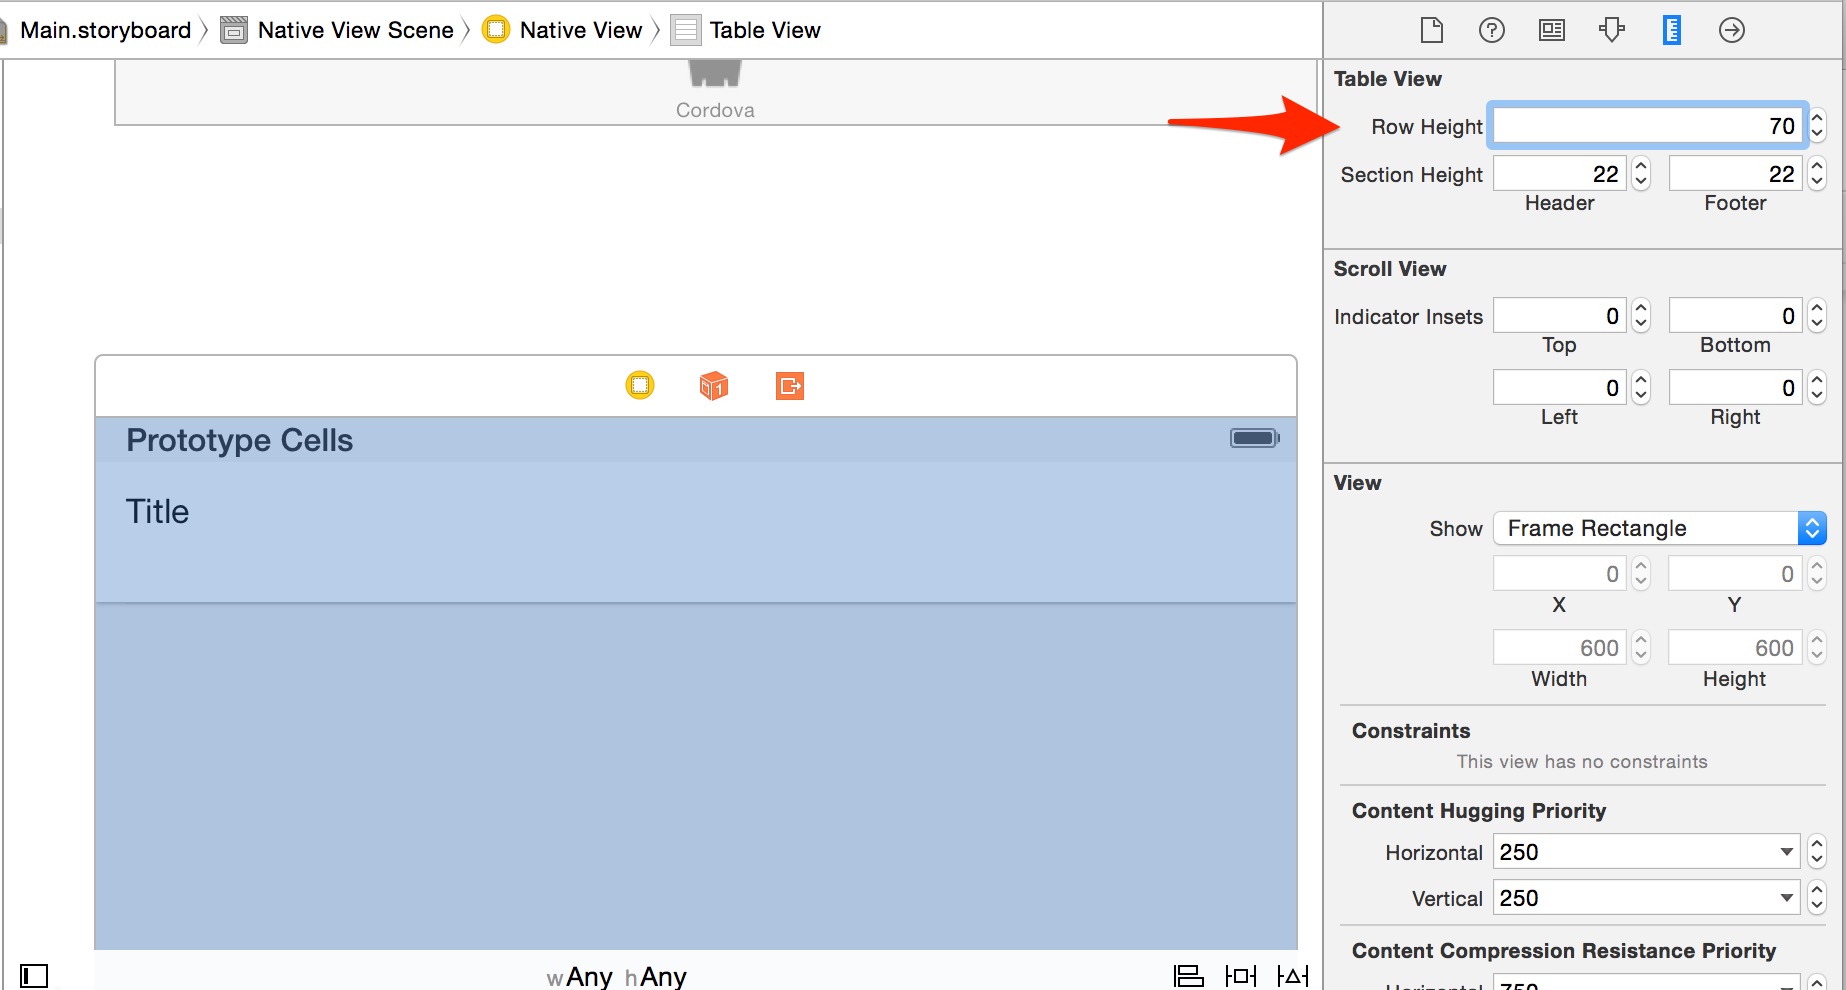
Now add a Table View Cell component on to the
TableViewby dragging it from the Object Library. You will see a new element on the Table View titled Prototype Cells. Name the Table View Cell to Cell1 by setting the Identifier in the Attribute Inspector tab. The name will change in the Document Outline as shown below: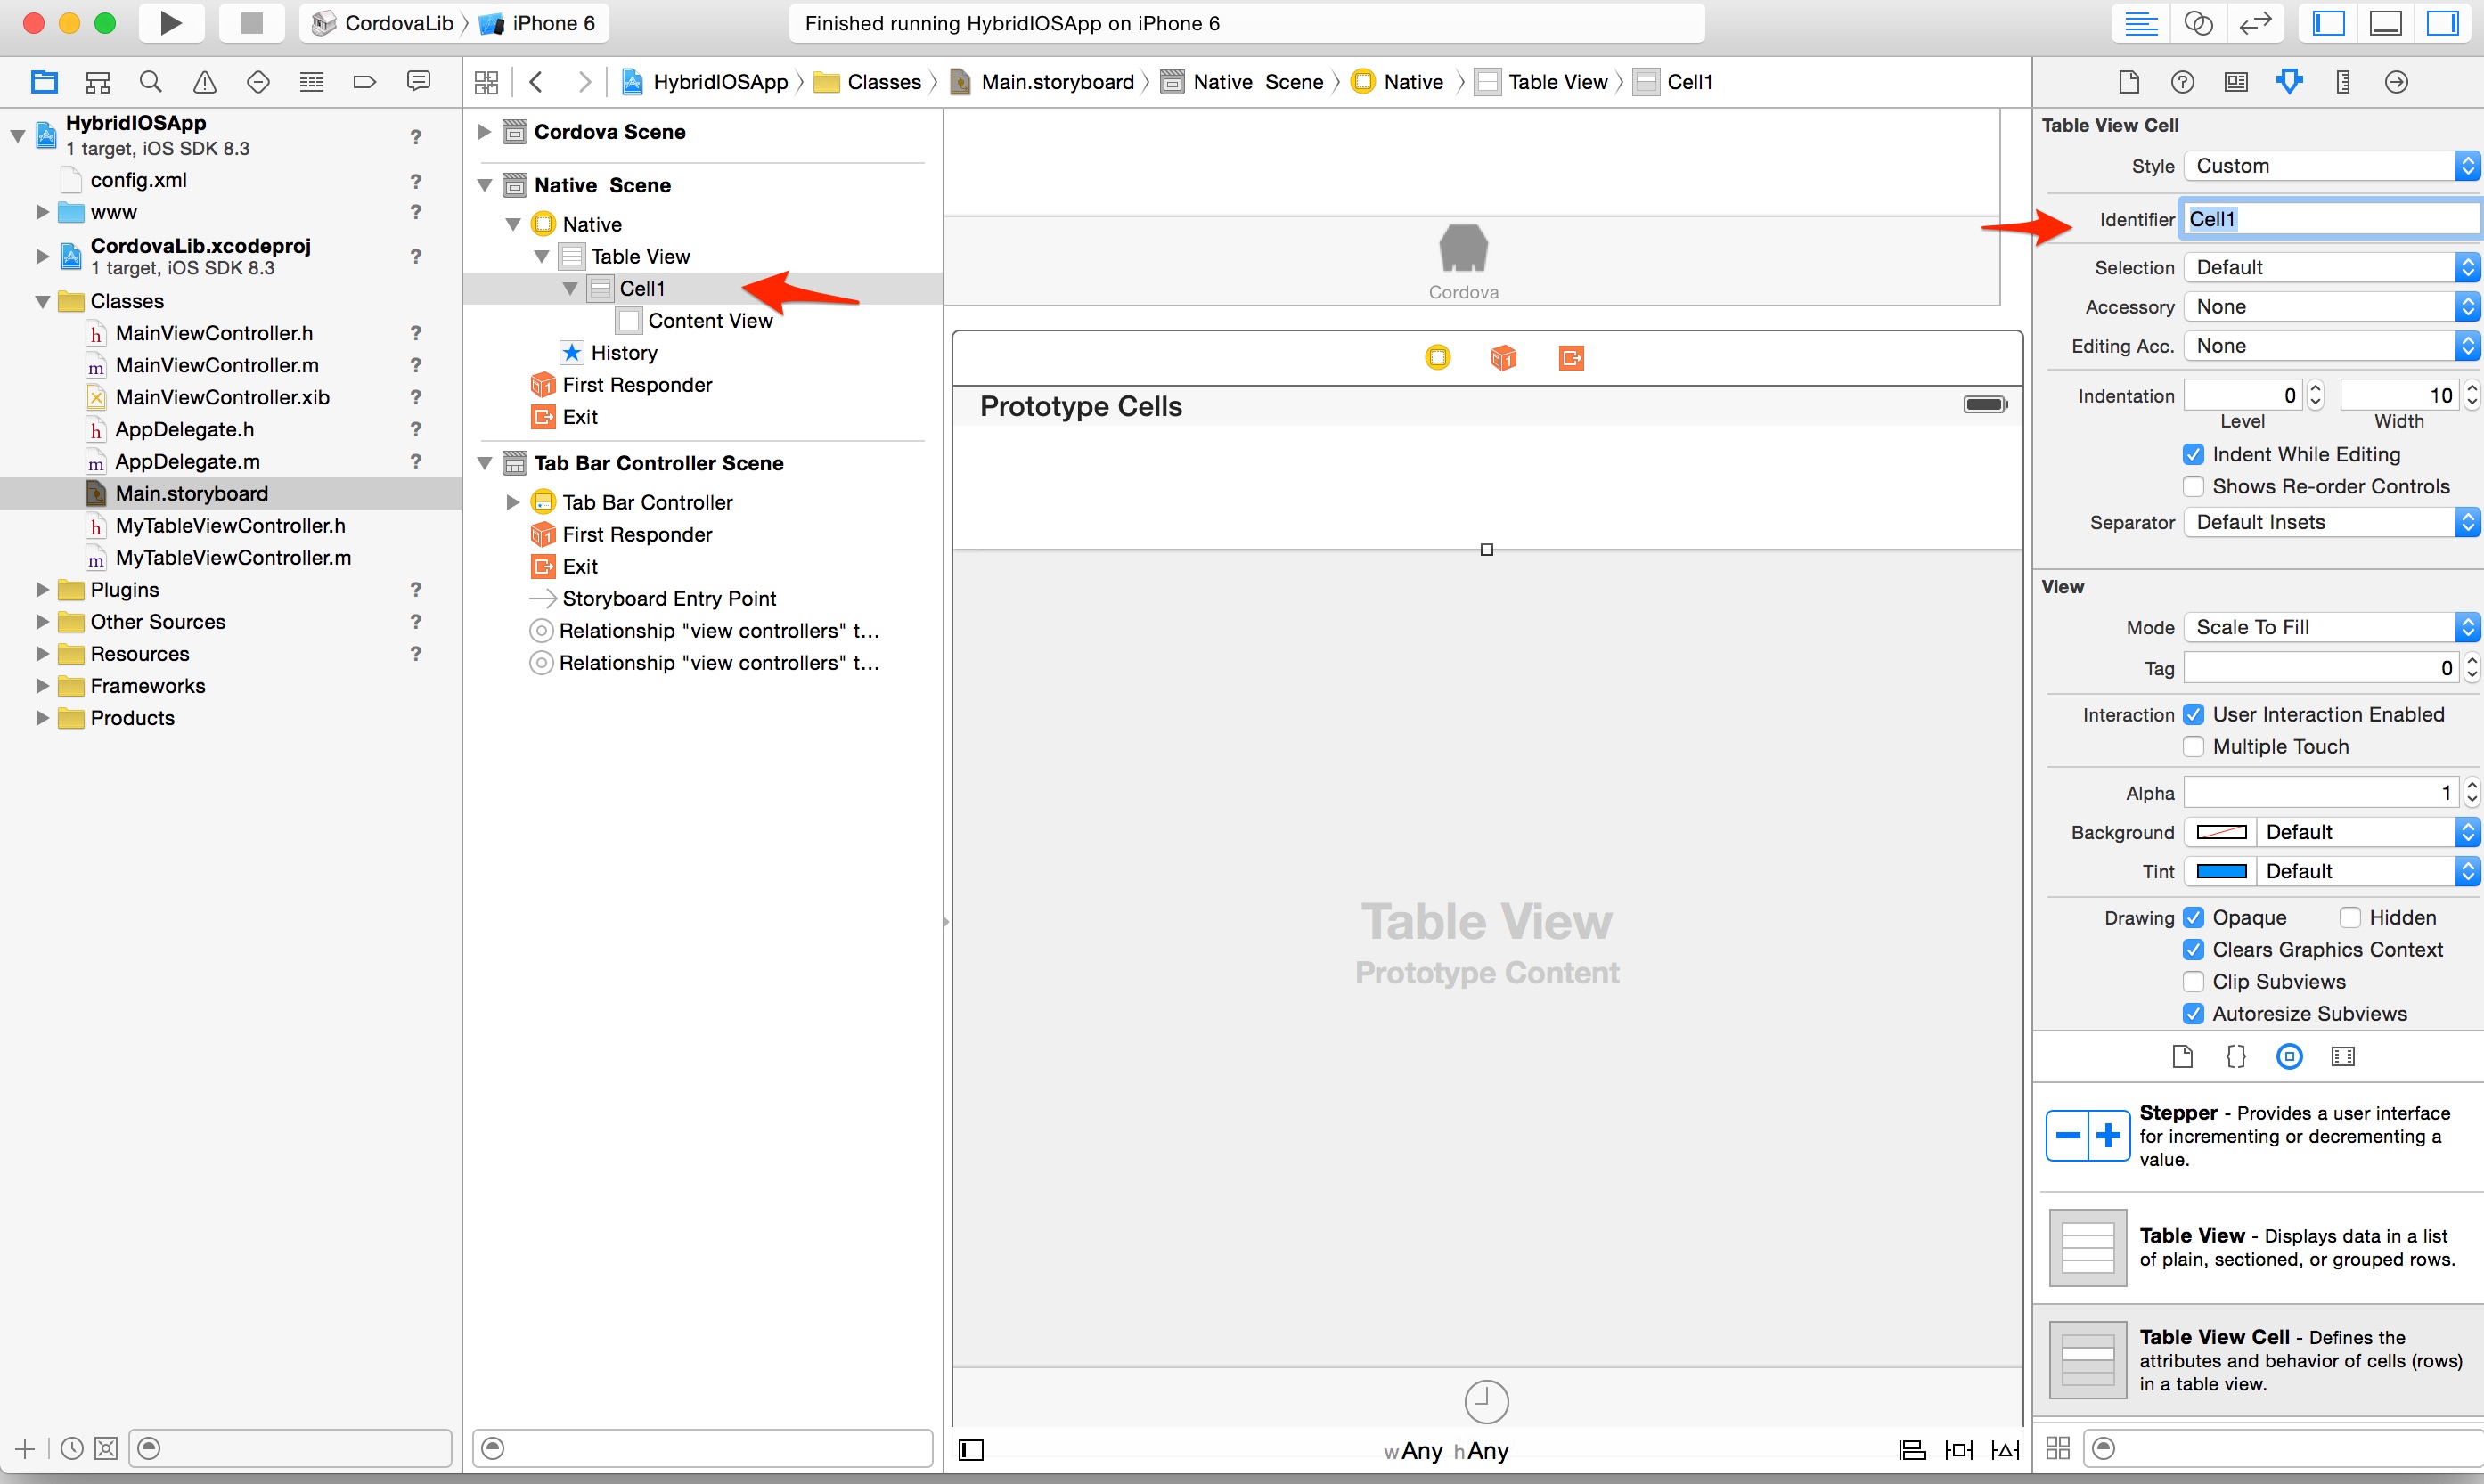
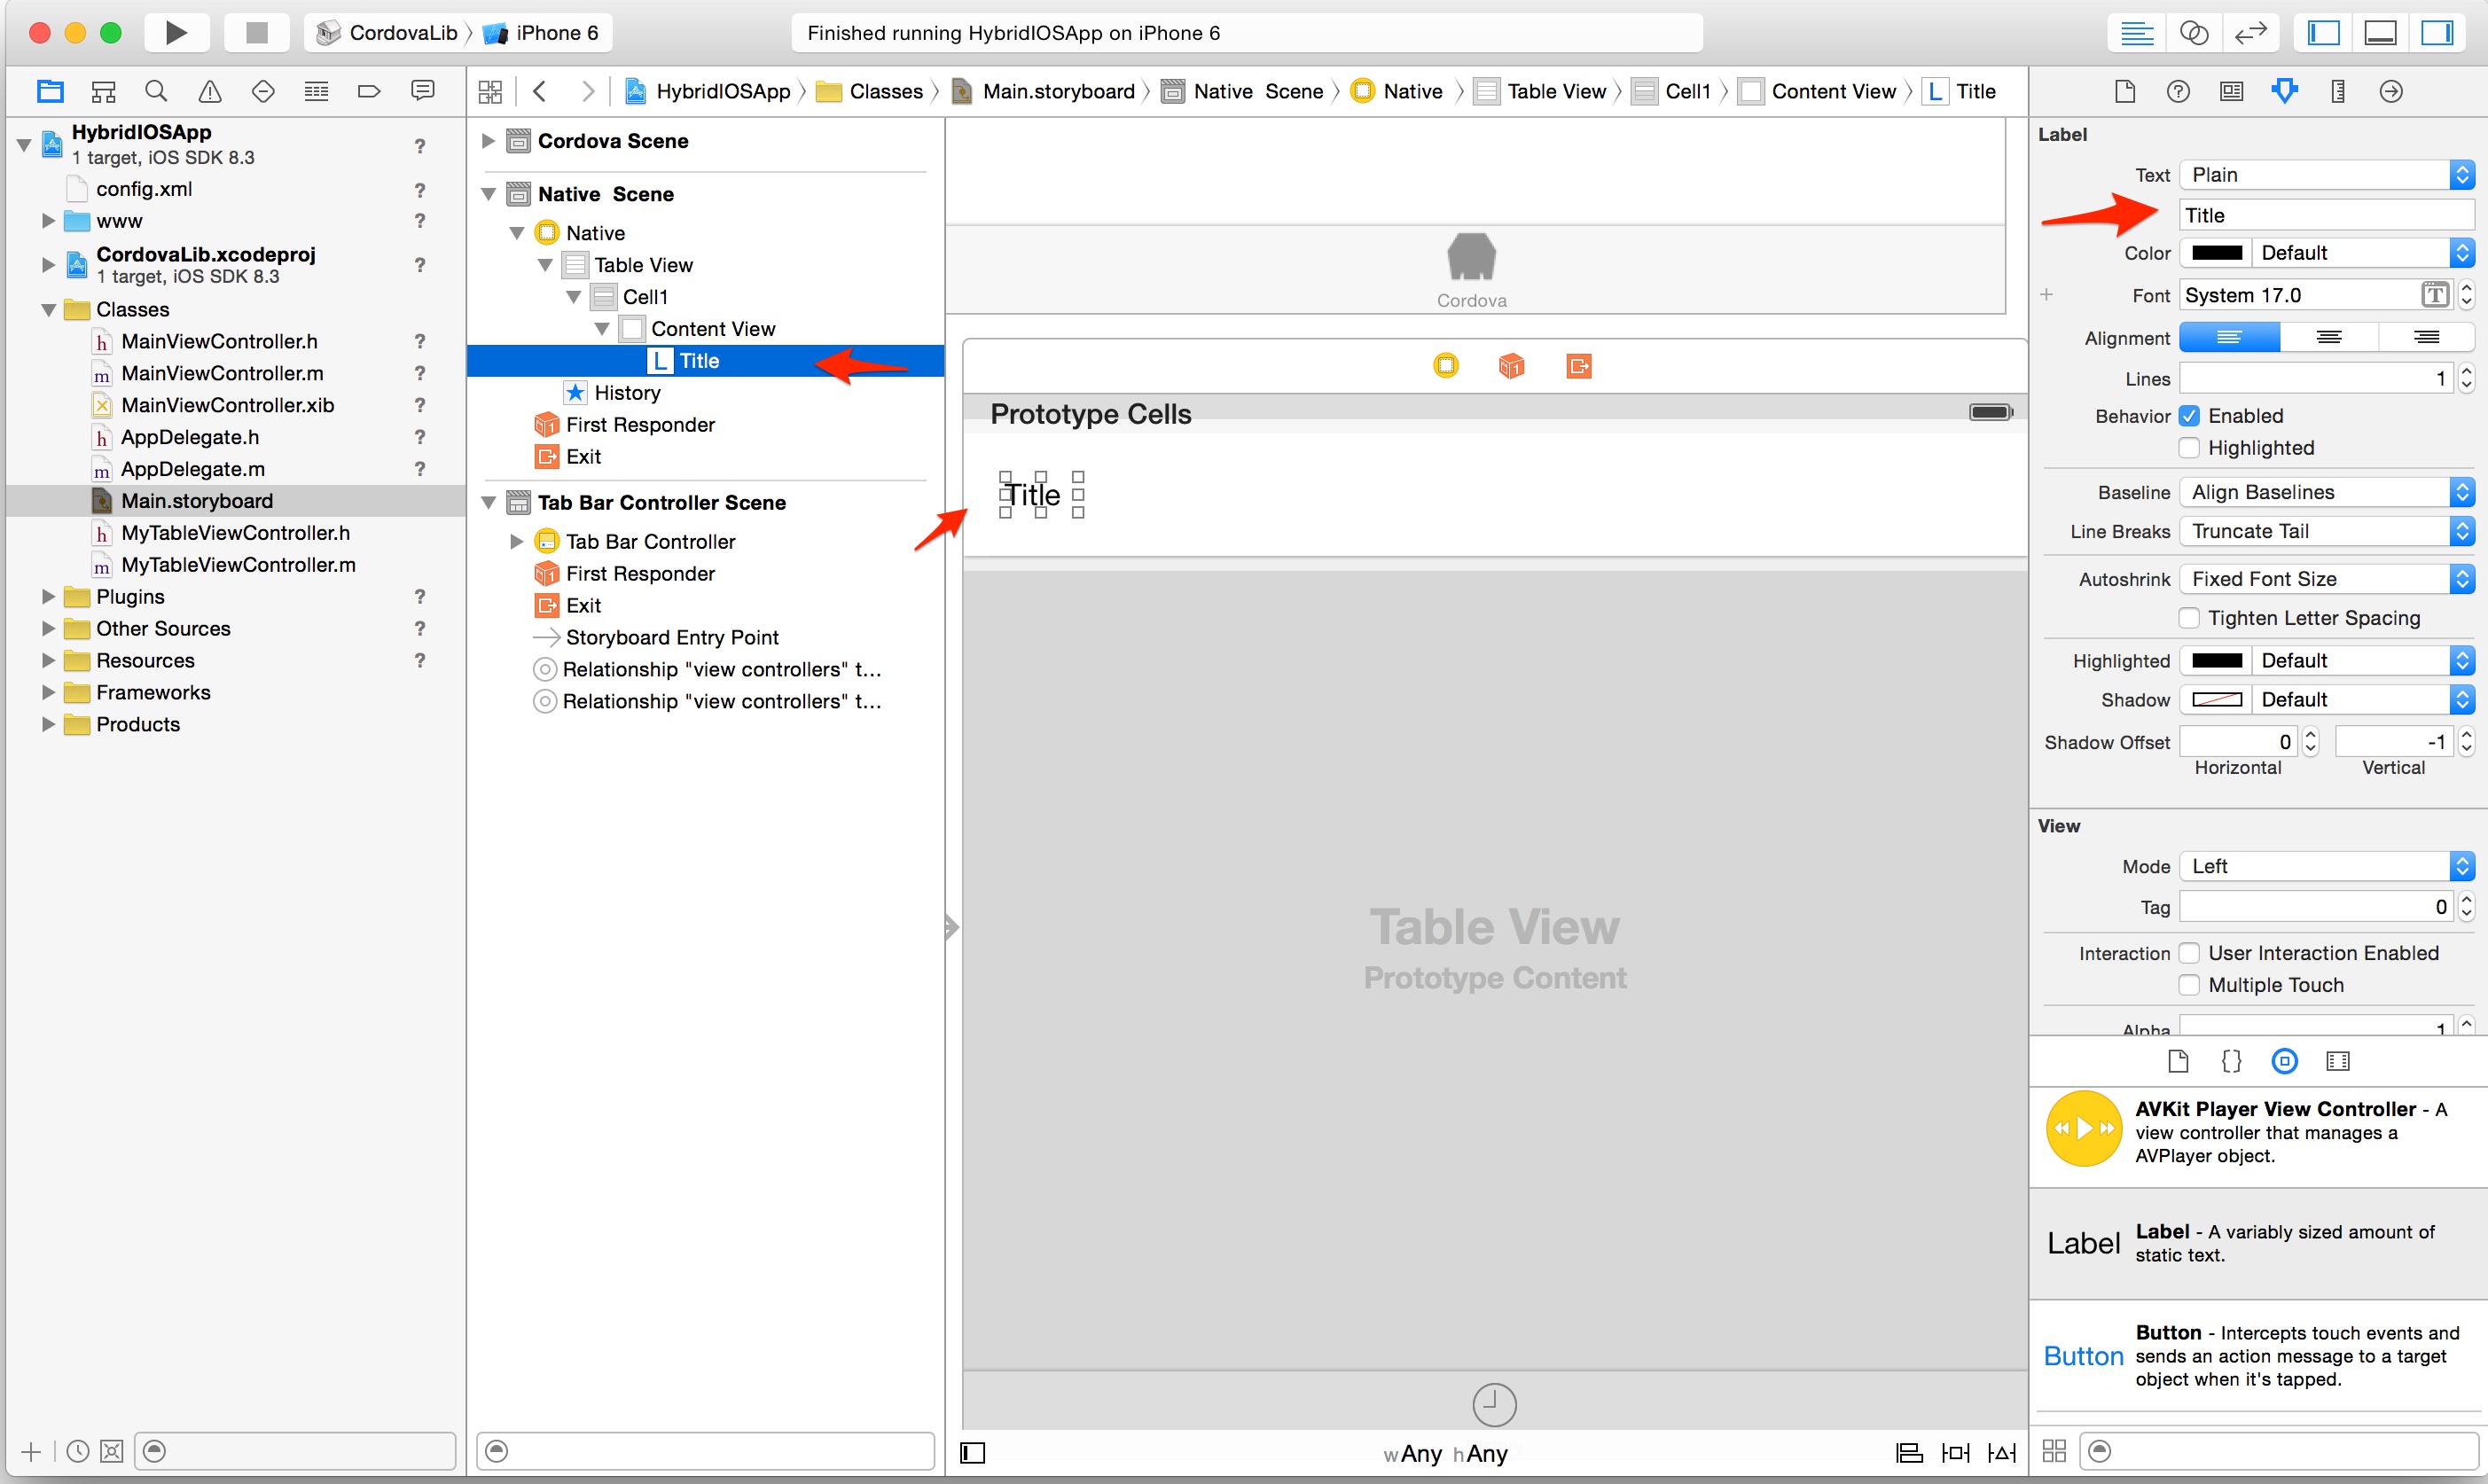
Next drag a Label on to the Table Cell View (Cell1) to represent the title of the item added. Name the new label Title and drag it over to the left to align it as shown below:
We are now done working with the Storyboard and UI. In this step we'll need to add some code handling for this new table by updating the
MyTableViewControllerheader and class.We will use an array to manage the items for the table and name the array variable bookmarks. To support the new array variable, we'll first need to define it as a property in the
MyTableViewController.hheader file.@property (nonatomic,strong) NSMutableArray* bookmarks;Next open the MyTableViewController.m class and make the following changes:
Add this new method above the
viewDidLoadmethod to initialize the bookmarks array:- (instancetype)initWithCoder:(NSCoder *)aDecoder { self = [super initWithCoder:aDecoder]; self.bookmarks = [[NSMutableArray alloc]init]; return self; }Update the
numberOfSectionsInTableViewmethod to return 1 instead of 0:- (NSInteger)numberOfSectionsInTableView:(UITableView *)tableView { return 1; }For
numberOfRowsInSection, return the current count of thebookmarksarray:- (NSInteger)tableView:(UITableView *)tableView numberOfRowsInSection:(NSInteger)section { return [self.bookmarks count]; }Lastly, uncomment and update the
cellForRowAtIndexPathto contain the following code:- (UITableViewCell *)tableView:(UITableView *)tableView cellForRowAtIndexPath:(NSIndexPath *)indexPath { UITableViewCell *cell = [tableView dequeueReusableCellWithIdentifier:@"Cell1" forIndexPath:indexPath]; cell.textLabel.text=[self.bookmarks objectAtIndex:indexPath.row]; return cell; }
Run it!
Now stop and run your application in the emulator or on your iPhone. You should see a blank table now for the Native History view as shown here:
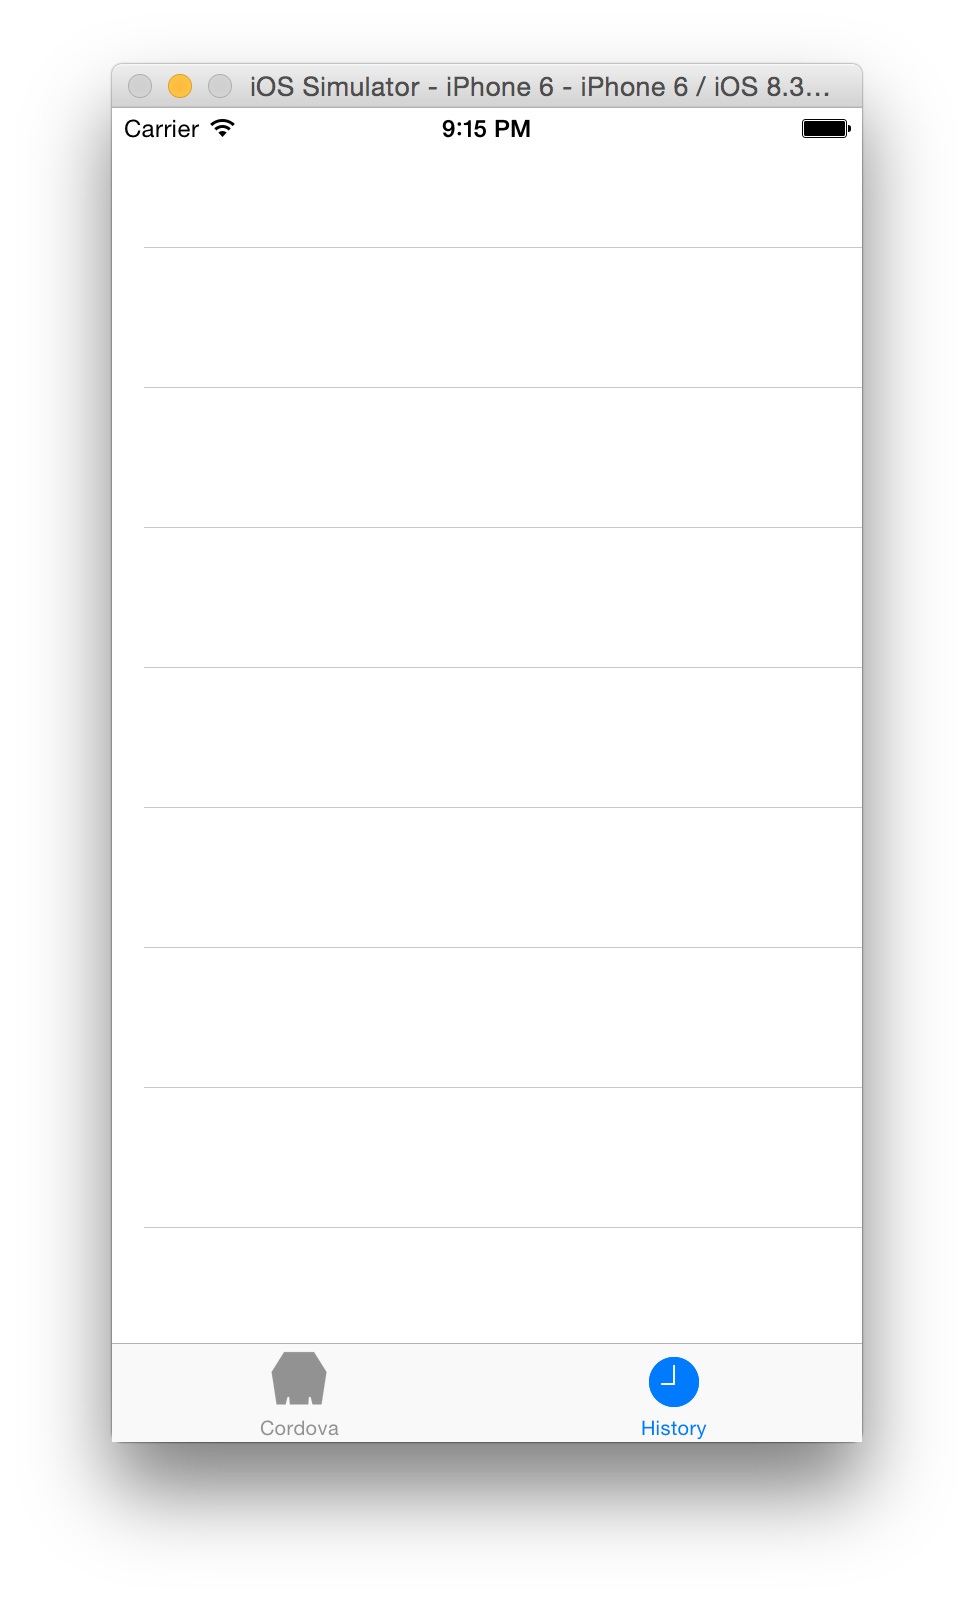
In the next lesson we'll show how you can add items to this table from a WebView button control by communication via a plugin.
Troubleshoot
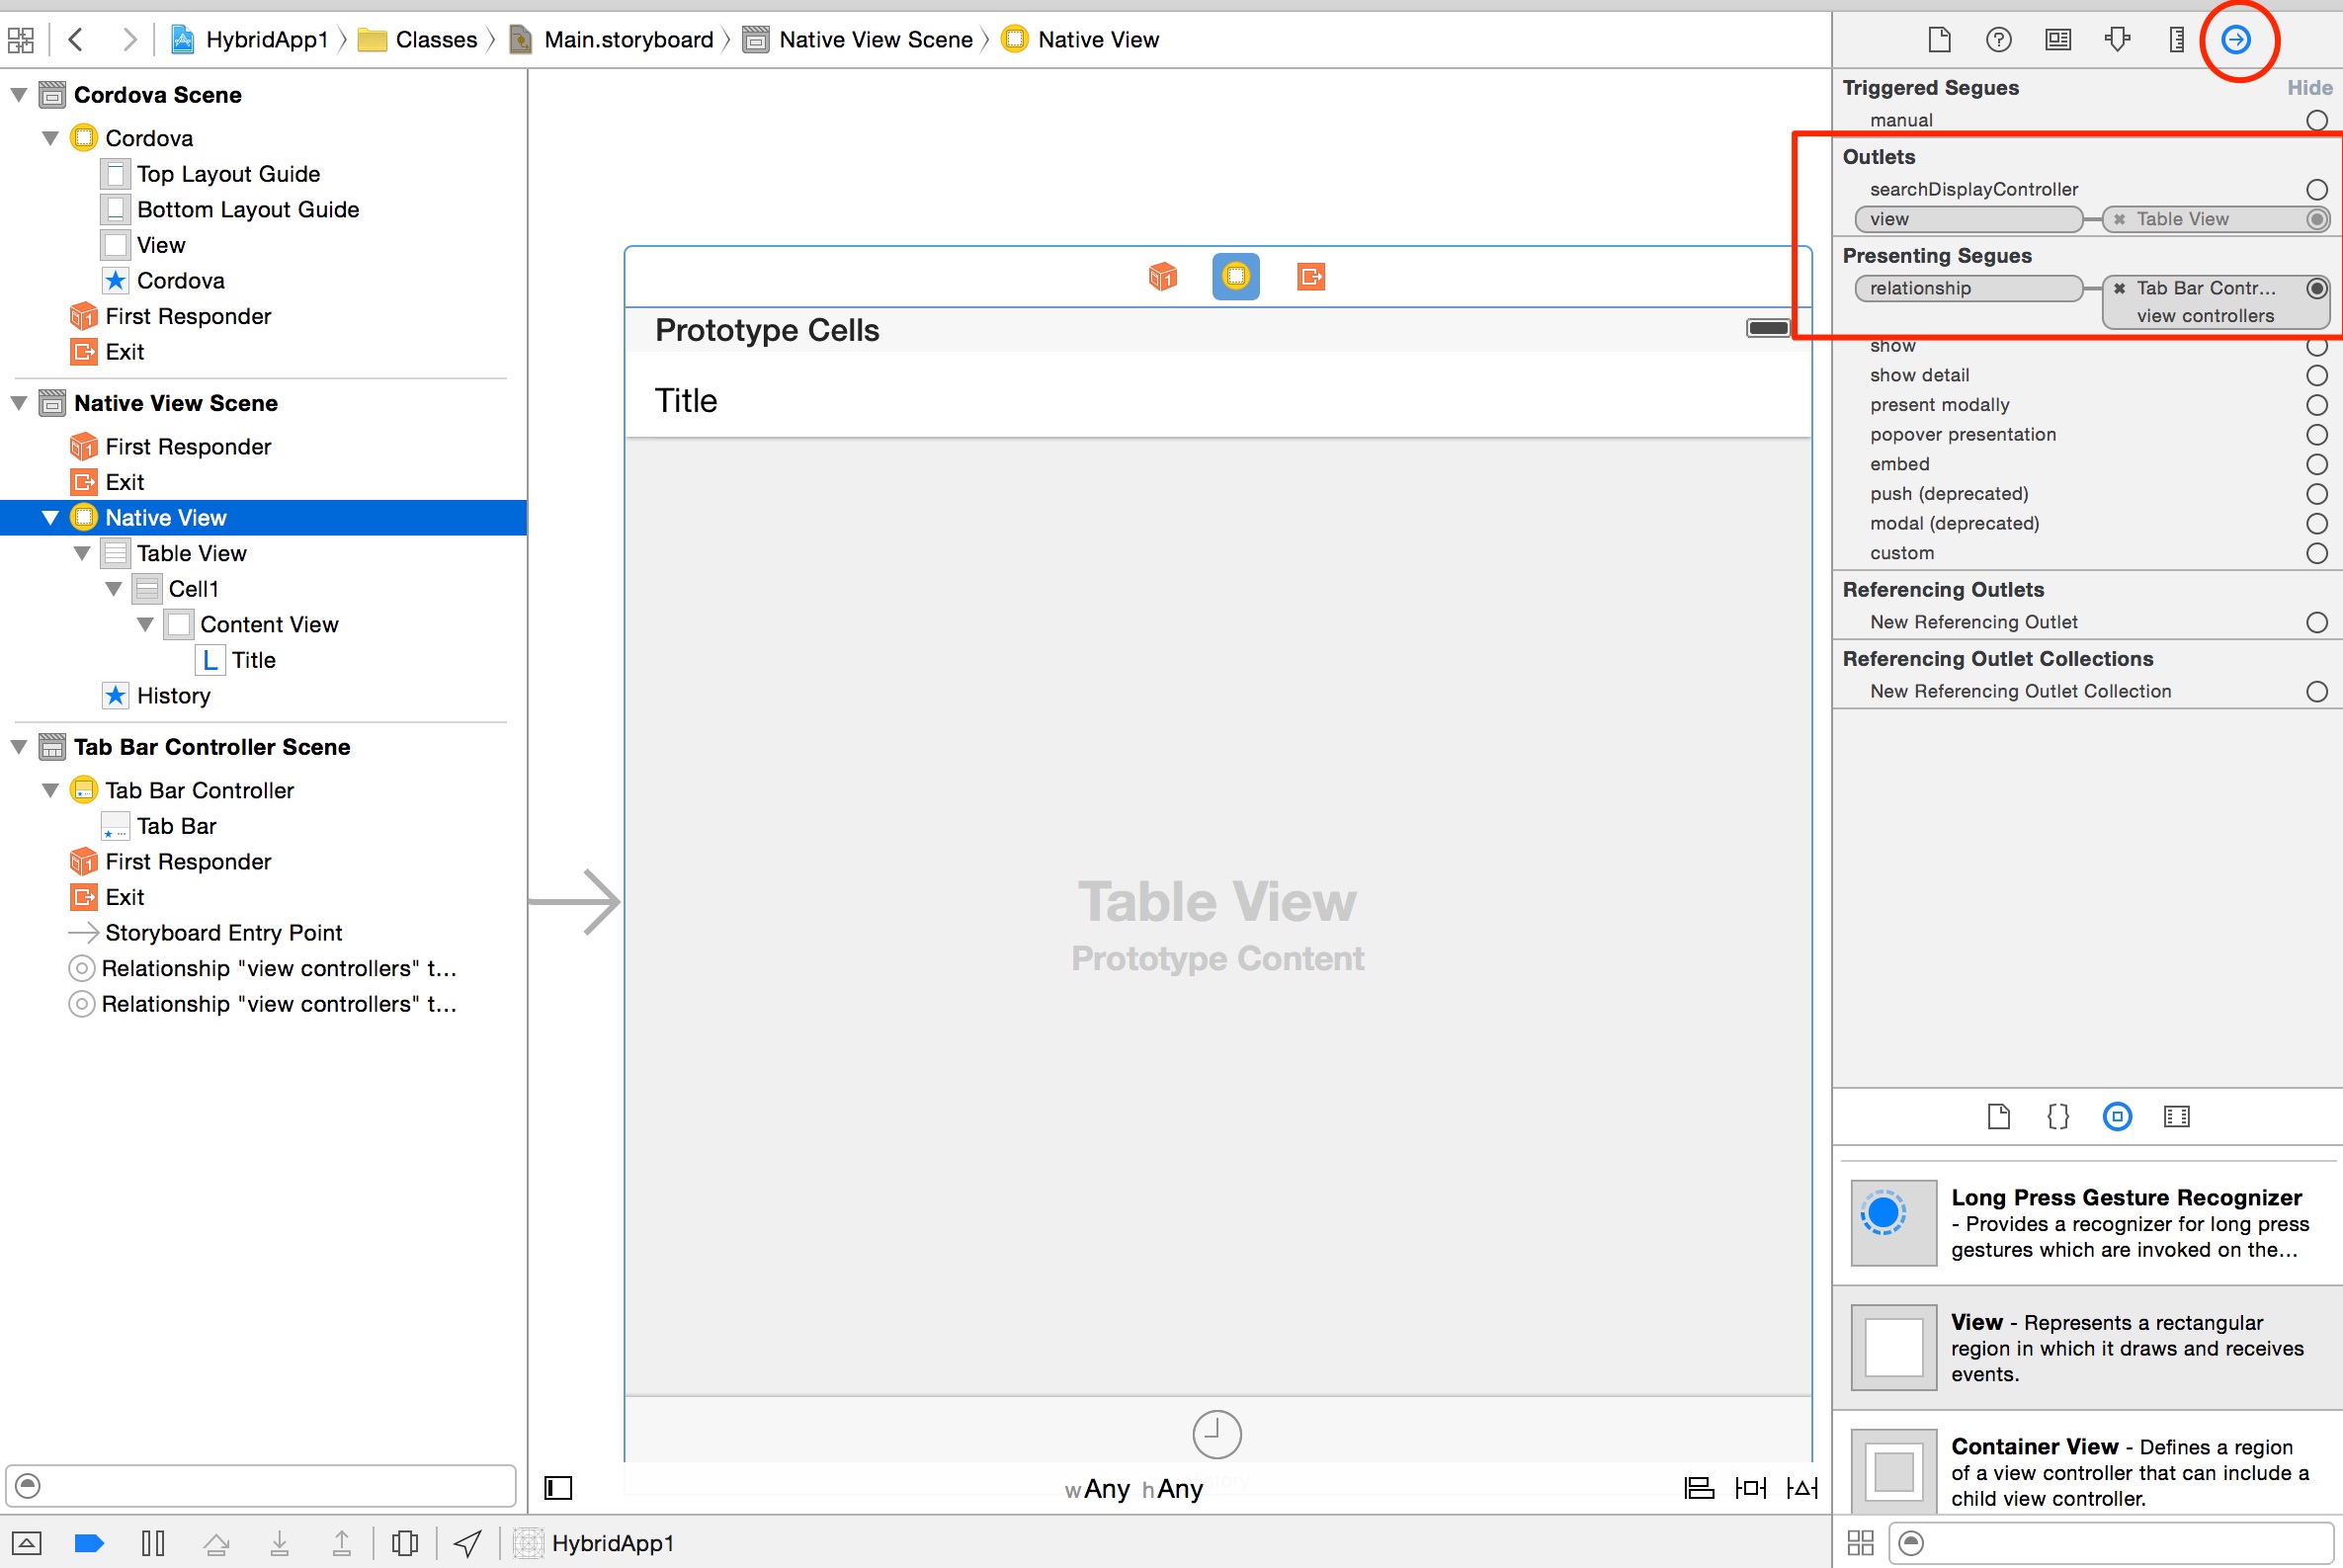
If you have any errors upon run, double check your code updates above against the sample project and ensure your Storyboard matches. You should also specifically check to ensure your Native View Controller outlets look the same as in this screenshot below and the View -> Table View is shown as an Outlet.
Also check to ensure the scheme and target device you're trying to run are properly set up in the top bar as shown here. Your app name should be set as the scheme, and the iPhone 6 simulator or your own device:

Lesson 4: Web to Native Communication
The way to communicate between the Cordova and native iOS views is via a Cordova plugin. Let's create our own custom plugin now and we'll see how we can gain access to the TableViewController to add an item to the table.
Cordova plugins for iOS extend the CDVPlugin class, can return a result using the CDVPluginResult class and are called from JavaScript via the cordova.exec interface. The exec interface signature takes callback functions for success and error, a service name, method name and an array of optional arguments as follows:
exec(<successFunction>, <failFunction>, <service>, <action>, [<args>]);The service parameter maps to the name of the iOS class to call and the action specifies the function within that class to execute using any arguments passed in from the last parameter. Upon success, the success callback function will be called, otherwise the error callback function will be called. The CDVPluginResult will hold the specific result, which can hold a variety of result types in the message. For instance, a simple result for a success status may have the form of the following where you're sending back the success status only:
pluginResult = [CDVPluginResult resultWithStatus:CDVCommandStatus_OK];or you could also pass a message string with it as follows:
pluginResult = [CDVPluginResult resultWithStatus:CDVCommandStatus_OK messageAsString:myStr];When an error results, you will likely want to pass a message or object back indicating details about the failure. Below is an example of passing a message back, but you could also pass the error status along with a message or another data type (messageAsArrayBuffer, messageAsMultipart etc).
pluginResult = [CDVPluginResult resultWithStatus:CDVCommandStatus_ERROR messageAsString:@"Arg was null"];For a list of the different result types, see this doc.
Create a Cordova Plugin
Start creating your custom plugin by going to the Xcode File -> New -> File menu and selecting Cocoa Touch. Ensure to choose the CDVPlugin as the subclass for your new plugin and name it something like MyHybridPlugin and save into your Classes folder.
Now update the MyHybridPlugin.h header file to look like the following:
#import <Cordova/CDVPlugin.h>

  @interface MyHybridPlugin : CDVPlugin
      - (void)addBookmark:(CDVInvokedUrlCommand*) command;
@endNext open the MyHybridPlugin.m class file and modify it to the following:
#import "MyHybridPlugin.h"
#import "MainViewController.h"
#import "MyTableViewController.h"

@implementation MyHybridPlugin
    -(void)addBookmark:(CDVInvokedUrlCommand*) command {
        NSString* bookmark = [command.arguments objectAtIndex:0];

        if(bookmark) {
            NSLog(@"addBookmark %@", bookmark);
            MainViewController* mvc = (MainViewController*)[self viewController];

            MyTableViewController* tvc = (MyTableViewController*)mvc.tabBarController.viewControllers[1];
            [tvc.bookmarks addObject:bookmark];
            [tvc.tableView reloadData];
            CDVPluginResult* pluginResult = [CDVPluginResult resultWithStatus:CDVCommandStatus_OK];
            [self.commandDelegate sendPluginResult:pluginResult callbackId:command.callbackId];
        } else {
            CDVPluginResult* pluginResult = [CDVPluginResult resultWithStatus:CDVCommandStatus_ERROR];
            [self.commandDelegate sendPluginResult:pluginResult callbackId:command.callbackId];
        }
    }
@end
Code Dissection
Here's an explanation of what is happening above...
Since we're running in the
MainViewControllerwhen the button is clicked, we can get access to that controller via this line:MainViewController* mvc = (MainViewController*)[self viewController];Now we'll use our
MainViewControllerobject to gain access to ourTabBarControllerand subsequently the native viewTableViewControllerobject via it'sViewControllerarray at index 1 (MainViewControlleris at index 0).MyTableViewController* tvc = (MyTableViewController*)mvc.tabBarController.viewControllers[1];Next we'll add a bookmark object to the array of bookmarks held in the
TableViewControllerobject:[tvc.bookmarks addObject:bookmark];Now we'll call the
reloadDatafunction to reload the data in the table view since the array (the datasource) has changed.[tvc.tableView reloadData];Lastly we'll form our Plugin Result via the
CDVPluginResultclasses discussed previously in this guide and return the plugin result status back using thecommandDelegate:CDVPluginResult* pluginResult = [CDVPluginResult resultWithStatus:CDVCommandStatus_OK]; [self.commandDelegate sendPluginResult:pluginResult callbackId:command.callbackId]; } else { CDVPluginResult* pluginResult = [CDVPluginResult resultWithStatus:CDVCommandStatus_ERROR]; [self.commandDelegate sendPluginResult:pluginResult callbackId:command.callbackId]; }
cordova.exec(win, fail, "MyHybridPlugin", "addBookmark", [bookmark]);Use the Plugin
Now open your Cordova index.js file located in the project under the
www/jsfolder and add a method on the JavaScript side calledaddBookmarkthat will call theaddBookmarkmethod in the plugin via theexeccall (highlighted in red).addBookmark: function() { var win = function(d) { console.log("Bookmark added!"); }; var fail = function(e) { console.log(e) } var bookmark = document.getElementById("bookmark").value; cordova.exec(win, fail, "MyHybridPlugin", "addBookmark", [bookmark]); }Open index.html and replace the
divcontents with a new text input and button:<div class="app"> <label for="bookmark">Bookmark this:</label> <input id="bookmark" type="text" /> <button id="bookmarkBtn">Add a bookmark</button> </div>Now go back into index.js and in the
onDeviceReadyfunction, delete or comment out thereceivedEventcall (since we removed the corresponding code from index.html in the previous step) and add the following line to call ouraddBookmarkfunction when the button is clicked:onDeviceReady: function() { //app.receivedEvent('deviceready'); document.getElementById("bookmarkBtn").onclick = app.addBookmark; },None of this will work yet until we update our config.xml file with the new plugin details in the form of a
<feature/>tag so it knows it's a valid plugin and how to reference it. Open the config.xml file located in the project at the same level as theClassesfolder we've been working out of (at path:HybridIOSApp/HybridIOSApp/config.xml) and add the following lines in the same area as any other feature elements already added if you added other plugins. (Since we didn't use a tool like plugman or the CLI to add our plugin, we must do this step manually).<feature name="MyHybridPlugin"> <param name="ios-package" value="MyHybridPlugin" /> </feature>Run your app now and ensure you can enter text into the input field on the Cordova screen, click the Add a bookmark button and see it added into your native view. Keep adding items and see them added into your native table view!

Conclusion
While it may not be the most aesthetically pleasing looking app, it illustrates how easily you can combine native and webview elements to get you thinking about more options in approaching this for your own hybrid app development!
Edit this page on GitHub