Introducing PhoneGap Build
Adobe® PhoneGap™ Build is a web service that compiles PhoneGap apps for you remotely, making downloadable packages available in a simple web interface at build.phonegap.com. If you use PhoneGap Build, you don't need to install and maintain local SDK tools for several mobile platforms, and can expect to update projects smoothly.
PhoneGap Build offers three basic development options:
You can upload your project files directly through the PhoneGap Build website.
You can link your PhoneGap Build account to your GitHub account, either public or private, then dynamically pull in remote code repositories.
You can link the
phonegapcommand-line tool to your PhoneGap Build account. Itsremoteoption allows you to compile projects on the PhoneGap Build site in a single command.
This guide provides an overview of the first two options, with basic
details on how to set up an account, link it to a code repository,
import projects, compile them, download packaged apps, and install
them wirelessly onto a device. Whichever option you choose, the CLI
offers the easiest way to set up the project's required top-level
www project directory, with its config.xml package specification
and its index.html home page. See The Command-line Interface for
information on how to use the CLI to generate a new project, and for
details on how to build local projects remotely from the command line.
Once you have set up your PhoneGap Build account and generated projects as described below, see the following sections for more advanced options:
Remote Collaboration and Testing shows how you can use the site to grant access rights to software testers, with the option for them to automatically download the latest version of the app.
Remote Debugging Tools shows how to configure PhoneGap Build's debugging options, or use a custom debug server.
Configuring Remote Builds details config.xml options that are only available for PhoneGap Build.
Signing Apps in PhoneGap Build shows the tools PhoneGap Build offers to help you sign Android and iOS builds so that they are ready to submit to the Android Market and the iTunes store.
Upgrading to PhoneGap 3.0 shows how to adapt projects to PhoneGap Build's latest PhoneGap back end.
The PhoneGap Build API details how an application can communicate with the PhoneGap Build service to compile PhoneGap projects.
Adding an App
Register for a new account at build.phonegap.com, specified by a unique email/password pair, or using the same credentials as in your GitHub account.
Once logged in for the first time, you are prompted to create a new app, either open-source or from private source:
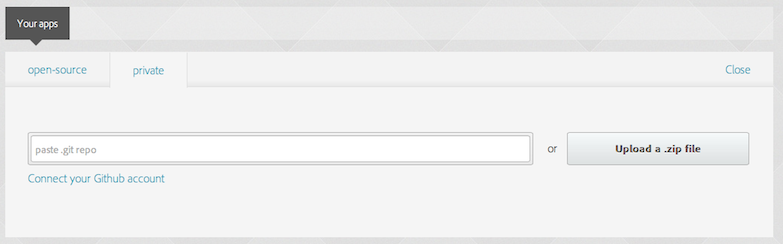
Choosing the private tab allows you to upload a .zip archive of
the source code, whose directory contains web assets such as a
config.xml file for the app's metadata, and an index.html for the
home page. You can use the phonegap CLI tool to create the project's
top-level www directory, then send an archive:
    $ cd /path/to/my/development/directories
    $ phonegap create hello com.example.hello HelloWorld
    $ ls hello
    merges    platforms     plugins         www
    $ ls hello/www
    config.xml   icon.png   index.html      res             spec.html
    css          img        js              spec
    $ cd hello
    $ zip -r hello.zip www
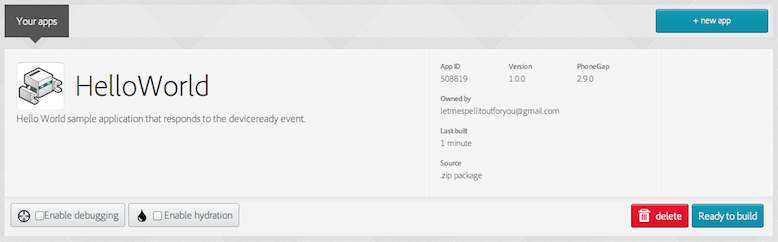
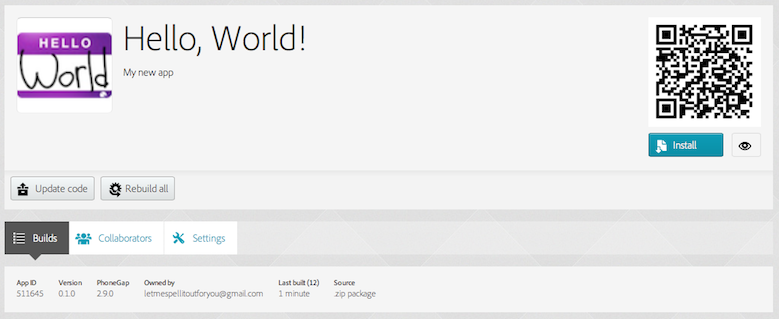
Once you upload the hello.zip archive, the site displays metadata
from the app's config.xml file, specified by the <name>,
<description>, and <icon> elements, and the <widget version=""/>
attribute. At this point, it is Ready to Build:
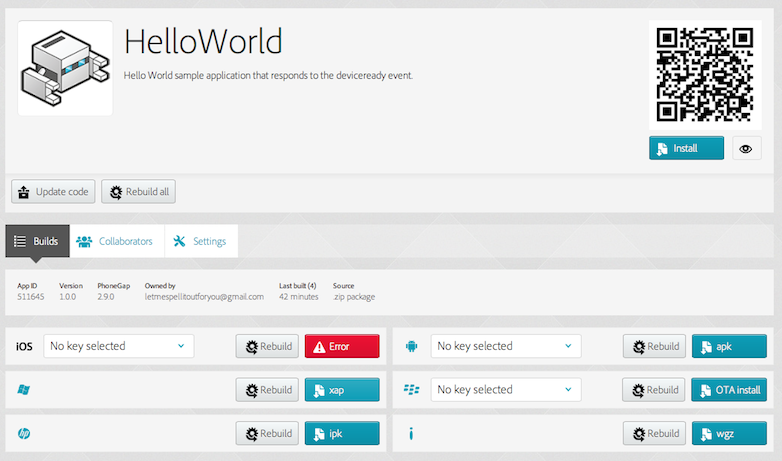
Once you build the app, the site compiles each platform, which may take a couple of minutes, and makes downloads available once they're done:
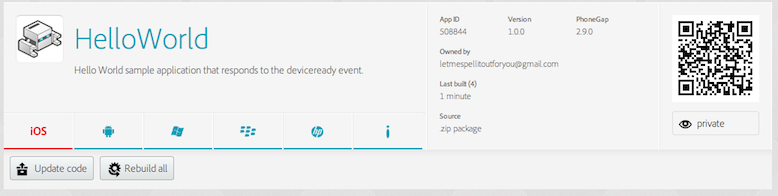
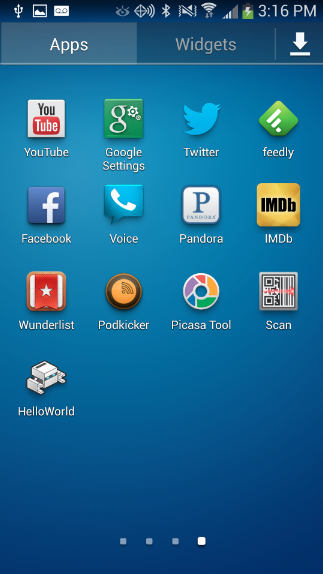
Click on each platform's link to download each package. Otherwise, while testing your app, the QR code image on the right of the panel offers an easy way to install it onto the device. Using a QR-reading app on iOS, Android, or BlackBerry devices, scan the image directly from your computer screen. The app loads wirelessly and prompts you to install it. It then becomes available on the home screen:
Note that you may have to change device settings to allow you to install apps in this manner, outside of the customary app-store interface.
If you replace the icon.png file and make a few changes to the app's
metadata in the config.xml, they're reflected on the site the next
time you upload the code:
Those changes also reflect when you re-install onto a device:

As you can see, the interface is very easy to use. After you have built an app, clicking on the name or icon allows you to rebuild each platform independently:
To delete an app from the PhoneGap Build site after initially building it, scroll to the bottom of the Settings tab, which otherwise displays the app's basic metadata.
Building from a Repository
Uploading a .zip archive as described above can be awfully time-consuming. As an alternative, you can link a newly created app to a GitHub repository, either open-source or private.
To do so, make sure you have a viable repository URL. On your GitHub page, go to the Repositories tab and navigate to the app's repository, creating a new one if necessary. The URL link displays in the sidebar:

Here is a simple way to use the PhoneGap CLI to create a new project on your local machine (as described in The Command-line Interface), then link it to a GitHub repository:
    $ cd /path/to/my/development/directories
    $ phonegap create hello com.example.hello HelloWorld
    $ cd hello
      # use this Markdown file to document the app on the GitHub site:
    $ touch README.md
    $ git init
    $ git add .
    $ git commit -am "bootstrap default app"
    $ git remote add origin https://github.com/ulothrix/hello.git
    $ git push -u origin master
Then, after modifying code and other local assets, commit the code and push it to your GitHub repository:
    $ git commit -am "modified app"
    $ git push
On the PhoneGap Build site, press Update Code to pull the latest master branch, and Rebuild All to generate application packages from the updated code.
Add Features for Remotely Built Projects
The most recent version of PhoneGap implements basic device APIs using
a system of added plugins. The version used in PhoneGap Build
(2.9.0) uses a somewhat different
system based on project settings. To enable device APIs for projects
compiled with PhoneGap Build, place any of the following <gap:plugin/>
elements in the project's top-level config.xml file:
-
Basic device information (Device API):
<gap:plugin name="Device" value="org.apache.cordova.core.Device"/> -
Network Connection and Battery Events:
<gap:plugin name="NetworkStatus" value="org.apache.cordova.core.NetworkManager" /> <gap:plugin name="Battery" value="org.apache.cordova.core.BatteryListener" /> -
Accelerometer, Compass, and Geolocation:
<gap:plugin name="Accelerometer" value="org.apache.cordova.core.AccelListener" /> <gap:plugin name="Compass" value="org.apache.cordova.core.CompassListener" /> <gap:plugin name="Geolocation" value="org.apache.cordova.core.GeoBroker" /> -
Camera, Media playback and Capture:
<gap:plugin name="Camera" value="org.apache.cordova.core.CameraLauncher" /> <gap:plugin name="Media" value="org.apache.cordova.core.AudioHandler" /> <gap:plugin name="Capture" value="org.apache.cordova.core.Capture" /> -
Access files on device or network (File API):
<gap:plugin name="File" value="org.apache.cordova.core.FileUtils" /> <gap:plugin name="FileTransfer" value="org.apache.cordova.core.FileTransfer" /> -
Notification via dialog box or vibration:
<gap:plugin name="Notification" value="org.apache.cordova.core.Notification" /> <gap:plugin name="Vibration" value="org.apache.cordova.core.Vibration" /> -
Contacts:
<gap:plugin name="Contacts" value="org.apache.cordova.core.ContactManager" /> -
Globalization:
<gap:plugin name="Globalization" value="org.apache.cordova.core.globalization" /> -
Splashscreen:
<gap:plugin name="SplashScreen" value="org.apache.cordova.core.SplashScreen" /> -
Open new browser windows (InAppBrowser):
<gap:plugin name="InAppBrowser" value="org.apache.cordova.core.InAppBrowser" />
See The config.xml File for information about other application settings you can configure.
NOTE: PhoneGap Build does not allow you to compile custom plugin interfaces to native components, as discussed in the Plugin Development Guide. The CLI-based workflow described in The Command-line Interface supports this feature. PhoneGap Build also does not support the CLI's merges feature that allows you to target files for specific platforms.