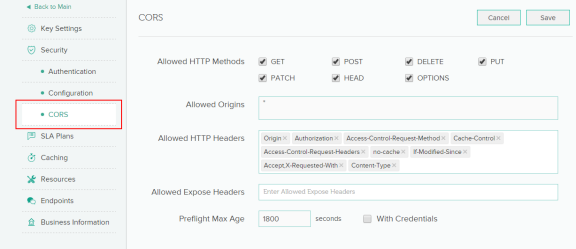
CORS allows restricted resources in the API to be accessed from another domain. CORS is a standard mechanism that allows JavaScript calls executed in a web page to interact with resources originating from an external domain. All known browsers enforce this policy.
Allowed HTTP Methods - A list of HTTP methods that are allowed, for example, GET, PUT, POST, and so forth.
Allowed Origins - Represents the origin of a request or *. For a request to be allowed cross-domain, add the header specified in Allowed Origins to the request. For example, if the server responds with allowed origin as http://examplerest.com, then only requests from http://examplerest.com are allowed.
Note: The Access-Control-Allow Origin Header should contain the list of origins that can use this API from the browser. The header also allows a wildcard value * adding it would allow any website can invoke this API and retrieve the response. The wild card value can be abused in some cases like where an external website part of internet can be able to consume the API which is part of Intranet zone.
Allowed HTTP Headers - A list of allowable custom request headers, for example, Origin, Content-Type, and so forth.
Allowed Expose Headers - Specify the headers you want to grant explicit permissions so that the client can read those headers. Doing so ensures that the client triggers a cross-origin request.
Preflight Max Age - Specify the amount of time (in seconds) for the browser to cache the response to a request.
Example
For example, you want to GET data from http://api.examplerest.com/user from http://examplerest.com. There is an access token, xyz123, that you can pass in the Authorization header to authenticate the request.
The browser sends an OPTIONS request to the server with the following header:
OPTIONS /user
Origin: http://www.examplerest.com
Access-Control-Request-Method: GET
Access-Control-Request-Headers: Authorization
Since you want to allow the request, you respond to the request with the header:
Allowed-Origin: http://www.examplerest.com
Allowed HTTP Headers: AUTHORIZATION
Allowed HTTP Methods: GET
The browser now sends the GET request to your server where the API is hosted.