Virtual Camera recording/playback controls
The Virtual Camera app works in two different modes, which display different interface controls.
| Mode | Purpose |
|---|---|
| Live | Preview the scene through the camera, and record live takes. |
| Playback | Manage and play back your recorded takes. |
Live mode interface
Use the Live mode to preview the scene through the camera, record live takes, and iterate on recorded takes.
Note: To enter Live mode when the app is in Playback mode, press the
button at the right or bottom right of the screen.
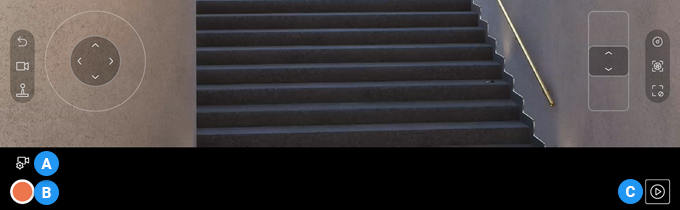
| Name | Function | |
|---|---|---|
| A | Take Configuration button | Open the Take configuration window to Configure the take system for iterative recording. The appearance of this button depends on the current take configuration state. |
| B | Record button | Start or stop the recording of a new take, according to the current Take Configuration. When you start a recording, the app displays a pre-recording countdown and then sends a command to the Unity Editor to start recording a take. |
| C | Playback mode button | Enter Playback mode. |
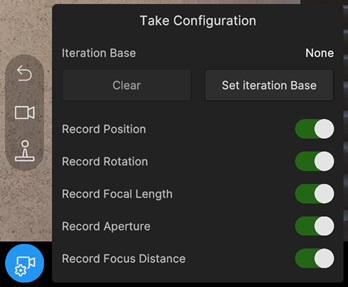
Take Configuration
Use the Take Configuration window to configure the Take System for iterative recording.
Iterative recording consists in recording a new take based on a take you already recorded (named base take) and override specific channels that correspond to camera properties: position, rotation, focal length, aperture, and focus distance.
Iteration base setup
Use these properties to manage the selection of a base take for iterative recording.
| Property | Description |
|---|---|
| Iteration Base | The take currently selected as the base take for the iterative recording. "None" means no take is currently selected, and the take system is set up to record independent takes. |
| Clear | Clears the Iteration Base selection. |
| Set Iteration Base | Lets you select a take to use as the base take for iterative recording. This button opens a gallery view of available takes. Select the take to use as the iteration base and press Done to complete the selection. |
Recording channels
Use these properties to enable or disable the channels you need to override or not in the next take recording iteration.
| Property | Description |
|---|---|
| Record Position | Enables or disables the override of the base take's Position channel when recording. |
| Record Rotation | Enables or disables the override of the base take's Rotation channel when recording. |
| Record Focal Length | Enables or disables the override of the base take's Focal Length channel when recording. |
| Record Aperture | Enables or disables the override of the base take's Aperture channel when recording. |
| Record Focus Distance | Enables or disables the override of the base take's Focus Distance channel when recording. |
Take Configuration button status
The appearance of the Take Configuration button depends on the current overall status of the recording channels.
| Appearance | Meaning |
|---|---|
 |
One or more recording channels are disabled. |
 |
All recording channels are enabled. |
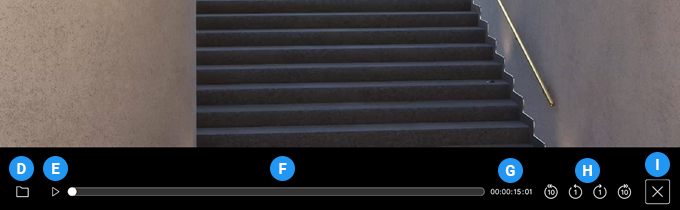
Playback mode interface
Use the Playback mode to play back your recorded takes and manage your Take Library.
Note: To enter Playback mode when the app is in Live mode, press the
button at the right or bottom right of the screen.
| Name | Function | |
|---|---|---|
| D | Take Library button | Opens or closes the Take Library, where you can select and manage your recorded takes. |
| E | Play/pause button | Start or pause the playback of the currently selected take. When you just recorded a take, it is selected by default, but you can select any other recorded take from the Take Library. |
| F | Timeline | Monitor the time progression of the playing take. Use the playhead to scrub through the take. |
| G | Timecode | The current take timecode (hr:min:sec:frame) according to the playhead position in the timeline. |
| H | Frame skip buttons | Four buttons to skip one or ten frames forward or backward when playing back a take. |
| I | Playback mode exit button | Exit Playback mode and re-enter Live mode. |
Note: If you don't see any playback controls (E, F, G, and H), it means no take is currently selected.
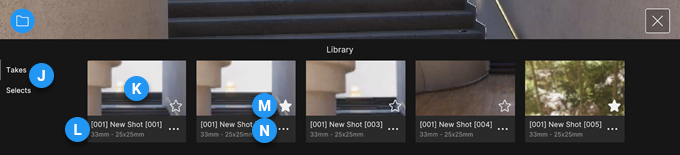
Take Library
Use the Take Library to select a specific take for playback and to manage all your recorded takes. Each take displays as a thumbnail with basic information and management options.
| Name | Function | |
|---|---|---|
| J | Filtering views | Allow you to display the recorded takes according to the rating you gave them: • Takes: displays all your recorded takes. • Selects: displays only the takes you marked with a star. |
| K | Take screenshot | Screenshot of the first frame in the take. |
| L | Take information | Basic information about the take: • Take name • Initial focal length - Sensor size |
| M | Star icon | Mark or unmark a take as favorite. When you mark a take with a star, it appears in both the Takes and Selects views. |
| N | Take menu icon | Access other take properties and management options: • Rename: opens a window to edit the take name and description. • Metadata: opens a window displaying the take metadata, such as the recording date, take length, lens properties, and camera settings. • Delete: deletes the take, after confirmation. |