For the complete experience, please enable JavaScript in your browser. Thank you!

  • Creative Cloud
  • Photoshop
  • Illustrator
  • InDesign
  • Premiere Pro
  • After Effects
  • Lightroom
  • See all
  • See plans for: businesses photographers students
  • Document Cloud
  • Acrobat DC
  • eSign
  • Stock
  • Elements
  • Marketing Cloud
  • Analytics
  • Audience Manager
  • Campaign
  • Experience Manager
  • Media Optimizer
  • Target
  • See all
  • Acrobat Reader DC
  • Adobe Flash Player
  • Adobe AIR
  • Adobe Shockwave Player
  • All products
  • Creative Cloud
  • Individuals
  • Photographers
  • Students and Teachers
  • Business
  • Schools and Universities
  • Marketing Cloud
  • Document Cloud
  • Stock
  • Elements
  • All products
  • Get Support
    Find answers quickly. Contact us if you need to.
    Start now >
  • Learn the apps
    Get started or learn new ways to work.
    Learn now >
  • Ask the community
    Post questions and get answers from experts.
    Start now >
    • About Us
    • Careers At Adobe
    • Investor Relations
    • Privacy  |  Security
    • Corporate Responsibility
    • Customer Showcase
    • Events
    • Contact Us
News
    • 3/22/2016
      Adobe Summit 2016: Are You An Experience Business?
    • 3/22/2016
      Adobe Announces Cross-Device Co-op to Enable People-Based Marketing
    • 3/22/2016
      Adobe and comScore Advance Digital TV and Ad Measurement
    • 3/22/2016
      Adobe Marketing Cloud Redefines TV Experience
Configuring and Administering Help / 

Administering ColdFusion Security

Adobe Community Help


Applies to

  • ColdFusion

Contact support

 
By clicking Submit, you accept the Adobe Terms of Use.
 

You can secure many Adobe ColdFusion resources using password authentication and configure sandbox security.

About ColdFusion security

Security is especially important in web-based applications, such as those you develop in ColdFusion. ColdFusion developers and administrators must fully understand the security risks that could affect their development and runtime environments so they can enable and restrict access appropriately.
Whether you have an e-commerce site where customers enter credit card information or a global collaboration site where users share confidential data, you should understand the security risks that could threaten your web applications.

  • Snooping and eavesdropping: Someone can monitor data sent over the public connections of the web.
  • User impersonation: Someone can impersonate a trusted user to gain access to information that only the trusted user should see or download.
  • Unauthorized access: Unauthorized users can gain access to sensitive information. This security risk is the most complex because the Internet links every computer to one large network. Completely allowing or disallowing access to a given system or data source is relatively straight-forward, but allowing the partial access required for an application to be useful remains risky. For example, a bank can easily publish a public, freely accessible site with general banking information. Creating an account maintenance site where users have exclusive access to their own personal account information is more difficult.
    ColdFusion provides a highly secure environment for web application development and deployment. It helps you reduce security risks in the following ways:
  • Encryption: Use of the Secure Sockets Layer (SSL) protocol prevents snooping, eavesdropping, and message tampering as information passes between clients and servers. SSL, which is supported by most web servers, encrypts Internet protocols (such as HTTP) with public key cryptography. A private key resides on the server to decrypt inbound data and encrypt outbound data.After the key is installed, the web server automatically handles encryption and decryption.
  • Authentication: Authentication checks whether someone is a valid system user. It prompts a user for a unique login or user name, and a password or personal identification number (PIN).
  • Access Control: Authenticated users have access to particular features or components based on security clearance, group affiliation, or other criteria specified by the developer.
    You can implement development security by requiring a password to use the ColdFusion Administrator and a password for Remote Development Services (RDS), which allows developers to develop CFML pages remotely. You implement runtime security in your CFML pages and in the ColdFusion Administrator. ColdFusion has the following runtime security categories:
  • User security Programmatically determine the logged-in user and allow or disallow restricted functionality based on the roles assigned to that user. For more information about user security, see ColdFusion security features in Securing Applications in the Developing ColdFusion Applications.
  • Sandbox security Using the ColdFusion Administrator, define the actions and resources that the ColdFusion pages in and below a specified directory can use.

    Note: In ColdFusion 11, you can configure multiple security sandboxes irrespective of the edition that you are using. However, for the previous versions (ColdFusion 10 or older), you can configure multiple security sandboxes only when you are using the Enterprise Edition.

    The Security area in the Administrator lets you do the following tasks:


    • Configure password protection for the ColdFusion Administrator. For more information, see Using password protection.
    • Configure password protection for RDS access. For more information, see RDS password protection.
    • Enable, disable, and customize ColdFusion security, on the Security > Sandbox Security page (called Resource Security page in the Standard edition). For more information, see Using sandbox security.

Using password protection

Password protection restricts access to the ColdFusion Administrator and to a ColdFusion server when you attempt access through RDS security.

ColdFusion Administrator password protection

Secure access to the ColdFusion Administrator is enabled by default. The password that you enter during installation is saved as the default. You are prompted to enter this password whenever you open the Administrator.
Password protection for accessing the Administrator helps guard against unauthorized modifications of ColdFusion, and Adobe recommends using passwords. You can disable or change the Administrator password on the Security > CF Admin Password page.

Configurable seed for password encryption

You can specify a new seed value to encrypt data source passwords.
To modify the default seed value assigned by ColdFusion or to change the value you specified,

  1. In the ColdFusion Administrator, got to Security > Administrator and then in the Password Seed section, specify the new seed value between 8-500 characters.
  2. Click Submit Changes.

    Note: When you modify the seed value, all data source connections are reset. Therefore, Adobe recommends that you perform this task when the server is idle or at the initial phase (after installation).

RDS password protection

If you configured password protection for RDS access when you installed ColdFusion, you are prompted for the password when you attempt to access ColdFusion from Dreamweaver MX 2004, HomeSite+, or the ColdFusion Report Builder.
You can disable RDS or change the RDS password on the Security > RDS Password page.

Note: Disabling RDS also disables the applet that the ColdFusion Administrator uses in file-related dialog boxes.

If you use RDS security, you rely on web server and operating system security settings to set permissions for ColdFusion application and document directories.

Enhancing ColdFusion Security on Windows

To enhance security for the ColdFusion server on Windows, restrict access to the following files to selected ColdFusion users:

  • /cfusion/lib/seed.properties
  • /cfusion/lib/password.properties
  • /cfusion/lib/license.properties
  • /cfusion/bin/passwordreset.bat
  • /cfusion/bin/cf-passwordreset.jar

Exposing services to users

ColdFusion exposes many existing enterprise services as web services. You can access these services using SOAP and AMF/Flash remoting.
The following are the exposed services:

  • cfpdf
  • cfImage
  • cfdocument
  • cfmail
  • cfpop
  • cfchart
  • upload service
    You can secure the exposed services to prevent access by unknown applications or users. This can be done by configuring the client IP address range to which services are accessible. Also, you can set up user access control for the services.
    On the Security > User Manager page, you can select the services available to a user from the Exposed Services section. 
    By default, all the services are listed in the Prohibited Services drop-down list. Press CTRL and select the services that you want the user to avail and click the << button. 
    Now, click Edit User to implement the changes to the user settings.

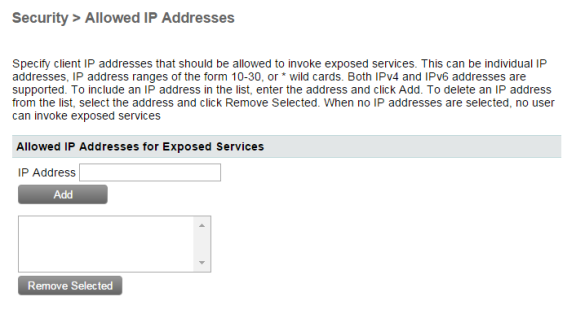
Configure IP address to access exposed services

To configure IP addresses to access exposed services:

  1. Go to Security > Allowed IP Addresses
  2. To add an IP address, specify the IP address in the IP addresses field and click Add.
  3. To remove an IP address, select the IP address from the View/Remove Selected IP Addresses for Exposed Services list.
  4. Click Remove Selected to remove the IP addresses.

Restricting access to ColdFusion Administrator

You can restrict access to ColdFusion Administrator.

Note: By default, localhost and all IP addresses can access ColdFusion server.

To add IP addresses that must be allowed access:

  1. Go to Security > Allowed IP Addresses > Add/Remove IP Addresses which will have Administrator access.
  2. In the IP Address text box, specify the IP addresses.
  3. Click Add.
  4. Repeat the procedures to add more IP addresses.
    Regular expressions are supported. That is, if you specify 10...*, all IP addresses starting with 10. are allowed access.

Enabling Secure Profile for ColdFusion Administrator

ColdFusion allows you to secure ColdFusion server furthermore by enabling or disabling selected settings on the ColdFusion Administrator. When installing ColdFusion, you can enable Secure Profile by selecting the option when prompted on the Secure Profile screen. Further, you could provide a comma separate list of IP addresses that may be allowed to access the ColdFusion Administrator.

Administrator settings affected by enabling Secure Profile


Administrator Settings

Path

Default Admin Profile

Secure Profile

Changes to the setting post migration to ColdFusion 10

1

Use UUID for cftoken

Server Settings > Settings

Enabled

Enabled

Overwritten

2

Disable access to internal ColdFusion Java components

Server Settings > Settings

Disabled

Enabled

Overwritten

3

Enable Global Script Protection

Server Settings > Settings

Enabled

Enabled

Overwritten

4

Maximum size of post data

Server Settings > Settings

20MB

20MB

Overwritten

5

Missing Template Handler

Server Settings > Settings

No Value

Custom missing error template

Retained if specified

6

Site-wide Error Handler

Server Settings > Settings

No Value

Custom site-wide error template

Retained if specified

7

Request Queue Timeout Page

Server Settings > Request Tuning

No value

Custom error template

Retained if specified

8

Cookie Timeout

Server Settings > Memory Variables

15767000 minutes

1440 minutes

N/A

9

Disabling updating of ColdFusion internal cookies using ColdFusion tags/functions

Server Settings > Memory Variables

Disabled

Enabled

N/A

10

Enable WebSocket Server

Server Settings > WebSocket

Enabled

Disabled

N/A

11

Start Flash Policy Server

Server Settings > WebSocket

Enabled

Disabled

N/A

12

Allowed SQL (all settings)

Data & Services > Data Sources > database > Advanced Settings

Enabled

Create, Drop, Alter, Grant, Revoke, Stored Procedures are disabled

Retained if specified

13

Enable Robust Exception Information

Debugging & Logging > Debug Output Settings

Disabled

Disabled

Overwritten

14

Enable CFSTAT

Debugging & Logging > Debug Output Settings

Enabled

Disabled

Overwritten

15

Select the type of Administrator authentication

Security > Administrator

Use a single password only

Separate user name and password authentication (allows multiple users)

N/A

16

Enable RDS Service

Security > RDS

Configurable at install time

Disabled

N/A

17

Select the type of RDS authentication

Security > RDS

Use a single password only

Separate user name and password authentication (allows multiple users)

N/A

18

Enable ColdFusion Sandbox Security

Security > Sandbox Security

Disabled

Disabled

Overwritten

19

Allowed IP addresses for ColdFusion Administrator access

Security > Allowed IP Addresses

Not available at install time

Available at install time

N/A

Note: Secure Profile disables Directory Browsing for a stand alone ColdFusion installation with built-in web server.

COMMUNITY CONTRIBUTED HELP

The page above explains that if the "secure profile" option is taken during installation, ColdFusion will set the 3 error handlers to a value that is shown above merely as "Custom missing error template".

More specifically, and particularly if anyone may remove them from the CF Admin and need to add them back, the three templates can be found in this directory in your installation: C:\ColdFusion10\cfusion\wwwroot\CFIDE\administrator\templates, and are named (in the order listed above): 

  • secure_profile_error.cfm
  • missing_template_error.cfm
  • request_timeout_error.cfm

So for instance, to put the "default" "secure" sitewide error handler back in place, provide this value for the CF Admin>Settings>Site-wide Error Handler:

  • /CFIDE/administrator/templates/secure_profile_error.cfm

Changes in Secure Profile (ColdFusion 11)

When installing ColdFusion Server, you can enable Secure Profile by selecting the option when prompted on the Secure Profile screen. Further, you could provide a comma separate list of IP addresses that may be allowed to access the ColdFusion Administrator. This feature has been available from ColdFusion 10. In ColdFusion 11, Secure Profile has been enhanced to handle access to other internal components too. For instance, you can set restrictions for following URLs:

  • CFIDE/main/*
  • CFIDE/adminapi/*
  • CFIDE/administrator/*
  • CFIDE/componentutils/*
  • CFIDE/wizards/*
  • CFIDE/servermanager/*

To allow IP addresses to access the internal ColdFusion components, perform the following tasks:

  1. Login to ColdFusion Administrator
  2. Click Security > Allow IP Addresses
  3. Go to Allow IP Addresses for accessing ColdFusion Administrator and ColdFusion Internal Directories section and add grant access to  individual IP address to access the internal components as shown in the following figure:

If you have configured an external web server, you can also restrict access to the ColdFusion Administrator and ColdFusion Internal Directories at the connector-level by modifying the iprestriction.properties file available under the connector folder. For instance, <cf_root>/config/wsconfig//iprestriction.properties.

Note : You will need to restart the external web server after modifying the iprestriction.properties file. 

Using sandbox security

Sandbox security (called Resource security in the Standard Edition) uses the location of your ColdFusion pages to control access to ColdFusion resources. A sandbox is a designated directory of your site to which you apply security restrictions. Sandbox security lets you specify which tags, functions, and resources (for example, files, directories, and data sources) can be used by ColdFusion pages located in and under the designated directory.
To use sandbox security in the J2EE editions, the application server must be running a security manager (java.lang.SecurityManager) and you define the following JVM arguments (for Tomcat, this is the java.args line in the cf_root/cfusion/bin/jvm.config file):

-Djava.security.manager "-Djava.security.policy=cf_root/WEB-INF/cfusion/lib/coldfusion.policy" "-Djava.security.auth.policy=cf_root/WEB-INF/cfusion/lib/neo_jaas.policy"

Note: Sandbox security is not enabled by default. You enable it on the Security > Sandbox Security page before ColdFusion enforces the settings.

Using multiple sandboxes (Enterprise Edition only)

By default, a subdirectory of a sandbox inherits the settings of the directory one level above it. However, if you define a sandbox for a subdirectory, the subdirectory no longer inherits settings from the parent, completely overriding the parent directory's sandbox settings. For example, consider the following directories:

C:\Inetpub\wwwroot
C:\Inetpub\wwwroot\sales
C:\Inetpub\wwwroot\rnd
C:\Inetpub\wwwroot\rnd\dev
C:\Inetpub\wwwroot\rnd\'a

If you define a sandbox for the wwwroot directory, the settings also apply to the sales and rnd directories. If you also define a sandbox for the rnd directory, the rnd sandbox settings also apply to the dev and qa directories. The wwwroot and sales directories maintain their original settings, and the rnd settings override the wwwroot directory settings for the rnd directory and subdirectories.
This hierarchical arrangement of security permits the configuration of personalized sandboxes for users with different security levels. For example, if you are a web hosting administrator who hosts several clients on a ColdFusion shared server, you can configure a sandbox for each customer. This prevents one customer from accessing the data sources or files of another customer.

Resources that you can restrict

You can restrict the following resources:

  • Data Sources Restrict the use of ColdFusion data sources.
  • CF Tags Restrict the use of ColdFusion tags that manipulate resources on the server (or on an external server), such as files, the registry, Lightweight Directory Access Protocol (LDAP), mail, and the log.
  • CF Functions Restrict the use of ColdFusion functions that access the file system.
  • Files/DirsEnable tags and functions in the sandbox to access files and directories outside the sandbox.

    Note: To use the Administrator API when sandbox security is enabled, allow access to the cf_web_root/CFIDE/adminapi directory.

  • Server/PortsSpecify the servers, ports, and port ranges that the ColdFusion tags that call third-party resources can use.For more information, see the Administrator online Help.

    Note: When you run ColdFusion in the J2EE configuration on IBM WebSphere, the Files/Dirs and Server/Ports tabs are not enabled.

About directories and permissions

When you enable access to files outside the sandbox, you specify the filename. When you enable access to directories outside the sandbox, you specify directoryname_indicator_, where indicator is a dash or asterisk, as follows:

  • A backslash followed by a dash (-) lets tags and functions access all files in the specified directory, and recursively allows access to all files in subdirectories.
  • A backslash followed by an asterisk (*) lets tags and functions access all files in the specified directory and also lets tags and functions access a list of subdirectories. However, this option denies access to files in any subdirectories.
    You can also specify the actions that ColdFusion tags and functions can perform on files and directories outside the sandbox. The following table shows the relationship between the permissions of a file and a directory:

Permission

Effect on files

Effect on directories

Read

View the file

List all files in the directory

Write

Write to the file

Not applicable

Execute

Execute the file

Not applicable

Delete

Delete the file

Delete the directory

Add a sandbox (Enterprise Edition only)

ColdFusion Enterprise Edition lets you define multiple security sandboxes.

  1. Open the Security > Sandbox Security page in the ColdFusion Administrator. The Sandbox Security Permissions page appears.
  2. In the Add Security Sandbox box, enter the name of the new sandbox. This name must be either a ColdFusion mapping (defined in the Administrator) or an absolute path.
  3. Select New Sandbox from the drop-down list to create a sandbox based on the default sandbox, or select an existing sandbox to copy its settings to your new sandbox.
  4. Click Add. The new sandbox appears in the list of Defined Directory Permissions.

Configure a sandbox

Before you begin security sandbox configuration, analyze your application and its usage to determine the tags, functions, and resources that it requires. You can then configure the sandbox to enable access to the required resources and disable use of the appropriate tags and functions. For example, if the applications in the sandbox do not use the cfregistry tag, you can safely disable it.

Note: In the Standard Edition, the Root Security Context is the only sandbox without any initial list of defined directory permissions.

  1. Open the Security > Sandbox Security page (Security > Resource Security page in the Standard Edition) in the ColdFusion Administrator.
  2. (Enterprise Edition only) In the list of Defined Directory Permissions, click the name or Edit icon for the directory.A page with several tabs appears. This is the initial page in the Standard Edition. The remaining steps describe the use of each tab.
  3. To disable a data source, in the left column of the Datasources tab, highlight the data source, and click the right arrow.By default, ColdFusion pages in this sandbox can access all data sources.

    Note: If <<ALL DATASOURCES>> is in the Enabled Datasources column, any data source that you add is enabled. If you move <<ALL DATASOURCES>> to the Disabled Datasources column, any new data source is disabled.

  4. Click the CFTags tab.
  5. To disable tags, in the left column of the CFTags tab, highlight the tags, and click the right arrow.By default, ColdFusion pages in this sandbox can access all listed tags.
  6. Click the CFFunctions tab.
  7. To disable functions, in the left column of the CFFunctions tab, highlight the functions, and click the right arrow.By default, ColdFusion pages in this sandbox can access all listed functions.
  8. Click the Files/Dirs tab.
  9. To enable files or directories, in the File Path box, enter or browse to the files or directories; for example, C:\pix. A file path that consists of the special token <<ALL FILES>> matches any file. For information on using the backslash-hyphen (-) and backslash-asterisk (*) wildcard characters, see About directories and permissions.
  10. Select the permissions.For example, select the Read check box to let ColdFusion pages in the mytestapps sandbox read files in the C:\pix directory.
  11. Click Add Files/Paths. When you edit an existing sandbox, this button reads Edit Files/Paths. The file path and its permissions appear in the Secured Files and Directories list.
  12. In the Secured Files and Directories list, verify that the file path is correct. The character after the backslash is important. For information, see About directories and permissions.

    Note: The Files/Dirs tab works together with the file-based permissions of the operating system. To restrict a user from browsing another user's directory, use file-based permissions.

  13. Click the Server/Ports tab.
  14. To turn off default behavior (global access to all servers and ports), enter the IP addresses and port numbers that pages in this sandbox can connect to by using tags that access external resources (for example, cfmail, cfpop, cfldap, cfhttp, and so on). You can specify an IP address, a server name (such as www.someservername.com), or a domain name (such as someservername.com). You can optionally specify a port restriction.

    Note: This behavior differs from other tabs, such as CFTags, where you select items to disable. If you set any values in this tab, external-resource tags executed in this sandbox can access only the specified servers and ports.

    For example, to allow this sandbox access to 207.88.220.3 on ports 80 and lower, perform the following steps:


    1. In the IP Address field, enter 207.88.220.3.
    2. In the Port field, enter 80, and click This Port and Lower.

      Note: To deny access by these ColdFusion tags to an entire site, enable access for a local resource, such as your local mail server, FTP server, and so on.

  15. Click Finish to save changes to the sandbox.

Sandbox Considerations

Using OpenOffice within Sandbox

Grant permissions in sandbox for the following filepaths:

  • D:\ColdFusion10\cfusion\runtime\servers\lib Read
  • D:\ColdFusion10\cfusion\runtime\servers\lib- Read
  • D:\ColdFusion10\cfusion\runtime\lib- Read
  • D:\ColdFusion10\cfusion\runtime\lib Read
  • C:\Program Files\OpenOffice.org 3\ Read, Execute
  • C:\Program Files\OpenOffice.org 3- Read
    , Execute

Using Caching within Sandbox

For disk-based caching to work inside a sandbox, the sandbox must provide read/write permission to the disk cache directory. This can be the default directory (java.io.tmpdir) or a user-configured directory as identified by the diskStore property. The diskStore property in cf_root\lib\ehcache.xml is used to specify the directory for disk cache (<diskStore path="java.io.tmpdir"/>).Use the following code to identify the temp directory:

<cfscript>
writeoutput("Temp Dir : " & createobject("java","java.lang.System").getProperty("java.io.tmpdir") );
</cfscript>

Also, read permission must be granted to cf_root\lib\ehcache.xml for certain functions that read from/write to ehCache.xml to work. For example, cacheGetProperties and cacheSetProperties.

Using Service CFCs within Sandbox

Grant the following permissions:

  • execute permission to cf_root\CustomTags\com\adobe\coldfusion
  • read permission to cf_root\WEB-INF\cftags\META_INF\taglib.tld

This work is licensed under a Creative Commons Attribution-Noncommercial-Share Alike 3.0 Unported License  Twitter™ and Facebook posts are not covered under the terms of Creative Commons.

Legal Notices   |   Online Privacy Policy

Choose your region United States (Change)   Products   Downloads   Learn & Support   Company
Choose your region Close

Americas

Europe, Middle East and Africa

Asia Pacific

  • Brasil
  • Canada - English
  • Canada - Français
  • Latinoamérica
  • México
  • United States
  • Africa - English
  • Österreich - Deutsch
  • Belgium - English
  • Belgique - Français
  • België - Nederlands
  • България
  • Hrvatska
  • Cyprus - English
  • Česká republika
  • Danmark
  • Eesti
  • Suomi
  • France
  • Deutschland
  • Greece - English
  • Magyarország
  • Ireland
  • Israel - English
  • ישראל - עברית
  • Italia
  • Latvija
  • Lietuva
  • Luxembourg - Deutsch
  • Luxembourg - English
  • Luxembourg - Français
  • Malta - English
  • الشرق الأوسط وشمال أفريقيا - اللغة العربية
  • Middle East and North Africa - English
  • Moyen-Orient et Afrique du Nord - Français
  • Nederland
  • Norge
  • Polska
  • Portugal
  • România
  • Россия
  • Srbija
  • Slovensko
  • Slovenija
  • España
  • Sverige
  • Schweiz - Deutsch
  • Suisse - Français
  • Svizzera - Italiano
  • Türkiye
  • Україна
  • United Kingdom
  • Australia
  • 中国
  • 中國香港特別行政區
  • Hong Kong S.A.R. of China
  • India - English
  • 日本
  • 한국
  • New Zealand
  • Southeast Asia (Includes Indonesia, Malaysia, Philippines, Singapore, Thailand, and Vietnam) - English
  • 台灣

Commonwealth of Independent States

  • Includes Armenia, Azerbaijan, Belarus, Georgia, Moldova, Kazakhstan, Kyrgyzstan, Tajikistan, Turkmenistan, Ukraine, Uzbekistan

Copyright © 2016 Adobe Systems Incorporated. All rights reserved.

Terms of Use | Privacy | Cookies

AdChoices