Project setup
To enable the Unity OpenXR: Meta in your project, follow the steps below:
- Go to Edit > Project Settings > XR Plug-in Management.
- In the Android tab, under Plug-in Providers, enable OpenXR.
- While still in the Project Settings window, go to XR Plug-in Management > OpenXR.
- In the Android tab, under Enabled Interaction Profiles, add Oculus Touch Controller Profile.
- Under OpenXR Feature Groups, enable the Meta Quest feature group.
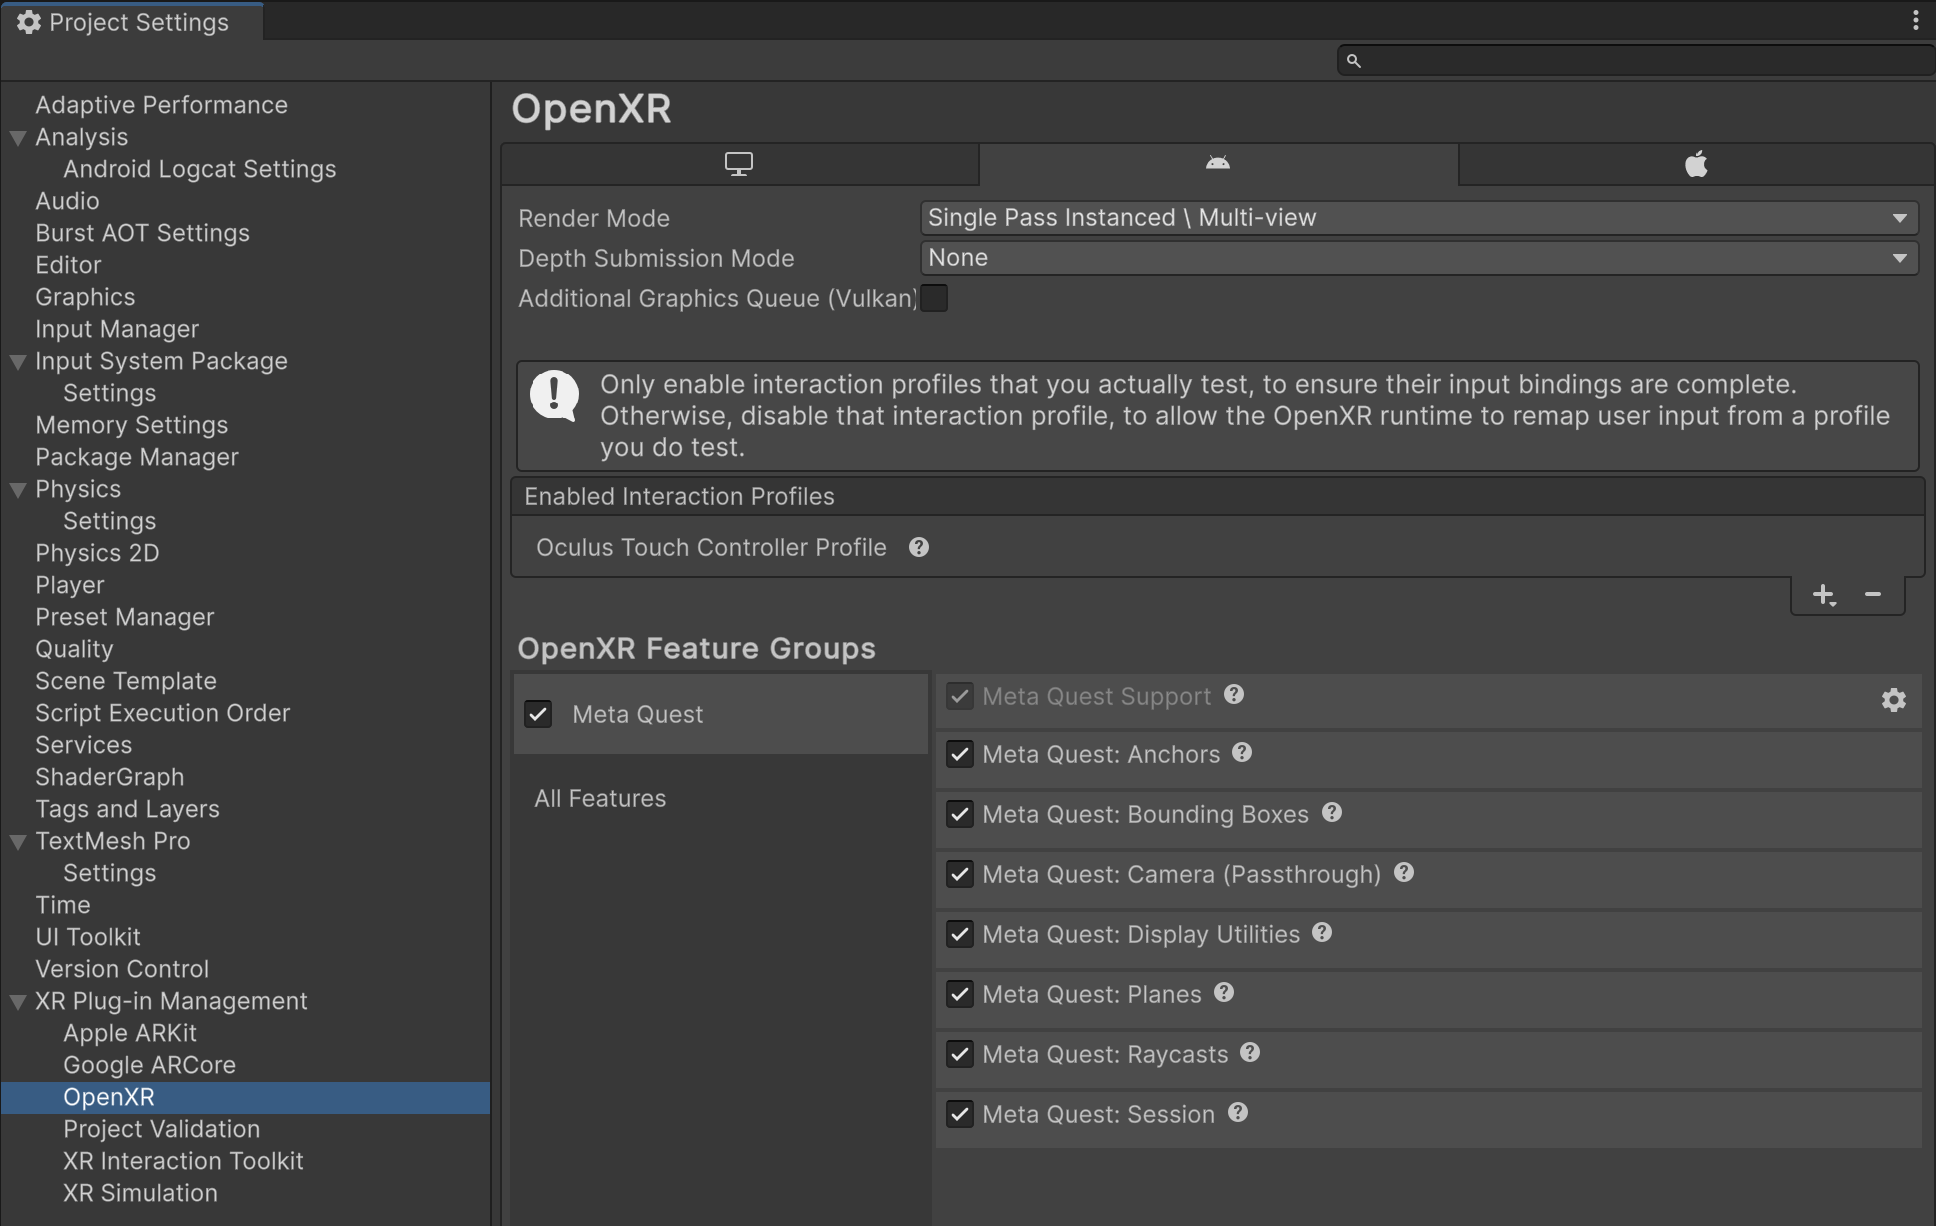
The Meta Quest OpenXR feature group
Note
XR Plug-in Management supports only one enabled plug-in provider at a time per build target. If your project also targets ARCore using the Google ARCore XR Plug-in, to avoid errors you should disable the Google ARCore plug-in provider in the Android tab of Project Settings > XR Plug-in Management before you build an APK for Meta Quest devices. Likewise, you should disable OpenXR before you build for ARCore.
Scene setup
To set up your scene for Meta OpenXR, first follow the standard AR Foundation Scene setup. If your scene will use the Meta Quest device's Passthrough camera, refer to the additional information below.
Ensure that the Tracked Pose Driver component on your camera has "centerEyePosition [XR HMD]" included in the position and rotation input actions.
Camera background
Meta Passthrough requires that your Camera's Background Color (Universal Render Pipeline) or Clear Flags (Built-In Render Pipeline) are set to Solid Color, with the Background color alpha channel value set to zero.
Note
The passthrough video is layered behind the image rendered by the scene camera. If you configure the camera's background color (or clear flags) to use a skybox or an opaque solid color, then the passthrough video is covered up by the camera background.
If you have completed the AR Foundation scene set up, follow these instructions to configure your scene to render with a transparent camera background:
- Locate the GameObject named XR Origin in your GameObject hierarchy. (Refer to Scene setup in the AR Foundation manual for instructions on how to set up the scene if it does not already contain an XR Origin.)
- Expand the hierarchy to reveal the Camera Offset and Main Camera GameObjects.
- Inspect the Main Camera GameObject.
- Select from the following options. The options differ based on the render pipeline you're using:
- URP: In the Environment section, set the Background Type to Solid Color.
- Built-In Render Pipeline: Set Clear Flags to Solid Color.
- Select the Background color to open the color picker.
- Set the color's A value to
0.
Your scene is now configured to support Meta Passthrough.
Vulkan Graphics API
Meta recommends that you use the Vulkan Graphics API in your project, as some of the newer features for Meta Quest devices are only supported with that API.
To change your project's Graphics API to Vulkan, follow these steps:
- Go to Edit > Project Settings > Player.
- Select the Android tab and open Other Settings.
- In the Rendering section, if Auto Graphics API is enabled, disable this setting to reveal the Graphics APIs section.
- Under Graphics APIs, click the Add button (+) to add a new Graphics API.
- Select Vulkan.
- Re-order the Graphics APIs using the handles (=) so that Vulkan is listed first.
- Optionally, select any other Graphics APIs and click the Remove button (-) to remove them.
Universal Render Pipeline
Meta Quest is compatible with the Universal Render Pipeline (URP), but the default URP settings are not suitable for best Passthrough performance on Quest. Refer to the table below for a list of Unity's recommended settings, which are explained in greater detail in the following sections.
| Setting | Location | Recommended value |
|---|---|---|
| Terrain Holes | Universal Render Pipeline Asset | Disabled |
| HDR | Universal Render Pipeline Asset | Disabled |
| Post-processing | Universal Renderer Data | Disabled |
| Intermediate Texture | Universal Renderer Data | Auto |
Universal Render Pipeline Asset settings
Follow the steps below to optimize your Universal Render Pipeline Asset for Meta Quest:
Locate your project's Universal Render Pipeline Asset. One way to do this is to type
t:UniversalRenderPipelineAssetinto the Project window's search bar.Tip
If your project does not contain a Universal Render Pipeline Asset, refer to Installing the Universal Render Pipeline into an existing Project from the URP docs.
In the Inspector, under the Rendering header, disable Terrain Holes.
Under the Quality header, disable HDR.
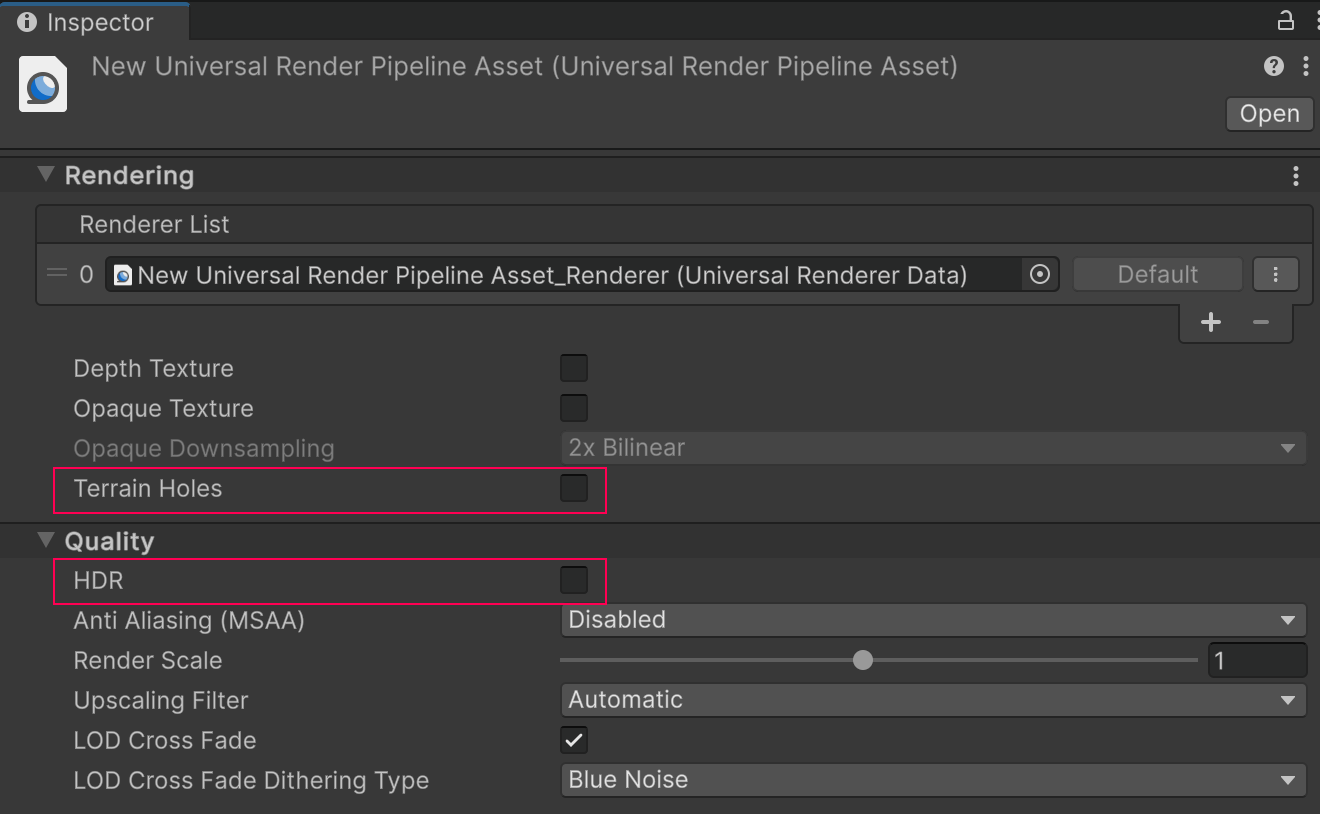
Universal Render Pipeline Asset shown with recommended settings
Universal Renderer Data settings
Follow the steps below to optimize your Universal Renderer Data for Meta Quest:
- Locate your project's Universal Renderer Data Asset. One way to do this is to type
t:UniversalRendererDatainto the Project window's search bar. - In the Inspector, under the Post-processing header, uncheck Enabled.
- Under the Compatibility header, set the Intermediate Texture value to Auto.
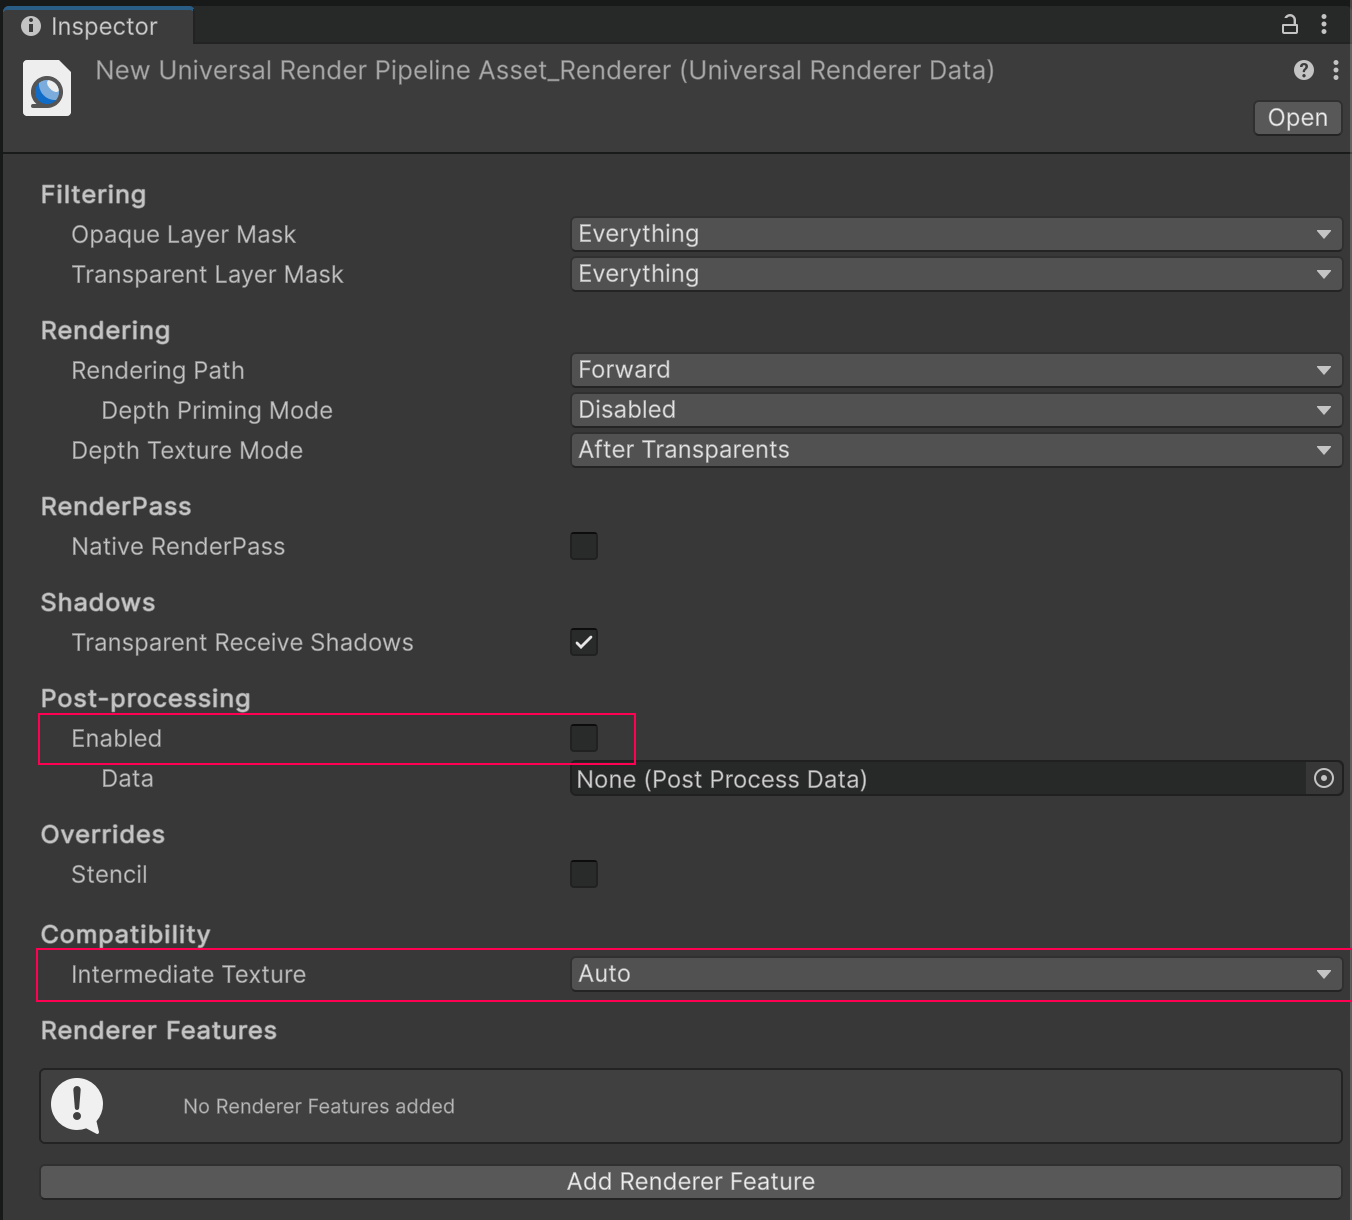
Universal Renderer Data shown with recommended settings