Launch recordings from the command line
Set up your Unity project to launch recordings from the command line. Use this setup to enable batch recording via a job queue of many command lines targeting different recordings.
Overview
This tutorial provides an example solution for recording from the command line using API scripting and Recorder Setting Presets.
- Create Recorder Settings Presets.
- Set up your project to be able to record via a script.
- Write a function to trigger a recording.
- Call the recording function from the command line.
- Use a job queue made of command lines to enable batch recording.
Create Recorder Settings Presets
The solution suggested in this tutorial uses Recorder Settings Presets. You can prepare as many Presets as needed according to all types or variants of recording outputs you want to get. Give them unambiguous names so that you can conveniently call them later from the command line.
For example, to create an HD Movie Recorder Settings Preset:
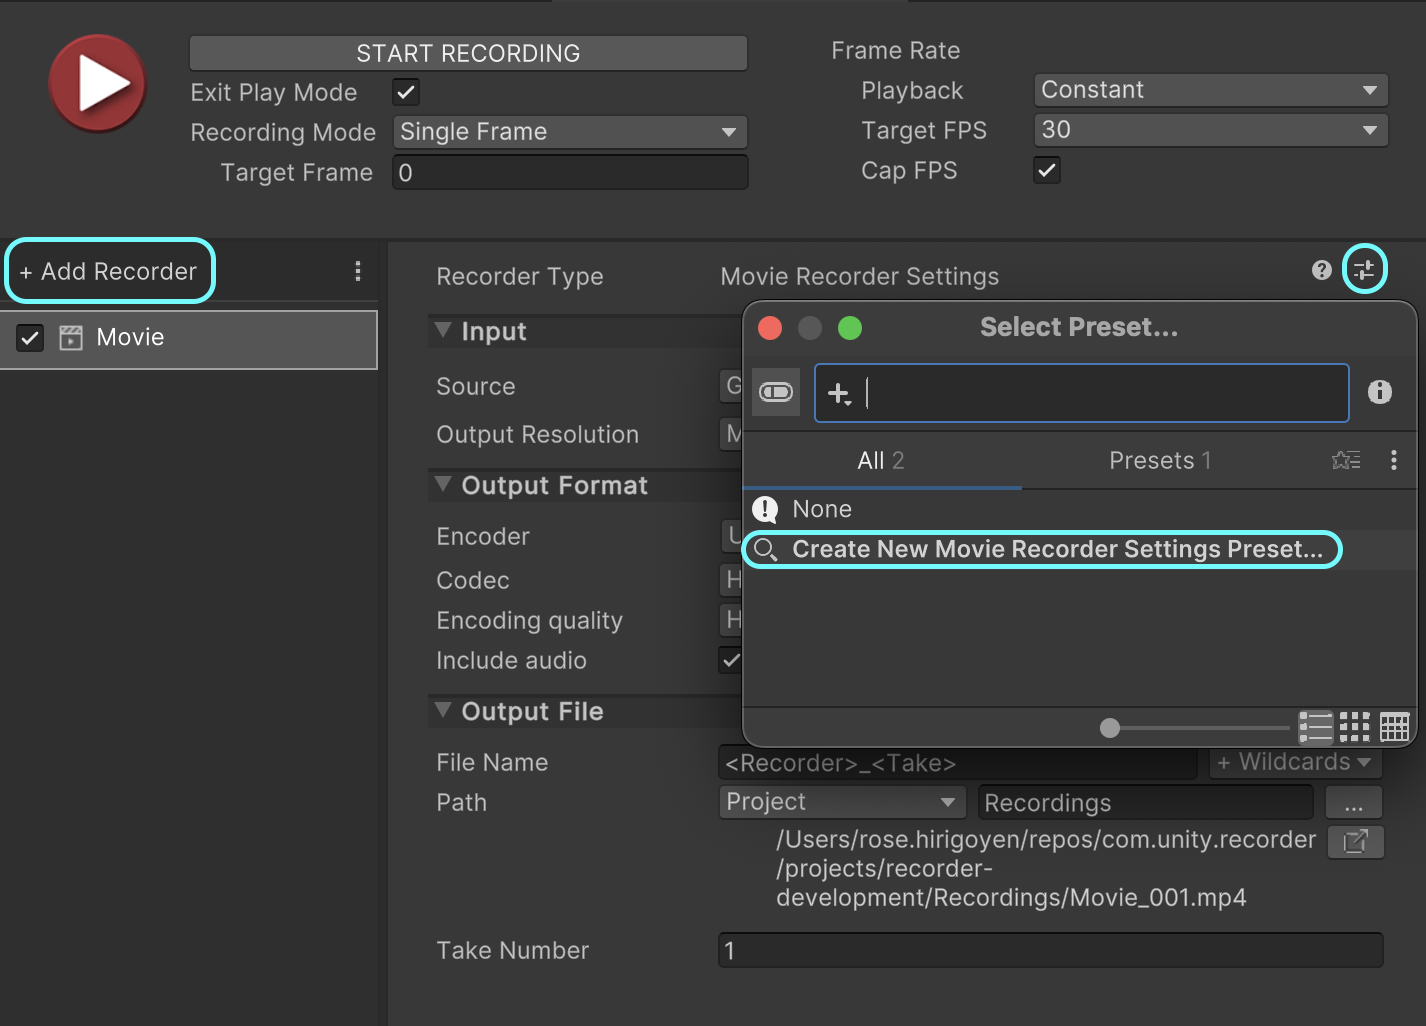
Open the Recorder window. Under Add Recorder, select or add a Movie recorder.
For Output Resolution, select FHD - 1080, which is Full HD 1920 x 1080. Adjust the rest of the properties as you wish.
Save the Recorder Settings as a Preset: select the Preset icon
 in the Recorder properties pane.
In the Select preset... window that opens, double-click on Create New Movie Recorder Settings Preset....
Name your preset "HDMovieRecorderSettings.preset" and select Save.
Set up a recording script
Set up your project to support recording through a script:
Create a new MonoBehaviour named
CommandLineRecorderand attach it to a GameObject in your Scene. For information on how to do that, see Creating and Using Scripts.Double-click on your new script to edit it. Replace its contents with the following code:
using System;
using System.Collections.Generic;
using System.Linq;
using UnityEditor;
using UnityEditor.Presets;
using UnityEditor.Recorder;
using UnityEngine;

public class CommandLineRecorder : MonoBehaviour
{
    // The RecorderController starts and stops the recording.
    private RecorderController m_Controller;

    // The first frame to record.
    [SerializeField] private int m_startFrame;

    // The last frame to record.
    [SerializeField] private int m_endFrame;

    // The path to the Recorder Settings preset file to use for the recording.
    [SerializeField] private string m_presetPath;
}
In the code above,
m_startFrame,m_endFrameandm_presetPathare serialized to ensure their values are preserved when entering PlayMode (i.e. when starting the recording).Create a utility function to load and setup your Recorder Settings Preset.
static RecorderSettings LoadRecorderSettingsFromPreset(string presetPath)
{
    // Load the Preset from the provided path.
    var preset = AssetDatabase.LoadAssetAtPath<Preset>(presetPath);

    // Use reflection to determine the type of the RecorderSettings to use
    // (for example a MovieRecorderSettings).
    var recorderSettingsTypes =
        TypeCache.GetTypesDerivedFrom<RecorderSettings>().ToList();

    var recorderSettingsType = recorderSettingsTypes.SingleOrDefault(
        t => t.Name == preset.GetTargetTypeName());

    if (recorderSettingsType == null)
    {
        Debug.Log("Preset must be a subclass of RecorderSettings");
        return null;
    }

    // Create a new RecorderSettings instance and apply the Preset to it.
    RecorderSettings outSettings =
        (RecorderSettings)ScriptableObject.CreateInstance(recorderSettingsType);

    preset.ApplyTo(outSettings);
    outSettings.name = preset.name;

    return outSettings;
}
Create a function that starts the recording with your start frame, end frame, and Recorder Settings Preset as parameters. This function uses the RecorderController to prepare and start the recording session.
void StartRecording(string presetPath, int startFrame, int endFrame)
{
    // Create RecorderSettings from the provided Preset path.
    RecorderSettings recorderSettings = LoadRecorderSettingsFromPreset(presetPath);
    recorderSettings.FrameRate = 60;

    // Create a new RecorderControllerSettings to set the start and end frame for
    // the recording session and add the RecorderSettings to it.
    var controllerSettings = ScriptableObject.CreateInstance<RecorderControllerSettings>();
    controllerSettings.AddRecorderSettings(recorderSettings);
    controllerSettings.SetRecordModeToFrameInterval(startFrame, endFrame);

    // Create and setup a new RecorderController and start the recording.
    m_Controller = new RecorderController(controllerSettings);
    m_Controller.PrepareRecording();
    m_Controller.StartRecording();
}
Use the default MonoBehaviour functions
OnEnableandUpdateto control when your recording begins and ends. For more information about the script lifecycle, see Order of execution for event functions.The recording starts when you enter the PlayMode (
OnEnable).void OnEnable() { // This is called once when Unity enters PlayMode. StartRecording(m_presetPath, m_startFrame, m_endFrame); }When the recording stops (all requested frames between start and end are recorded), Unity exits the PlayMode. This is controlled in the
Updatefunction.void Update() { // This is called on every frame when Unity is in PlayMode. if (m_Controller != null && !m_Controller.IsRecording()) { // When the RecorderController has no more frame to record, stop // the recording and exit the PlayMode. m_Controller.StopRecording(); EditorApplication.ExitPlaymode(); } }
Note
More examples on how to record using scripts are available as Samples provided with the Recorder Package. To import them, use the Package Manager window.
Create a function to trigger recordings
To be able to record from the command line, you have to expose a function that you can call from outside of Unity. This function must allow you to set up the recording with specific parameters, enter playMode, and start the recording.
Create a utility function to parse the command line arguments required to set up and start a recording.
static Dictionary<string, string> GetCommandLineArgs()
{
    string[] cmdLineParts = Environment.GetCommandLineArgs();
    Dictionary<String, String> arguments = new Dictionary<string, string>();

    // These are the 3 arguments this MonoBehaviour expects to start a recording.
    string[] args = { "-startFrame", "-endFrame", "-presetPath" };

    var idx = 1;
    while (idx < cmdLineParts.Length)
    {
        var part = cmdLineParts[idx];
        if (args.Contains(part))
        {
            var argName = part.TrimStart('-');
            arguments[argName] = cmdLineParts[idx + 1];
        }

        idx++;
    }

    return arguments;
}
Create another utility function to ease the process of setting up the MonoBehaviour variables:
startFrame,endFrameandpresetPath.private void SetRecordingInfo(int startFrame, int endFrame, string presetPath) { m_startFrame = startFrame; m_endFrame = endFrame; m_presetPath = presetPath; AssetDatabase.SaveAssets(); }Add the
ExecuteCommandLinefunction to be called from the command line. This function starts the recording with the correct settings.public static void ExecuteCommandLine() { // Parse the command line arguments to find the start and end frame and // the path to the Recorder Settings Preset file to use. var args = GetCommandLineArgs(); if (!args.TryGetValue("startFrame", out var startFrame)) throw new ArgumentException("[ERROR] Expected argument -startFrame"); if (!args.TryGetValue("endFrame", out var endFrame)) throw new ArgumentException("[ERROR] Expected argument -endFrame"); if (!args.TryGetValue("presetPath", out var presetPath)) throw new ArgumentException("[ERROR] Expected argument -presetPath"); // Find the GameObject that has the CommandLineRecorder MonoBehaviour attached // to it and set the recording information provided by the command line arguments. var sceneCommandLineRecorder = FindObjectsByType<CommandLineRecorder>(FindObjectsSortMode.None).First(); sceneCommandLineRecorder.SetRecordingInfo( Convert.ToInt32(startFrame), Convert.ToInt32(endFrame), presetPath); // Enter PlayMode: which starts the Recording (OnEnable) EditorApplication.EnterPlaymode(); }
Now, your CommandLineRecorder should look like this.
Call the recording function from the command line
Now, you can call the ExecuteCommandLine function from the command line.
Preparation
It is recommended to clean up your Unity project and prepare your environment:
- Remove any Recorder from the Recorder window.
- Close the Recorder window.
- Save your Unity project.
- Close your Unity project.
- In your Command Line tool, go to the root of your Unity project:
cd <Path to the Project's root folder> - Remember the path to your Recorder Settings Preset file. It should look like "Assets/HDMovieRecorderSettings.preset".
Execute the command line
On any platform, the command line command has the following structure:
<Path to the Unity Executable> -projectPath <Path to the Unity project> -executeMethod <ExecuteCommandLine function> <your custom parameters>
For more information, see Unity Editor command line arguments.
Here are examples of what a command can look like on different platforms with different Unity installations:
Windows
In PowerShell:
& 'C:\Program Files\Unity\Hub\Editor\2023.2.0b4\Editor\Unity.exe' -projectPath . -executeMethod CommandLineRecorder.ExecuteCommandLine -startFrame 0 -endFrame 10 -presetPath 'Assets/HDMovieRecorderSettings.preset'
MacOS
/Applications/Unity/Hub/Editor/2023.1.10f1/Unity.app/Contents/MacOS/Unity -projectpath . -executeMethod CommandLineRecorder.ExecuteCommandLine -startFrame 0 -endFrame 10 -presetPath "Assets/HDMovieRecorderSettings.preset"
Linux
/home/<user>/Unity/Hub/Editor/2023.2.0b2/Editor/Unity -projectpath . -executeMethod CommandLineRecorder.ExecuteCommandLine -startFrame 0 -endFrame 10 -presetPath "Assets/HDMovieRecorderSettings.preset"
Expected results
When you execute the command, Unity opens and start the recording.
When the recording ends, which means Unity exits PlayMode, check the Recordings folder at the root of your Unity project. A new movie file must have been created, open it to see your recording.
If you get an error in the console when executing the command line (a NullRefException), verify that the -presetPath value is correct. You must specify it between quotes with forward slash characters only (even on Windows) and start it with "Assets" (for example: "Assets/path-to-my-preset/MyPreset.preset").
Batch recording
At this point, you can use a batch file or a Powershell script to launch multiple recordings that may use different presets. You can also edit the script provided in this tutorial to add more parameters to further customize your recording command line.