2D Pixel Perfect
The 2D Pixel Perfect package contains the Pixel Perfect Camera component, which ensures your pixel art remains crisp and clear at different resolutions, and stable in motion.
It is a single component that makes all the calculations Unity needs to scale the viewport with resolution changes, so that you don’t need to do it manually. You can use the component settings to adjust the definition of the rendered pixel art within the camera viewport, and you can use the Run in Edit Mode feature to preview any changes immediately in the Game view.
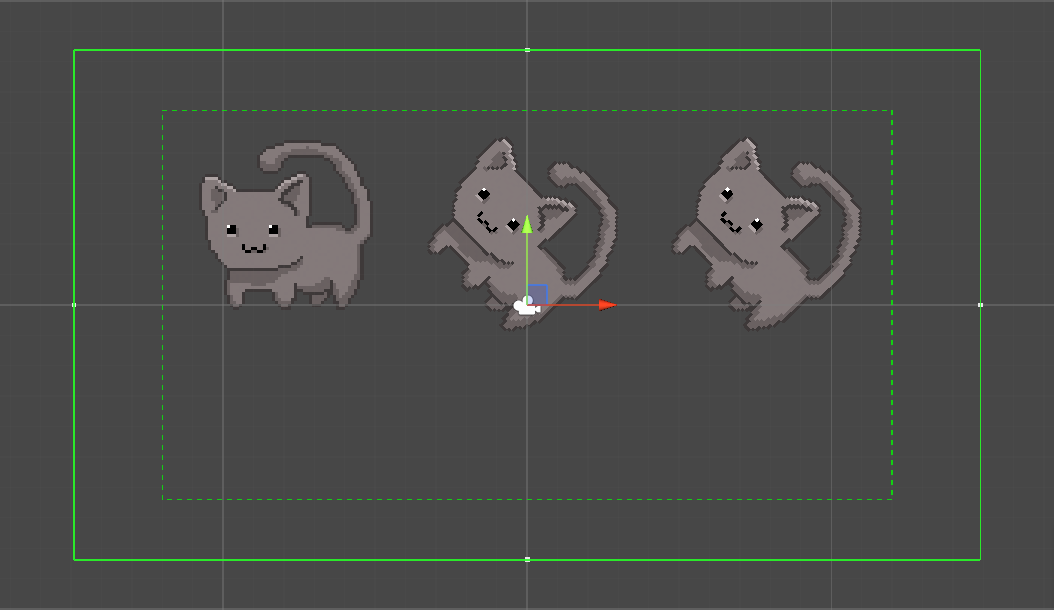
Attach the Pixel Perfect Camera component to the main Camera GameObject in the Scene, it is represented by two green bounding boxes centered on the Camera gizmo in the Scene view. The solid green bounding box shows the visible area in Game view, while the dotted bounding box shows the Reference Resolution.
The Reference Resolution is the original resolution your Assets are designed for, its effect on the component's functions is detailed further in the documentation.
Before using the component, first ensure your Sprites are prepared correctly for best results with the the following steps.
Preparing Your Sprites
After importing your textures into the project as Sprites, set all Sprites to the same Pixels Per Unit value.

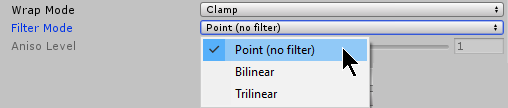
In the Sprites' Inspector window, set their Filter Mode to ‘Point’.
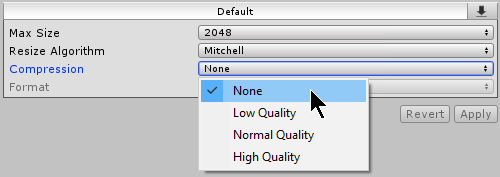
Set their Compression to 'None'.
Follow the steps below to correctly set the pivot for a Sprite
Open the Sprite Editor for the selected Sprite.
If Sprite Mode __is set to ‘Multiple’ and there are multiple __Sprite elements, then you need to set a pivot point for each individual Sprite element.
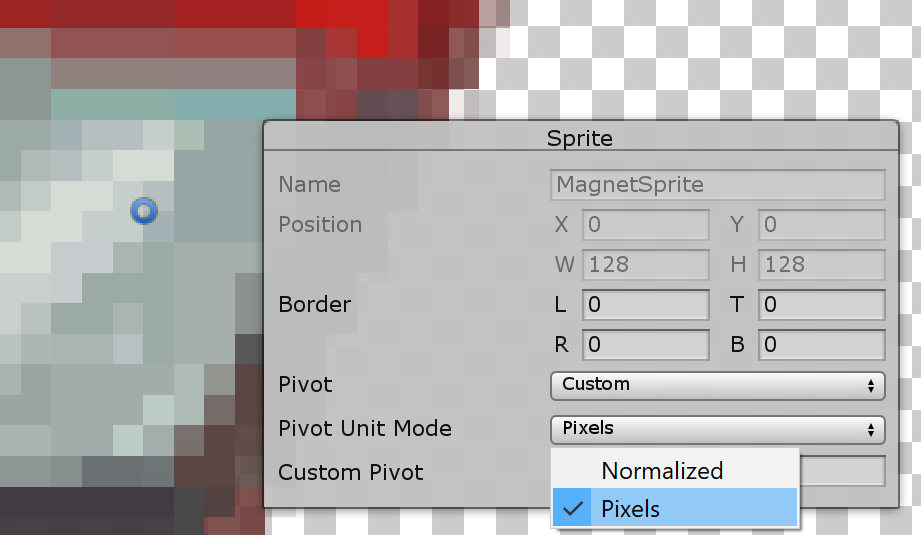
Under the Sprite settings, set Pivot to ‘Custom’, then set Pivot Unit Mode to ‘Pixels’. This allows you to set the pivot point's coordinates in pixels, or drag the pivot point around freely in the Sprite Editor and have it automatically snap to pixel corners.
Repeat for each Sprite element as necessary.
Snap Settings
To ensure the pixelated movement of Sprites are consistent with each other, follow the below steps to set the proper snap settings for your project.
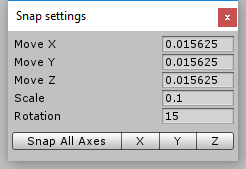
To open the Snap settings, go to Edit > Snap Settings.
Set the Move X/Y/Z properties to 1 divided by the Pixel Perfect Camera’s Asset Pixels Per Unit (PPU) value. For example, if the Asset PPU is 100, you should set the Move X/Y/Z properties to 0.01 (1 / 100 = 0.01).
Unity does not apply Snap settings retroactively. If there are any pre-existing GameObjects in the Scene, select each of them and select Snap All Axes to apply the Snap settings.
Properties
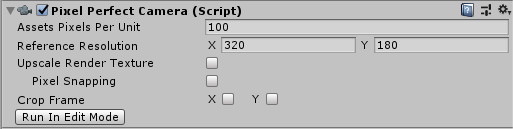
The component's Inspector window
| Property | Function |
|---|---|
| Asset Pixels Per Unit | This is the amount of pixels that make up one unit of the Scene. Match this value to the Pixels Per Unit values of all Sprites in the Scene. |
| Reference Resolution | This is the original resolution your Assets are designed for. |
| Upscale Render Texture | Enable this property to create a temporary rendered texture of the Scene close-to or at the Reference Resolution, which is then upscaled. |
| Pixel Snapping (only available when ‘Upscale Render Texture’ is disabled) | Enable this feature to snap Sprite Renderers to a grid in world space at render-time. The grid size is based on the Assets’ Pixels Per Unit value. |
| Crop Frame | Crops the viewport with black bars to match the Reference Resolution along the checked axis. Check X to add horizontal black bars, and Y to add vertical black bars. For more information and a visual example, refer to the Property Details below. |
| Stretch Fill (available when both X and Y are checked) | Enable to expand the viewport to fit the screen resolution while maintaining the viewport's aspect ratio. |
| Run In Edit Mode | Enable this checkbox to preview Camera setting changes in Edit Mode. This causes constant changes to the Scene while active. |
| Current Pixel Ratio (available when ‘Run In Edit Mode’ is enabled) | Shows the size ratio of the rendered Sprites compared to their original size. |
Additional Property Details
Reference Resolution
This is the original resolution your Assets are designed for. Scaling up Scenes and Assets from this resolution preserves your pixel art cleanly at higher resolutions.
Upscale Render Texture
By default, the Scene is rendered at the pixel perfect resolution closest to the full screen resolution.
Enable this option to have the Scene rendered to a temporary texture set as close as possible to the Reference Resolution, while maintaining the full screen aspect ratio. This temporary texture is then upscaled to fit the entire screen.
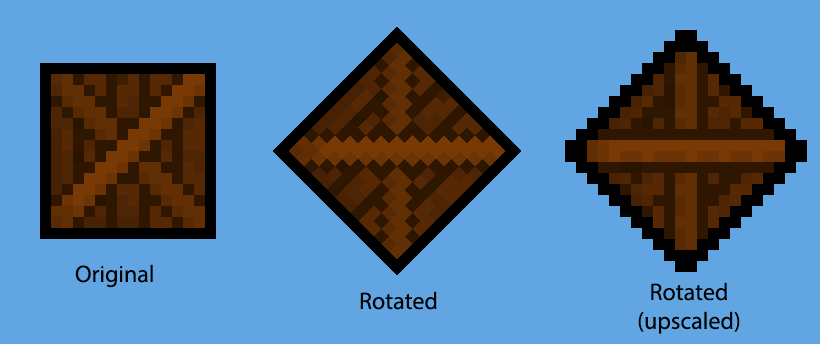
The result is unaliased and unrotated pixels, which may be a desirable visual style for certain game projects.
Pixel Snapping
Enable this feature to snap Sprite Renderers to a grid in world space at render-time. The grid size is based on the Assets Pixels Per Unit value.
Pixel Snapping prevents subpixel movement and make Sprites appear to move in pixel-by-pixel increments. This does not affect any GameObjects' Transform positions.
Crop Frame
Crops the viewport along the checked axis with black bars to match the Reference Resolution. Black bars are added to make the Game view fit the full screen resolution.
 |
 |
|---|---|
| Uncropped | Cropped |
Cinemachine Extension
As both the Pixel Perfect Camera and Cinemachine modify a Camera’s orthographic size, using these two systems together in a single Scene would cause them to fight for control over the Camera and likely produce unwanted results. To solve this incompatibility, add the Cinemachine Pixel Perfect extension to your virtual cameras. You can find more information about the extension’s features in the Cinemachine documentation.