Prev Tutorial: Hough Circle Transform
Next Tutorial: Remapping
| |
| Original author | Markus Heck |
| Compatibility | OpenCV >= 3.4 |
Goal
In this tutorial you will learn how to:
Example
What does this program do?
- Load the image and template


- Instantiate cv::GeneralizedHoughBallard with the help of
createGeneralizedHoughBallard()
- Instantiate cv::GeneralizedHoughGuil with the help of
createGeneralizedHoughGuil()
- Set the required parameters for both GeneralizedHough variants
- Detect and show found results
- Note
- Both variants can't be instantiated directly. Using the create methods is required.
- Guil Hough is very slow. Calculating the results for the "mini" files used in this tutorial takes only a few seconds. With image and template in a higher resolution, as shown below, my notebook requires about 5 minutes to calculate a result.


Code
The complete code for this tutorial is shown below.
Mat grayImage;
vector<Vec4f> positionBallard, positionGuil;
int w = templ.cols;
int h = templ.rows;
ballard->setMinDist(10);
ballard->setLevels(360);
ballard->setDp(2);
ballard->setMaxBufferSize(1000);
ballard->setVotesThreshold(40);
ballard->setCannyLowThresh(30);
ballard->setCannyHighThresh(110);
ballard->setTemplate(templ);
guil->setMinDist(10);
guil->setLevels(360);
guil->setDp(3);
guil->setMaxBufferSize(1000);
guil->setMinAngle(0);
guil->setMaxAngle(360);
guil->setAngleStep(1);
guil->setAngleThresh(1500);
guil->setMinScale(0.5);
guil->setMaxScale(2.0);
guil->setScaleStep(0.05);
guil->setScaleThresh(50);
guil->setPosThresh(10);
guil->setCannyLowThresh(30);
guil->setCannyHighThresh(110);
guil->setTemplate(templ);
ballard->detect(grayImage, positionBallard);
guil->detect(grayImage, positionGuil);
for (vector<Vec4f>::iterator iter = positionBallard.begin(); iter != positionBallard.end(); ++iter) {
RotatedRect rRect = RotatedRect(
Point2f((*iter)[0], (*iter)[1]),
Size2f(w * (*iter)[2], h * (*iter)[2]),
(*iter)[3]);
rRect.points(vertices);
for (int i = 0; i < 4; i++)
line(image, vertices[i], vertices[(i + 1) % 4],
Scalar(255, 0, 0), 6);
}
for (vector<Vec4f>::iterator iter = positionGuil.begin(); iter != positionGuil.end(); ++iter) {
RotatedRect rRect = RotatedRect(
Point2f((*iter)[0], (*iter)[1]),
Size2f(w * (*iter)[2], h * (*iter)[2]),
(*iter)[3]);
rRect.points(vertices);
for (int i = 0; i < 4; i++)
line(image, vertices[i], vertices[(i + 1) % 4],
Scalar(0, 255, 0), 2);
}
return EXIT_SUCCESS;
}
Scalar_< double > Scalar
Definition: modules/core/include/opencv2/core/types.hpp:709
Point_< float > Point2f
Definition: modules/core/include/opencv2/core/types.hpp:207
Size_< float > Size2f
Definition: modules/core/include/opencv2/core/types.hpp:368
cv::String findFile(const cv::String &relative_path, bool required=true, bool silentMode=false)
Try to find requested data file.
void addSamplesDataSearchSubDirectory(const cv::String &subdir)
Append samples search data sub directory.
void imshow(const String &winname, InputArray mat)
Displays an image in the specified window.
int waitKey(int delay=0)
Waits for a pressed key.
@ IMREAD_GRAYSCALE
If set, always convert image to the single channel grayscale image (codec internal conversion).
Definition: imgcodecs.hpp:70
CV_EXPORTS_W Mat imread(const String &filename, int flags=IMREAD_COLOR_BGR)
Loads an image from a file.
void cvtColor(InputArray src, OutputArray dst, int code, int dstCn=0, AlgorithmHint hint=cv::ALGO_HINT_DEFAULT)
Converts an image from one color space to another.
@ COLOR_RGB2GRAY
Definition: imgproc/include/opencv2/imgproc.hpp:556
void line(InputOutputArray img, Point pt1, Point pt2, const Scalar &color, int thickness=1, int lineType=LINE_8, int shift=0)
Draws a line segment connecting two points.
Ptr< GeneralizedHoughGuil > createGeneralizedHoughGuil()
Creates a smart pointer to a cv::GeneralizedHoughGuil class and initializes it.
Ptr< GeneralizedHoughBallard > createGeneralizedHoughBallard()
Creates a smart pointer to a cv::GeneralizedHoughBallard class and initializes it.
int main(int argc, char *argv[])
Definition: highgui_qt.cpp:3
Definition: core/include/opencv2/core.hpp:107
Explanation
Load image, template and setup variables
Mat grayImage;
vector<Vec4f> positionBallard, positionGuil;
int w = templ.cols;
int h = templ.rows;
The position vectors will contain the matches the detectors will find. Every entry contains four floating point values: position vector
- [0]: x coordinate of center point
- [1]: y coordinate of center point
- [2]: scale of detected object compared to template
- [3]: rotation of detected object in degree in relation to template
An example could look as follows: [200, 100, 0.9, 120]
Setup parameters
ballard->setMinDist(10);
ballard->setLevels(360);
ballard->setDp(2);
ballard->setMaxBufferSize(1000);
ballard->setVotesThreshold(40);
ballard->setCannyLowThresh(30);
ballard->setCannyHighThresh(110);
ballard->setTemplate(templ);
guil->setMinDist(10);
guil->setLevels(360);
guil->setDp(3);
guil->setMaxBufferSize(1000);
guil->setMinAngle(0);
guil->setMaxAngle(360);
guil->setAngleStep(1);
guil->setAngleThresh(1500);
guil->setMinScale(0.5);
guil->setMaxScale(2.0);
guil->setScaleStep(0.05);
guil->setScaleThresh(50);
guil->setPosThresh(10);
guil->setCannyLowThresh(30);
guil->setCannyHighThresh(110);
guil->setTemplate(templ);
Finding the optimal values can end up in trial and error and depends on many factors, such as the image resolution.
Run detection
ballard->detect(grayImage, positionBallard);
guil->detect(grayImage, positionGuil);
As mentioned above, this step will take some time, especially with larger images and when using Guil.
Draw results and show image
for (vector<Vec4f>::iterator iter = positionBallard.begin(); iter != positionBallard.end(); ++iter) {
RotatedRect rRect = RotatedRect(
Point2f((*iter)[0], (*iter)[1]),
Size2f(w * (*iter)[2], h * (*iter)[2]),
(*iter)[3]);
rRect.points(vertices);
for (int i = 0; i < 4; i++)
line(image, vertices[i], vertices[(i + 1) % 4],
Scalar(255, 0, 0), 6);
}
for (vector<Vec4f>::iterator iter = positionGuil.begin(); iter != positionGuil.end(); ++iter) {
RotatedRect rRect = RotatedRect(
Point2f((*iter)[0], (*iter)[1]),
Size2f(w * (*iter)[2], h * (*iter)[2]),
(*iter)[3]);
rRect.points(vertices);
for (int i = 0; i < 4; i++)
line(image, vertices[i], vertices[(i + 1) % 4],
Scalar(0, 255, 0), 2);
}
Result
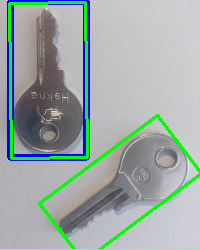
result image
The blue rectangle shows the result of cv::GeneralizedHoughBallard and the green rectangles the results of cv::GeneralizedHoughGuil.
Getting perfect results like in this example is unlikely if the parameters are not perfectly adapted to the sample. An example with less perfect parameters is shown below. For the Ballard variant, only the center of the result is marked as a black dot on this image. The rectangle would be the same as on the previous image.
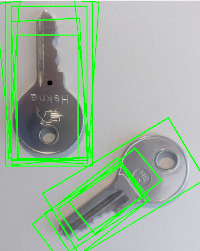
less perfect result