OnFileSaved: Add event notification when file is saved
When a file is saved in ColdFusion Builder, an event notification is sent to the Handler CFM file. For this, a new event onFileSaved has been introduce. The event can be registered as follows:
<event type="onFileSaved" handlerid="OnFileSaved"/
|
The information sent to the Handler includes:
- Specifying callback commands from handlerstype: Event type is onFileSaved
- project_path: Absolute path of the project in which the file that is saved belongs.
- file_path: Absolute path of the file saved.
- editor_name: Name of the editor that opened the file. For CFML files the name is Adobe CFML Editor.
The following is a sample output:
<?xml version="1.0" encoding="UTF-8"?>
<event>
<ide version="2.0">
<callbackurl>
http://[ip_address:port]/index.cfm? extension=<Extension_Name>
</callbackurl>
<eventinfo type="onfilechangeineditor">
<project>
Extensions
</project>
<project_path>
[project_path]
</project_path>
<file_path>
[file_path]
</file_path>
<event>
onfilesaved
</event>
<editor_name>
Adobe CFML Editor
</editor_name>
</eventinfo>
</ide>
<user>
</user>
</event>
|
Specifying context-menus
Use the menucontributions tag to specify a context-menu. A context-menu is a pop-up menu that appears on a right-click event.
To specify menu contributions for different views, use the contribution tag. Use the target attribute within the contribution tag to specify the target view where the menu must appear. Use the menu tag within the contribution tag to specify the menu to add. Use the action tag within the menu tag to specify menu items.
Syntax
<menucontributions>
<contribution target="rdsview|projectview|outlineview">
<menu name="name of the menu item">
<action name="action name">
</action>
</menu>
</contribution>
</menucontributions>
|
contribution
Attribute
|
Description
|
|---|
target
|
The target view can be any of the following:
- rdsview
- projectview
- outlineview
- editor
|
Note: You can specify only alphanumeric characters for the attribute values. Special characters are not allowed.
|
menu
Attribute
|
Description
|
|---|
name
|
Specifies the name of the menu.
|
Note: You can specify only alphanumeric characters for the attribute values. Special characters are not allowed.
|
action
Attribute
|
Description
|
|---|
name
|
Specifies the name of the action.
|
handlerid
|
Specifies the ID of the associated handler.
|
showresponse
|
A Boolean that value that specifies if the HTML response that the handler receives must be shown to the user:
- yes
- no
The default value is false.
|
Note: You can specify only alphanumeric characters for the attribute values. Special characters are not allowed.
|
Specifying menu filters
Menu filters help control where a menu or menu item must appear. You specify menu filters using the filters tag. You can specify different filter types within the filters tag; use the type and pattern attributes to specify where the menu or menu item must appear. If any of the specified filters match, the specified menu or menu item appears.
You can specify filters for both menus and actions. If you specify the filter tag within the menu tag, the filter controls the display of the menu. For example, in the following code, the ORM Code Generator menu appears only if the user right-clicks the modelglue.xml file.
<menu name="ORM Code Generator">
<filters>
<filter type="file" pattern="modelGlue.xml" />
<filters>
</menu>
|
Specifying filters for the Navigator View
You can specify filters on the project, folder, or file of the Navigator view.
Syntax
<filter type="folder|project|file"
pattern="regular expression to match folder, project, or filename" />
|
*Example*If you want the ORM Code Generator menu to appear only in the context of a folder, you can use code like the following:
<menu name="ORM Code Generator">
<filters>
<filter type="folder" />
<filters>
</menu>
|
Specifying filters for the Outline View
You can specify filters on different node types of the Outline view. The node name that you specify acts as the filter. In the Outline view, you can also specify filters for files. When you open the file that matches the filter in the CFML editor, the contributed menu appears in the Outline view.
Syntax
<menu name="menu name">
<filters>
<filter type="node name" />
|
*Example*If you want the ORM Code Generator menu to appear only on the CFfunction node in the Outline view, you can use code like the following:
<menu name="ORM Code Generator">
<filters>
<filter type="cffunction" />
|
Specifying input types
Before a handler is called, you can get user inputs using the input tag. The associated handler processes the user inputs. You specify an input tag for every action and the input tag must be within the action tag.
To control the height and width of the input dialogs, you specify the input tag within the dialog tag. For example, you can specify code like the following:
<dialog height="400" width="600" title="title" image="path to the image file">
<input name="Mapping" ... />
<input name="Datasource" ... />
</dialog>
|
Attribute
|
Description
|
|---|
height
|
Specifies the height of the dialog.
|
width
|
Specifies the width of the dialog.
|
title
|
Specifies the title for the dialog.
|
image
|
Specifies the path to the image that appears in the title bar. The path that you specify must be relative to the Extension folder.
|
Syntax
<action name="action name">
<input name="input variable name"
label="label for the input dialog box"
tooltip="tool tip"
type="dir|string|boolean|file|password|list"/>
</action>
|
Attribute
|
Description
|
|---|
name
|
Input variable name
|
label
|
The label of the input dialog box
|
tooltip
|
The tool tip that appears when the user moves the mouse over the input dialog box.
|
type
|
The input variable can be any of the following data types:
- dir
- string
- Boolean
- file
- password
- list
- projectdir
- projectfile
|
required
|
Specifies the input field as required. When you specify an input field as required, the OK button is not enabled until the user enters a value in the required field.
|
pattern
|
Specifies the regular expression against which user input is validated. For a validation error, you can specify the error message that must appear. You use the errormessage attribute to specify the error message.
|
errormessage
|
The error message that appears when validation fails for a given pattern.
|
helpmessage
|
The Help tip that appears in the title area of the dialog for a given input field.
|
default
|
Specifies a default value for a given input type. You cannot specify a default value for Boolean input types. For lists, the default value is pre-selected.
|
checked
|
A Boolean value that specifies if the check box field is selected or deselected, by default:
- true - check box is selected (default value).
- false - check box is deselected
|
Note: You can specify only alphanumeric characters for the attribute values. Special characters are not allowed.
|
Each data type corresponds to an input type as specified in the table below. The syntax for each input type is also specified.
Datatype
|
Input type
|
Syntax
|
|---|
dir
|
Directory selection field
|
<input name="input variable name" label="label" tooltip=" tooltip" type="dir"/>
|
string
|
Text field
|
<input name="input variable name" label="label" tooltip=" tooltip" type="string"/>
|
boolean
|
Check box
|
<input name="input variable name" label="label" tooltip=" tooltip" type="boolean"/>
|
file
|
File selection field
|
<input name="input variable name" label="label" tooltip=" tooltip" type="file"/>
|
password
|
Password field
|
<input name="input variable name" label="label" tooltip=" tooltip" type="password"/>
|
list
|
List field
|
<input name="input variable name" label="label" tooltip=" tooltip" type="list"> <option value=”Option1”> <option value=”Option2”> </input>
|
projectdir
|
Project directory selection field
|
<input name="input variable name" label="label" tooltip=" tooltip" type="projectdir"/>
|
projectfile
|
Project file selection field
|
<input name="input variable name" label="label" tooltip=" tooltip" type="projectfile"/>
|
Example
<menucontributions >
<contribution target="rdsview" >
<menu name="ORM Code Generator">
<action name="Generate ORM CFC" handlerid="cfm1" >
<input name="Location" label="Enter location"
tooltip="Location where generated CFCs will be stored" type="dir"/>
<input name="generateAppCFC" label="Generate
Application CFC" tooltip="Generate Application CFC along with ORM CFC"
type="boolean"/>
<input name="generateView" label="Generate View"
tooltip="Generate View template along with ORM CFC" type="boolean"/>
</action>
<action name="Generate Ajax Grid" handlerid="cfm2" >
<input name="Location" label="Enter location"
tooltip="Location where generated View will be stored" type="dir"/>
</action>
</menu>
</contribution>
<contribution target="projectview" >
<menu name="ORM Code Generator">
<action name="Generate ORM CFC" handlerid="cfm1" />
<action name="Generate Ajax Grid" handlerid="cfm2" />
</menu>
</contribution>
<contribution target="outlineview" >
<menu name="ORM Code Generator">
<action name="Generate ORM CFC" handlerid="cfm1" />
<action name="Generate Ajax Grid" handlerid="cfm2" />
</menu>
</contribution>
</menucontributions>
|
Keyword support
ColdFusion Builder supports keywords that are used to add default values in input dialogs. During runtime, actual values replace the keywords.
The following table lists the supported keywords and the corresponding actual values.
Keyword
|
Actual value
|
|---|
projectlocation
|
Absolute path to the project location
|
projectname
|
Name of the project
|
serverhome
|
Absolute path to the serve installation location
|
wwwroot
|
Server web root
|
For example, you can specify the projectname keyword as follows:
<input name="projectname" label="projectname" default="{$projectname}" type="dir"/>
|
For information about importing, reloading, packaging, and debugging extensions, see Using the Extensions view.
Support for menu contribution on multiple nodes
Note: Introduced in ColdFusion Builder 2.0.1
|
In RDS Data View, menu contributions can be added to server, database, and file nodes in addition to table nodes.
If you select server node, then server names are sent to the Handler. The attribute selected, if true, indicates if the server, database, table or field is part of the selection as shown in the following sample response sent to the Handler:
<?xml version="1.0" encoding="UTF-8"?>
<event>
<ide version="2.0">
<callbackurl>
url
</callbackurl>
<rdsview>
<servers>
<server name="server1">
<server name="server2">
</servers>
<database name="db1" server="server1" selected="true">
<table name="table1" selected="false">
<fields>
<field
name="field1" .... selected="true">
</fields>
</table>
</database>
</rdsview>
</ide>
</event>
|
Filters
As menu contributions can be added to multiple nodes in the RDS data view, you can specify filters to specify the node that you choose to be active as shown in the following example.The valid filter types are server, database, table, and field.
<contribution target="rdsview">
<menu name="menu1">
<action name="action1">
</action>
<filters>
<filter type="database" />
<filter type="table" />
</filters>
</menu>
</contribution>-
|
Understanding ColdFusion Builder and handler communication
Communication between the handler and ColdFusion Builder IDE is through XML. When an event occurs, ColdFusion Builder sends the event details to the associated handler in XML format. The XML is sent to the handler as a FORM-scope variable named ideEventInfo. To retrieve the XML from the FORM-scope variable, use the cfparam tag in the handler.
Syntax
<cfparam name="ideeventinfo">
|
or
<cfset ideData= form.ideEventInfo >
|
Understanding XML structure
To understand the XML structure, let us review the XML code. Consider the following points before reviewing the code:
- All information sent to the handler is within the event tag.
- All event and action information is within the {{ide }}tag.
- Any user inputs are within the user tag.
The following table describes the XML code. The contents of the XML code vary depending on the event.
Code
|
Context
|
Description
|
|---|
<rdsview >
<database name="">
<table name="">
<fields>
<field name=""
type=""
length=""
nullallowed=""
primarykey=""/>
</fields>
</table>
</database>
</rdsview>
|
rdsview
|
When you click a menu item of the RDS view, the event details are sent to the associated handler.
|
<projectview
projectname="" projectlocation="">
<resource name=""
path=""
type="file/folder/project" />
</projectview>
|
projectview
|
When you click a menu item of the Project view, the event details are sent to the associated handler.
|
<outlineview
projectname=""
projectlocation="" >
<source filename=""
path="" >
<node type="function/other">
<function name=""
returntype="">
<argument name=""
type="" />
</function>
</node>
</source>
</outlineview>
|
outlineview
|
When you click a menu item of the Outline view, the event details are sent to the associated handler.
|
<eventinfo
projectname=""
projectlocation=""
eventtype="" >
<resource name=""
path=""
type="file/folder/project" />
</eventinfo>
|
on project create
|
When the specified event occurs, the event details are sent to the associated handler.
|
<user>
<input name="" value=""/>
<input name="" value=""/>
<input name="" value=""/>
</user>
|
input dialog
|
All user inputs are specified within the user tag. Each input tag within the user tag, contains specific user input. The input name is the same as the input name specified in the IDE_Config.xml file.
|
<user> <page index="" > <input name="" value="" /> </page> </user>
|
Install wizard
|
All user inputs are specified within the user tag and sent to the handler associated with the Install wizard. Each input tag within the user tag contains specific user input. The input name is the same as the input name specified in the IDE_Config.xml file.
|
ideeventinfo.xml sent to Handler CFM files from ColdFusion Builder has:
ColdFusion Builder version information provided as follows:
<event>
<ide version="2.0" >
....
</ide>
</event>
|
Server details that include hostname and port number, provided as follows:
<eventinfo projectname="mg1"
projectlocation="C:/Documents and Settings/sandeepp/runtime-EclipseApplication/mg1"
eventtype="onprojectcreate">
<server name="local1" hostname="localhost" port="8501" wwwroot="C:\ColdFusion9\wwwroot"/>
</eventinfo>
|
Sending messages between extensions
Note: Introduced in ColdFusion Builder 2.0.1
|
An extension can now send messages to another extension to perform an action or to notify of some event. The extension that receives the message can either take action or ignore the message.
The following scenario explains how this feature is useful:
You can now create extension that can listen to events, for example switching to a different file in the editor or selection change in the RDS data view. Using this feature, if you want, you can update the view content with this information (say about the new selection).
The handler CFM file that receives the event change notification executes a callback command sendMessageToExtension to ColdFusion Builder with the following:
- Message information
- Name of the extension to which the message has to be sent
- The handler CFM file in the extension that has to be executed
The following example asks ColdFusion Builder to send message to New Extension Enhacements in CFB Twister extension and call its handler NewFeaturesTestViewHandler and passes information such as event type and other event related information:
<cfsavecontent variable="command" > <cfoutput> <response>
<ide> <commands> <command type="sendMessageToExtension">
<params> <param
key="extension_name" value="New Extension Enhacements in CFB Twister" />
<param key="handlerid" value="NewFeaturesTestViewHandler" />
<param key="event_type" value="#type#" /> <cfloop
list="#structKeyList(eventinfo[1])#" index="key"> <param
key="#key#" value="#eventinfo[1][key].xmlText#" />
</cfloop> </params> </command>
</commands> </ide> </response> </cfoutput> </cfsavecontent>
<cftry>
<cfhttp url="#callbackURL#" method="post" result="httpResult">
<cfhttpparam type="body" value="#command#">
</cfhttp>
<cfcatch>
<cfset httpError = cfcatch.Message>
</cfcatch>
</cftry>
|
Handler communication
ColdFusion Builder sends the event details to the handler NewFeaturesTestViewHandler as XML (as FORM-scope variable ideEventInfo) as follows:
<event>
<ide version="2.0">
<callbackurl>
http://[ip_address:port]/index.cfm?extension=New Extension Enhacements in CFB 2.0.1
</callbackurl>
<extension_message>
<from_extension_name>
New Extension Enhacements in CFB 2.0.1
</from_extension_name>
<params>
<param key="project" value="Extensions"/>
<param key="project_path" value="[project_path]"/>
<param key="file_path" value="[file_path]"/>
<param key="event" value="onfilechangeineditor"/>
<param key="event_type" value="onfilechangeineditor"/>
<param key="editor_name" value="Adobe CFML Editor"/>
</params>
<from_extension_server>
LocalCF9
</from_extension_server>
</extension_message>
</ide>
<user>
</user>
</event>
|
The information passed inside the extension_message node include the following:
Information
|
Description
|
|---|
from_extension_name
|
The extension that has sent the message.
|
params
|
Parameters of the message.
|
Creating user interfaces for extensions
Create input dialogs
You can create an input dialog either by using a configuration file (IDE_Config.xml) or using CFM pages.
Note: If you are creating a user interface using XML response, turn off the debug output by specifying cfsetting showdebugoutput="no" in the relevant code.
|
Using the configuration file
You create an input dialog by creating a configuration file (IDE_config.xml) and specifying the necessary details. For more information, see Configuration file.For, example, you can specify code like the following:
<action name="action name">
<dialog>
<input name="input variable name" label="label for the input dialog"
tooltip="tool tip" type="dir"/>
</dialog>
</action>
|
Using CFM pages
Specify the content-type value of the cfheader tag as text/xml, as follows:
<cfheader name="Content-Type" value="text/xml">
|
Create the input dialog by constructing the XML as follows:
<cfoutput>
<response>
<ide>
<dialog >
<input name="location" Label="Enter Location" type="dir" />
</dialog>
</ide>
</response>
</cfoutput>
|
Create HTML user interfaces
You can create an HTML user interface either by using HTML response or XML response.
Using HTML response
In the IDE_config.xml file, specify the showResponse attribute of the Action tag as yes, as follows:
<action name="generate CFC" handlerid="cfcgenerator" showResponse="yes" />
|
The HTML content of the CFM page appears in a dialog box. Ajax and Javascript are not supported in the HTML content. If you use links in the HTML content, the URL for the link must be an absolute URL and not a relative URL.
Using XML response
In the CFM handler, do the following:
Specify the content-type value of the cfheader tag as text/xml, as follows:
<cfheader name="Content-Type" value="text/xml">
|
Create the HTML user interface by constructing the XML as follows:
<cfoutput>
<response showresponse="true">
<ide url="http://localhost:8500/local/Dynamic%20UI%20Test/handlers/main.swf" >
<dialog width="455" height="470" />
</ide>
</response>
</cfoutput>
|
The HTML content of the specified URL appears in a dialog box.You can also display HTML user interface through an XML response as follows:
<cfoutput>
<response showresponse="true">
<ide >
<dialog width="100" height="400" />
<body>
<![CDATA[
Any HTML content
]]>
</body>
</ide>
</response>
</cfoutput>
|
Note: Extensions do not support relative paths for CSS and JavaScript. Ajax and JavaScript code that is specified in the CDATA section does not work. Any URL that you specify in the CDATA section must be an absolute URL.
|
Understanding the structure of XML response
Response
The XML response is defined within the response tag that has the following attributes:
Attribute
|
Description
|
|---|
showresponse
|
A Boolean value that specifies if the response must be shown to the user:
|
status
|
Displays a success or error dialog box. Depending on the status - success or error, the dialog appears with a relevant icon. Applicable only when message attribute is specified in IDE tag.This attribute is applicable only when you specify the message attribute within the IDE tag.
|
IDE
The IDE tag has the following attributes:
Attribute
|
Description
|
|---|
message
|
Displays the message that you specify in a success or error dialog box. Use status="success/error" attribute of the response tag to specify if the message must appear as an error message.
|
url
|
The URL of a page that you want to display to the user.
|
handlerfile
|
Path to the handler file that must be called when a user clicks OK in the message dialog box.This attribute is applicable only when input dialogs are created from an XML response.
|
Body
Use the body tag to specify any HTML content. The HTML content within the body tag must be specified in the CDATA section.
Dialog
The dialog tag is used to create input dialogs and has the following attributes:
Attribute
|
Description
|
|---|
height
|
Specifies the height of the dialog.
|
width
|
Specifies the width of the dialog.
|
title
|
Specifies the title for the dialog.
|
image
|
Specifies the path to the image that appears in the title bar.
|
dialogclosehandler
|
Path to the handler file that must be called when a user clicks Close or Cancel in the message dialog box.This attribute is applicable only when input dialogs are created from an XML response.
|
To control the height and width of the input dialogs, you use the input tag within the dialog tag.
Attribute
|
Description
|
|---|
height
|
Specifies the height of the dialog.
|
width
|
Specifies the width of the dialog.
|
title
|
Specifies the title for the dialog.
|
image
|
Specifies the path to the image that appears in the title bar. The path that you specify must be relative to the Extension folder.
|
Create views
ColdFusion Builder lets you create views using extensions. You can also specify a view icon and toolbar items for the view you create.
The feature helps you use IDE features concurrently while seeing the data.
Create view in either of the following ways:
- Add contribution to ide_config.xml
- Dynamically from handler response
Add contribution to IDE_config.xml
Specify the details in the configuration file IDE_config.xml as shown in the following code. Adding view contribution to ide_config.xml adds the view to the list of views under ColdFusion category in Show View dialog box (Window > Show View > Other).
<viewcontributions>
<view id="ID" title="title" icon="relative_path_to_icon" handlerid="handler_id" >
<toolbarcontributions>
<toolbaritem icon="relative_path_to_icon" handlerid="handler_id" />
<toolbaritem icon="relative_path_to_icon" handlerid="handler_id" />
</toolbarcontributions>
</view>
</viewcontributions>
|
Attribute
|
Description
|
|---|
id
|
Identifies the view. Views contributed by an extension must have unique IDs. id can be used to update the content of a view from handler response.
|
title
|
A title for the view.
|
toolbaritem
|
Adds an item to the view toolbar.
|
icon
|
Relative path to image file that resides in the installation location of extensions. For example, specifying images/icon.png (in the images folder of extension installation location) displays icon.png as the view icon.The standard sizes are 16x16 pixels or 20x20 pixels. All popular image formats are supported.
|
handlerid
|
ID of the associated handler.
|
keepFocus(Added in ColdFusion Builder 2.0.1)
|
If true, avoids focus from shifting when an extension view is generated dynamically. Assume that you are editing a file and an action results in refresh/creation of extension view. You may not want the focus to move from the editor to the view. Set the attribute keepFocus to true to avoid focus from shifting when an extension view is generated dynamically using the <view> tag in IDE_config.xml. By default, dynamically created extension views do not get focus. The extension views displayed from the Window menu > Show View option always gets focus.
|
Displaying the view
- Install or import the extension which contributes the view.
- Open Show View dialog box (Window > Show View > Other).
- Double-click ColdFusion in the folder list.
- Select the view (that is contributed) and then click OK.
The view appears and calls the corresponding Handler CFM file.
Use Handlers (for dynamic views)
In the CFM handler,
Specify the content-type value of the cfheader tag (as text/xml)as follows:
<cfheader name="Content-Type" value="text/xml">
|
Create the view that displays HTML content by constructing the XML as follows:
<cfoutput>
<response showresponse="true">
<ide url="URL">
<view id="ID" title="title" icon="icon_path" />
</ide>
</response>
</cfoutput>
|
You can also display HTML content through an XML response as follows:
<cfoutput>
<response showresponse="true">
<ide>
<view id="ID" title="title" icon="icon_path" handlerid="ID" />
<body>
[![CDATA[any html content]]>
</body>
</ide>
</response>
</cfoutput>
|
Note: Currently, views do not persist across ColdFusion Builder sessions.
|
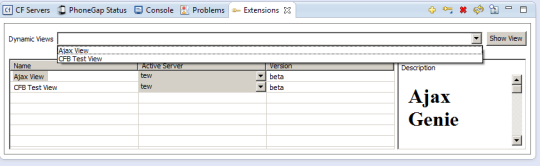
In ColdFusion Builder 2 and earlier versions, the dynamic views gets added to the sub menu of “Window > Show view” dialog. However, in ColdFusion Builder 3, the dynamic views are shown in the extension view as a drop down item:
 and select the Archive file to install.
 . You can uninstall an extension from the IDE only, or remove the extension from your IDE and computer’s file system at the same time. When an extension is permanently removed from the file system, you cannot undo the command.
 in the Extensions view, and select the directory that contains the extension files.
 in the Extensions view to reload all the installed extensions.